

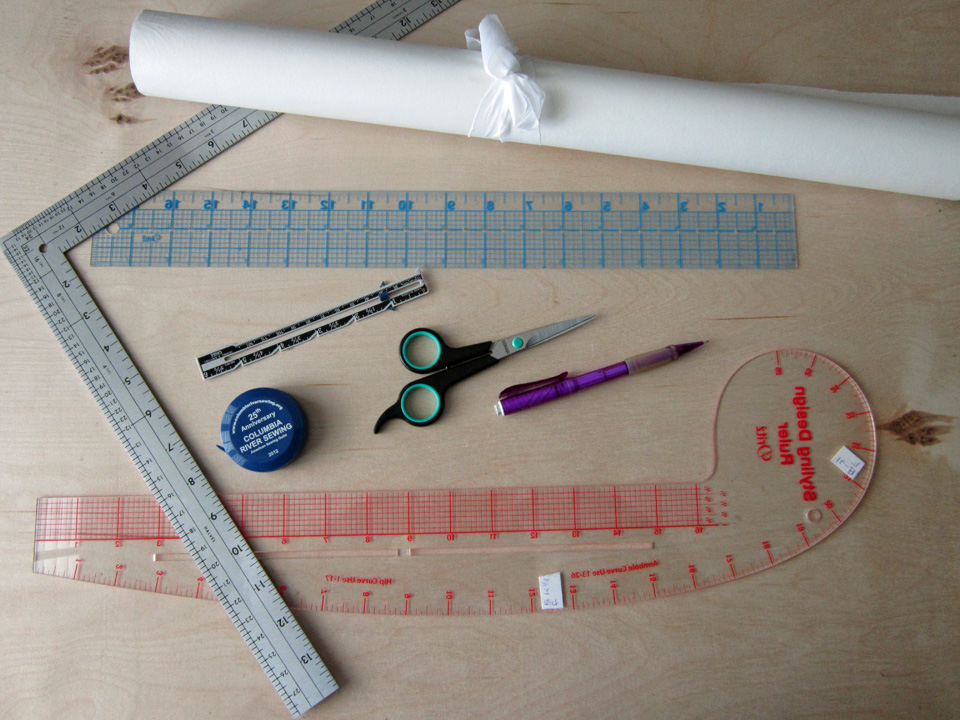
Useful Tools for Flat Pattern Design… Except one item missing… TAPE!
For several years before the last several years, before our economy blew up, clothes in stores, blouses in particular, had style! They were made from fairly good quality fabrics in stunning patterns and beautiful colors and were just plain fun! AND… during that time, it was more tempting to buy than sew, especially when you fell in love with something and wanted to take it home and wear it immediately! Okay… so the cat is out of the bag… Yes, I think I bought more than I sewed! There! I said it! I was sew lazy! Now days though, when I get that wee little urge to go out for a little sneak peek, all I see on the racks is, for lack of a better word, garbage! It seems there are more cheap ugly clothes than ever! You know what this means don’t you?!! Yep… it’s time to do some serious blouse sewing!
I have an assortment of top/blouse patterns in different styles, a few I have attempted to make but…so far, none that really fit me properly. I can’t hold the pattern makers responsible because it is the same problem when I buy Ready-to-Wear blouses. In either case, blouses are a little too roomy in the shoulders and if they do fit in the shoulders, they are not quite roomy enough at the waist. My only explanation… I am shaped like a triangle! I long ago accepted this fate in life but am growing tired of the fitting battle so I decided to strap on the big guns and take on the challenge of making my own blouse pattern(s).
Okay… so for my first blouse design, my inspiration came from something I saw Emily VanCamp wear on Revenge about a month ago. Yes… I’m still watching that stupid show! She wore a cream colored blouse that looked to me to be made of Crepe de Chine but of course that’s just a guess. Anyways, after stewing on it a bit, I grabbed my clip board with pages of ready to use croquis and started sketching. Eventually this is what I ended up.
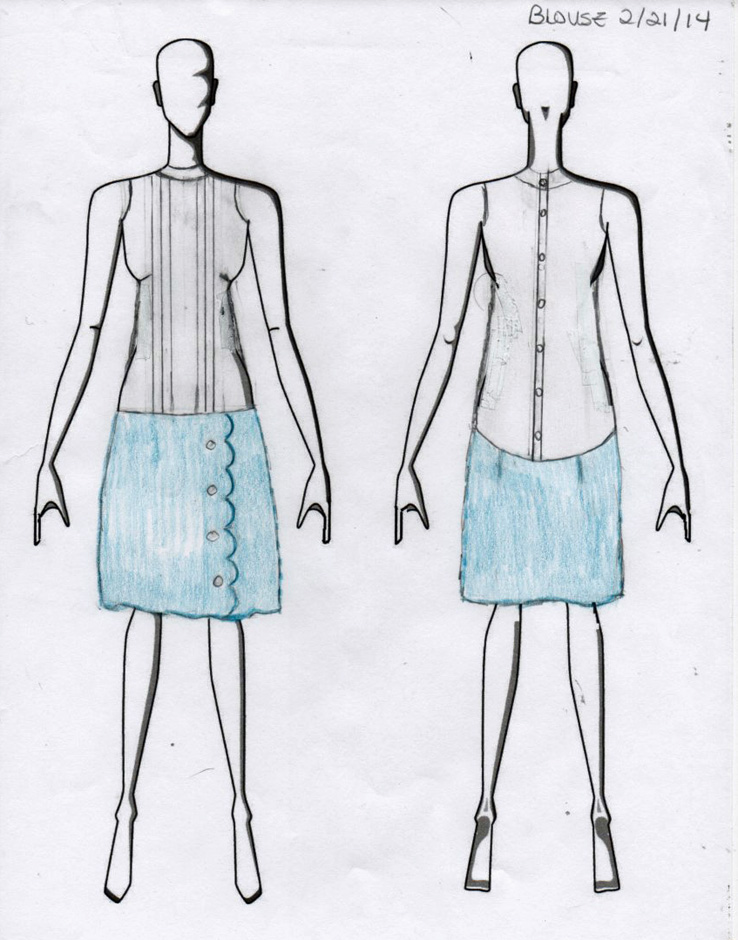 Yes, there was a bit of skirt thinking going on too!
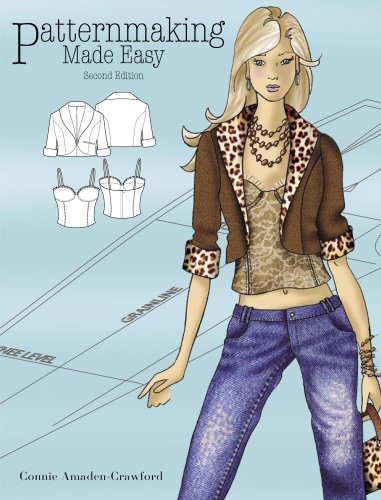
Obviously I am not the greatest at fashion drawing on croquis but it works for me and that’s what matters! After dwelling on this drawing for a bit, I went to work. I started off with a basic bodice block that I drafted last year using Connie Amaden-Crawford’s book, “Patternmaking Made Easy” (The book on Connie’s site is the 3rd edition whereas mine is the 2nd so the front cover picture is different).
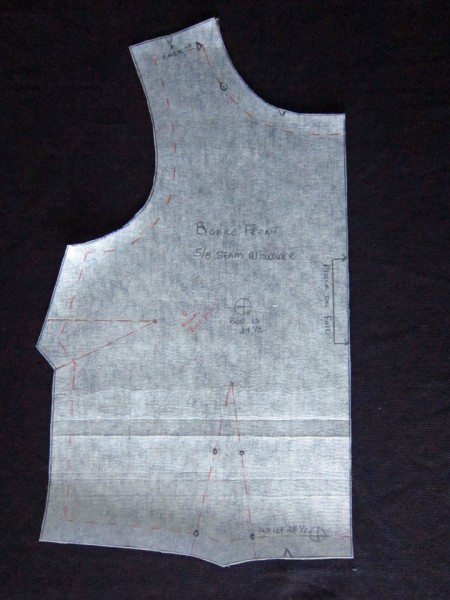
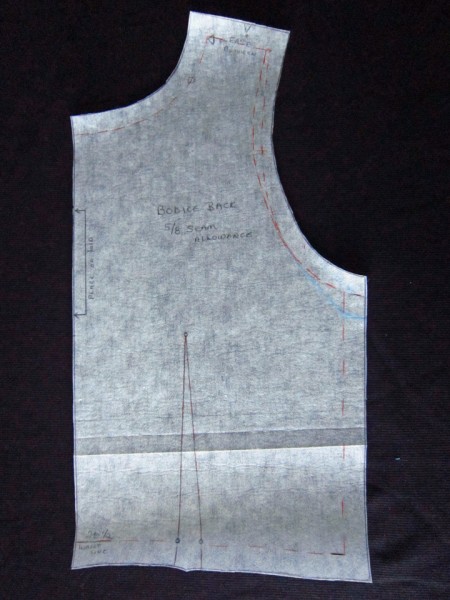
My bodice block has waist darts on both the front and back and a side dart on the front. They come in handy time and time again when I am fitting patterns that have similar bodices. Not sure why I added the 5/8 inch seam allowances to them when I originally drafted them. It was a learning curve at the time! Sheesh… it’s still a learning curve! I should say it now… my pictures for this post are a bit lacking and I’m sorry about that. It’s hard taking pictures of paper! Next time maybe I should do mini’s.
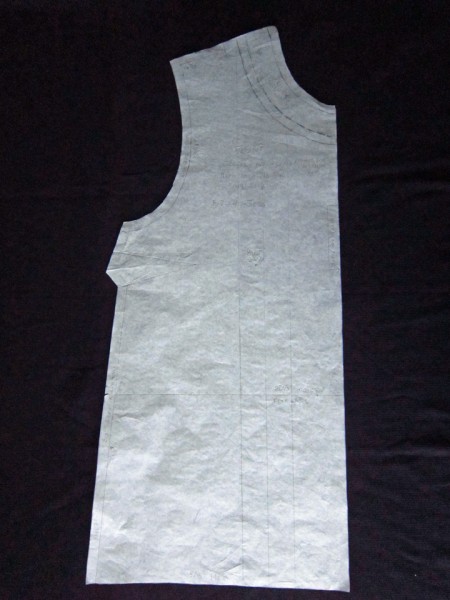
Anyhoos, the next two pictures are my basic bodice block, front and back (oops! I’ve got fold wrinkles – sorry about that!)
My initial idea was to use this basic bodice block to create a dart-less blouse block, aided by my book “Patternmaking Made Easy”. I spent two days drawing, measuring, ERASING, drawing more, cutting, wadding paper into balls, then taping and drawing again… and when I thought I had it, made a muslin. It was after trying it on at least five times after at least five different MAJOR adjustments, I contemplated taking it down to the fire pit in the back yard and setting it ablaze, then filling my wine glass extra full and playing games on my computer! “Defeat” is hard for me to accept though so instead of resorting to fire, I dumped the dart-less idea and started over.
Here’s how I created my Darted Blouse Block
1 ) Using tracing paper and my basic bodice blocks, I begin again to trace, only this time the front side dart at the bust line got to stay. The waist darts in front and back became non-existent.
2) For the front, I continued drawing the center front line downward from the waist line adding another 7 inches of length. I wanted the back longer than the front so I extended the center back line down from the waist an additional 11 inches. However, before I could draw in side seams, I had to determine just how wide my hem line would be.
3) I calculated the width I needed for the front and back hem-line. (hip measurement + ease ÷ by 2, then ÷ by 2 again because the flat pattern is 1/4 of the measurement amount. After doing these calculations, I subtracted 1/2″ from the second calculation, and used this final figure for the front but added 1/2″ to the same second calculation, using this final figure for the back which is “butt” a little fuller than the front. 🙂
Example: Hip 37 inches. I added enough ease for a drapey look which I guesstimated to be of about 5 inches: 37 “+ 5″ = 42”
42″ ÷ 2 = 21″ (width for front and back)
21″ ÷ 2 = 10 1/2″ (width for flat pattern front and back pieces)
Now, move 1/2 inch to the back: 10 1/2″ + 1/2″ = 11″
The front: 10 1/2″ – 1/2″ = 10″
** Note that 11″ + 10″ = 21″ x 2 equals the 42″ we started with.
4) Using the above calculations, I then drew in the hem lines for the front and back. An L-square metal ruler (shown in the picture at the beginning of this post) is really helpful for doing this. You place the ruler with an edge on the center front or center back with the other end extending along where you need to draw the hem line.
5) To create side seam lines for the front and back, I drew lines that angled out from the waist to the hem line. We are not really boxy or straight edged so I then did a little curving and blending so that the side seam lines looked more like a body shape! When done, I double checked to make sure that the front and back side seam lengths were equal to one another.
Well here is my new drafted blouse blocks. I went ahead and added seam allowances since I’m almost ready for production. I decided to go with 3/8″ so I wouldn’t have to do trimming.
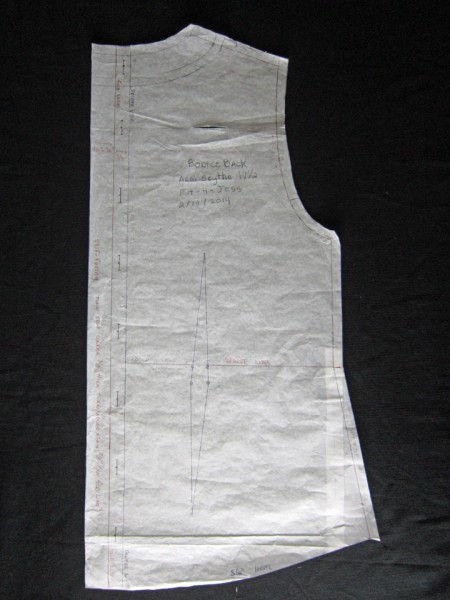
It’s hard to see in the 2 pictures above, but there are a number of features that I included on my front and back blocks because of some styling features I wanted to achieve.
1) Yokes: There are yokes drawn in, on both the front and back blouse blocks. I made them 1 inch in width and drew them in before I added seam allowances. I did this by drawing a line 1 inch down and along each of the the block necklines. In order to create yoke pattern pieces, I then traced the yokes I drew in and added 3/8″ seam allowances. Word of warning. Make sure they are equal widths all the way around! My first pieces I cut from my fashion fabric were off and after I sewed them on and thought I was finished, I noticed some major discrepancies! Yuck! I had to take them off and make new ones.

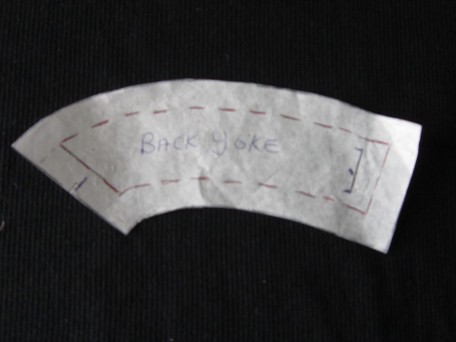
** Note 2: The yokes are just the upper part or neckline section of my blouse blocks so in order for me to create the style I wanted, I needed to trace the blocks again and exclude the yoke sections but remembering to include a seam allowance.
2) Center back button/buttonhole extension: At the center back, I added 1 and 5/8 inches that is a combined facing unit and button/buttonhole extension.
To break it down: I drew a new line 5/8″ further out from the center back line that runs parallel from neck to hem line. This added amount will accommodate the buttons and buttonholes. Then parallel to this line I drew an additional line 1 ” away from it. This 1 inch section is the facing unit. It contains a 5/8″ facing and 3/8″ for a clean finish.
How it works: In order to keep all things equal, I first basted a 3/8 and 5/8″ seam on each back side. (the picture below is the left side – the pin in the shoulder tells me that this is the right side of the fabric)
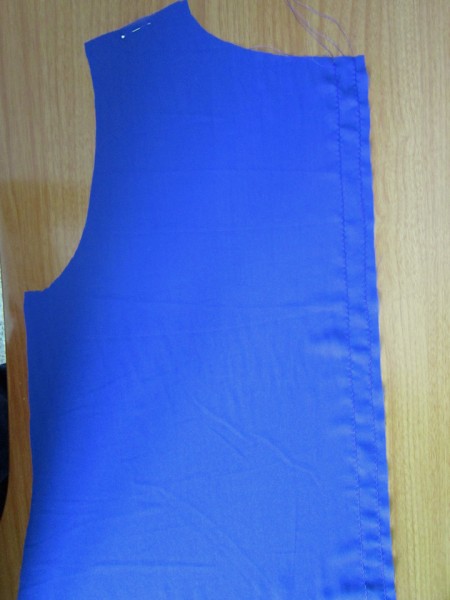
I next turned under the 3/8″ section and pressed it. Then I did the same for the 5/8″ section. Now I was ready to sew the final seams. I laid each back side right-side up, and stitched a 5/8″ seam using the guide on my sewing machine. Fortunately I caught the folded-under edge all the way down! You could also edge stitch on the underneath which I often do so I don’t have to worry about not catch the folded edge, but because the fabric I was using for my prototype was so slippery and showed every uneven thing I did, I decided to do what I did. Below is a picture of the underside but unfortunately it’s not the match to the left side shown above. This is the inside of the right side instead of the left. Damn it I hate it when I do that!

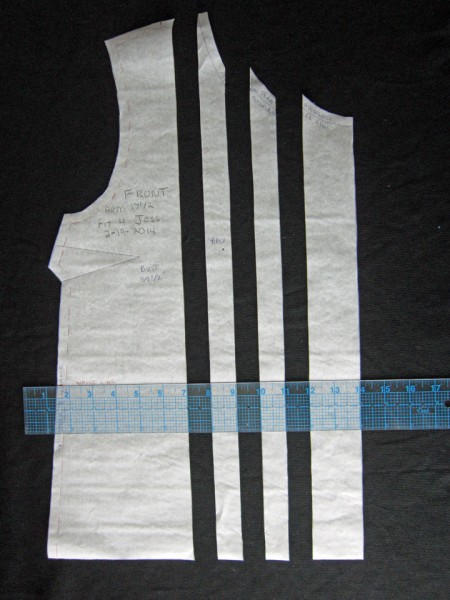
3) Creating my pleats (tucks): There are 3 straight lines drawn in on my front blouse block that run from the neckline to the hem line and are parallel to center front. They are for the creating of tucks (Page 173 of “Patternmaking Made Easy”) or what I call pleats. The bust level line is on perfect crossgrain so once again, with the aid of a metal L-square ruler, I used this point and the center front to make my markings for my pleat lines. Since cutting up the block is the next step, I decided to first trace an additional front blouse block that included the 3 lines for pleats and then let the cutting commence! Mind you I have now done this twice! Once for the actual creation of my pattern and the other to be able to show you how I did it! On the positive side… I’m getting faster at it!
So when I was done tracing, I next had to cut along each of the 3 lines, separating the sections completely from one another. Here’s what it looks like.
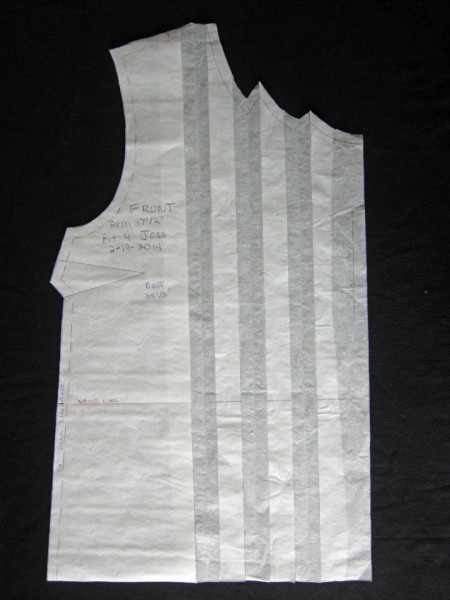
Now I have 4 sections but there are only going to be 3 pleats. You can choose whatever width you want… it could have been 1/8, or 1/4, 3/8 or 1/2″ but I decided I wanted 1 inch. The ruler in the picture is there to show you how it looks when I place my sections 1″ apart for my pleats. (my picture is not square so my strips don’t look square!)
The above picture is for explaining… you actually take the strips and position them the width you want, onto a piece of paper that fills in the gaps and enough room at the top so that you can fold, and draw in the finished look of the pleats. Here is a picture though once again, it may look uneven but after the many times I folded the paper in order to draw in the top of the pleats and all the tape that was involved, I couldn’t get it to lie very flat!
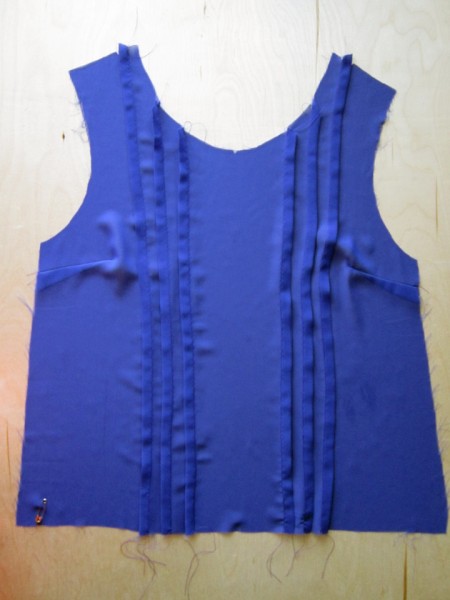
For the real deal, here’s what it looked like during construction! By the way, I messed up several times when trying to decide how I wanted to fold my pleats (tucks) and so had to pull all the threads out. With no instructions you are free to do what you want, but this is when the accidents occur! It’s a wonder that my blouse went together at all by the end.
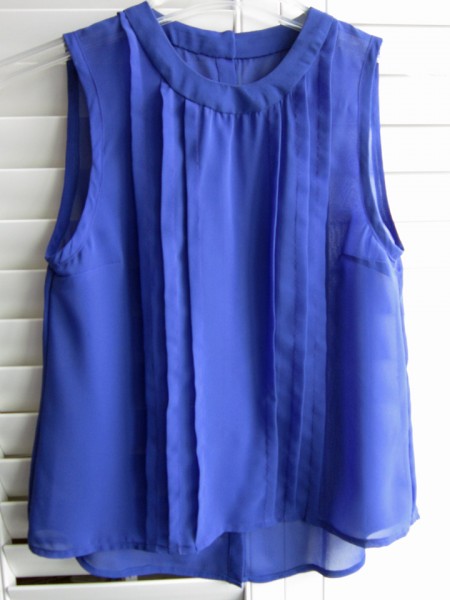
Now is the moment of truth… here is the front
And here is the back…
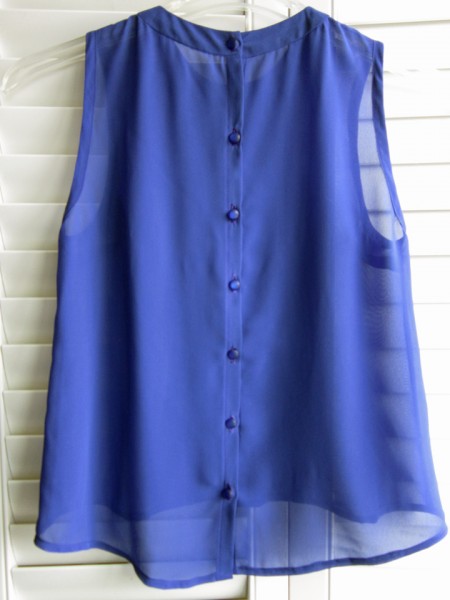
My handy camera crew are both sick and tired so not able to help me with a photoshoot so I couldn’t model it for you! Yes, it turned out and I will wear it but it does have flaws. My front and back yokes were even but they don’t lie as nicely as I had hoped. It probably didn’t help that I pretty much mangulated the neck line while trying to figure out how to do my pleats and resewed the yoke on about 3 times! I also ended up with the front being shorter than I thought it was going to be. It’s just long enough but I like it longer than just enough. I will probably layer with a red cami which will make things interesting. As I look at these last 2 pictures, I realize that I didn’t say anything about the armholes and how I finished them. It was pretty easy… 3/8″ seams and bias tape that I made from the same fabric using my Clover Bias Tape Maker, only I folded it to the outside.
This is a monster of a post which I know is a pain to read and I am sorry about that. But hey… it was a pain to write! Whew! Right now it’s totally Wine:30! And time for a piece of cake too! I am truly happy though, that I could share this with you and hope it helps someone! Sew until next post…
Salute! Jessica
About Me
 Portland, Oregon,
 United States
Hi there! I’m Jessica Brandon and I am a clothes-loving sewing artist. When I am not sewing, blogging or shopping for shoes for my creations, I fill in the remainder of my days spending time with my children, playing ice hockey, gardening and making and drinking wine!


Up Coming Projects:
Vogue 1426

Vogue 7881

McCall's 7089

Vogue 8997

Vogue 1431

Vogue 9006

Vogue 8991
