

Pattern Review McCall’s 6754

When I first saw the Eiffel Tower, I was awestruck. It was gargantuous! No doubt I looked like the typical tourist at the time, snapping away on my camera, picture after picture. It was a magical moment for me that is hard to describe and one that I will never forget. So when I saw the McCall’s 6754 pattern with the model standing in front of a back drop picture of the Eiffel Tower, there was no question… I had to get that pattern. Yeah for me that it happened to be a dress – I love dresses because they are so feminine and to me, this dress had a look of french-ness, especially with the Eiffel Tower in the background.
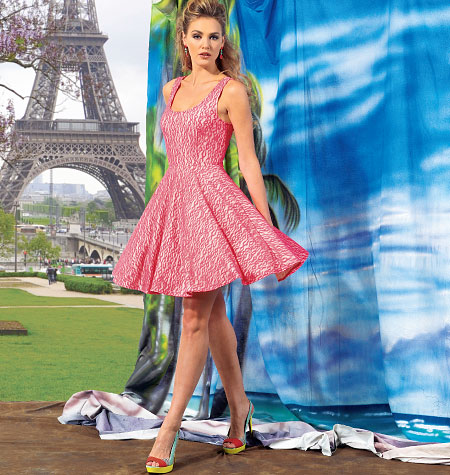
The pattern is designed for knits and instructions suggest a stretch lace specifically for dress B, the adorable one shown on the envelope. It’ rated as an “easy” pattern and I would agree, however, if you plan on making dress B with stretch lace, get ready for a LOT of hand sewing. Both the dresses and tops require 1/4 inch wide elastic in the waist. I personally do not like using elastic because it feels to me like I am cheapening the quality of a garment that I have poured my heart and a lot of time into. But… the design utilizes the waistband seam allowance as the casing to hold the elastic so it is a lot less intrusive to the outside appearance which eased my mind quite a bit.
For a test, I decided to first make the sleeveless top that’s like dress B from some left over knit fabric that I had when I made McCall’s 6708 sweater.
It fit quite nice aside from the neckline in both the front and back which hung so low that my bra was sticking out majorly, a demi-bra that shows some cleavage! I wasn’t sure what to attribute this to. It could have been a combination of things: the knit fabric I was using, my shoulders may be more sloped downward than I thought, or just maybe the pattern size I was using was to big. Whatever it was, I managed to repair this problem somewhat in this top through shortening the shoulder straps but decided that when I made the dress, I would add 3/4″ to the neckline on both the front and the back and definitely do a fitting right after assembling the bodice to the skirt before I started finishing the neck and armhole edges.

After looking at myself wearing this, I think I will take the elastic out of the waist.
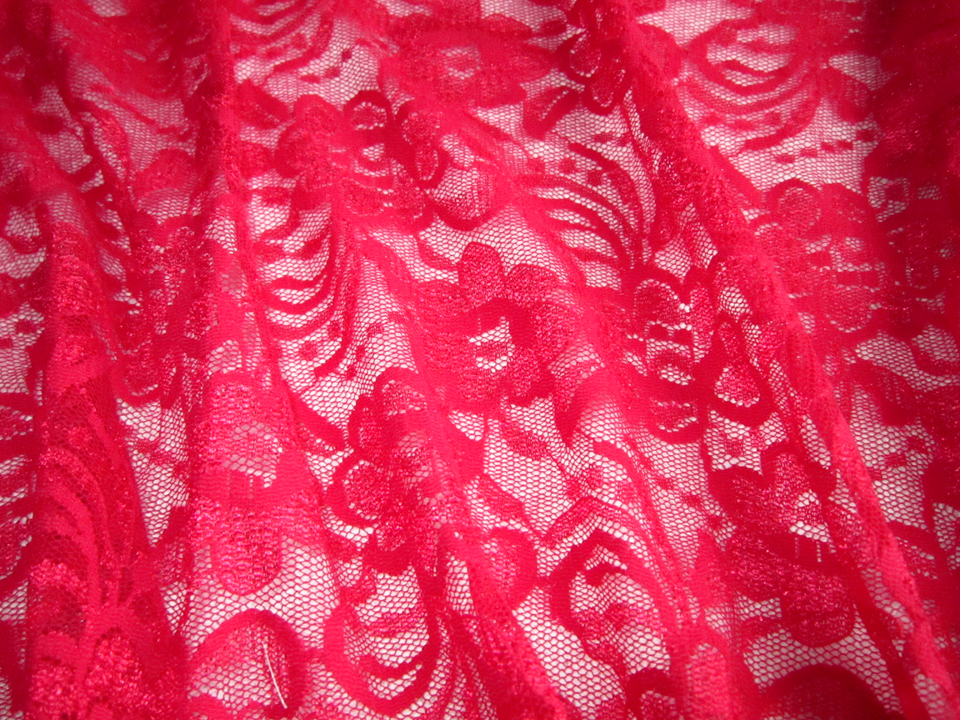
Now that I was armed and dangerous, I went to what I thought would be a decently stocked fabric store to get some gorgeous stretch lace and 60 inch wide tricot for my french-ness dress. Mind you I was really hoping to find fabric just like what was used for the dress shown on the pattern envelope. I bombed! There was only one lace that was stretchy, 60 inches wide and red…too red and I would later discover, really snaggy!
Then there was the 60″ wide tricot that I needed… well forget that! There was nothing, nada, zilch, zip, zero in white. It was suggested by one of the ladies at the fabric store that I try using swimsuit fabric which I did. DON’T DO IT! I think it is too heavy and the skirt of the dress will not have that billowy or light flouncy look you see on the envelope.
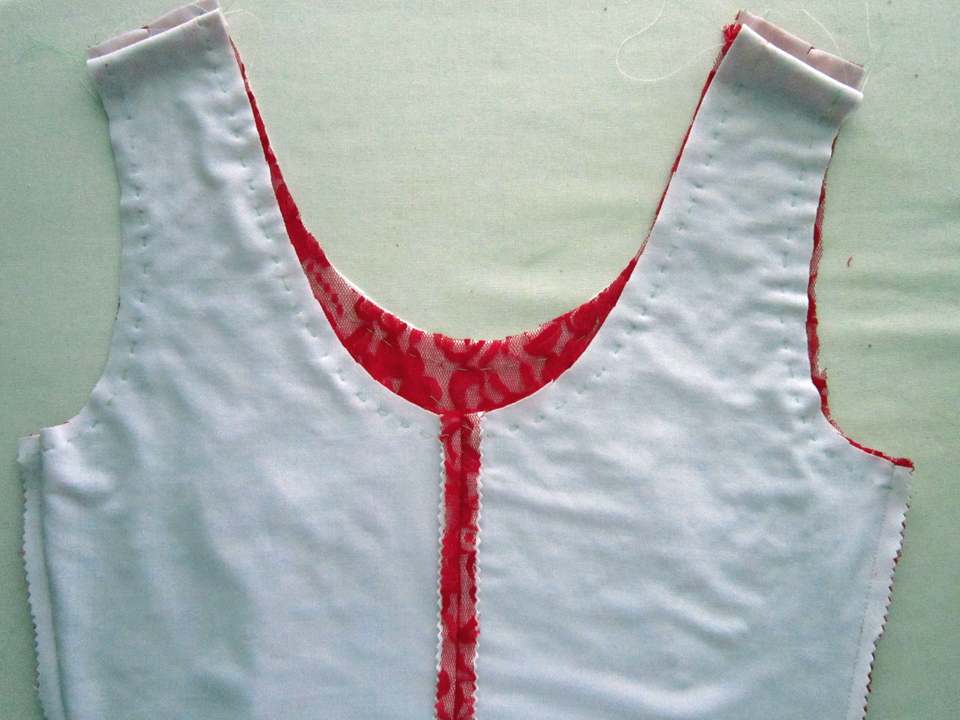
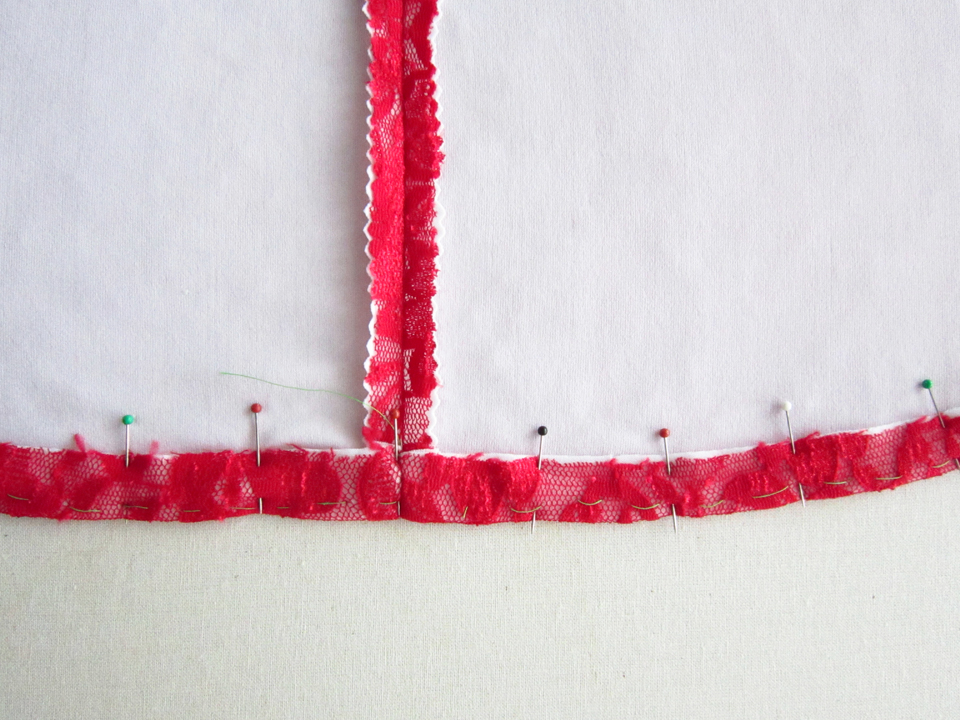
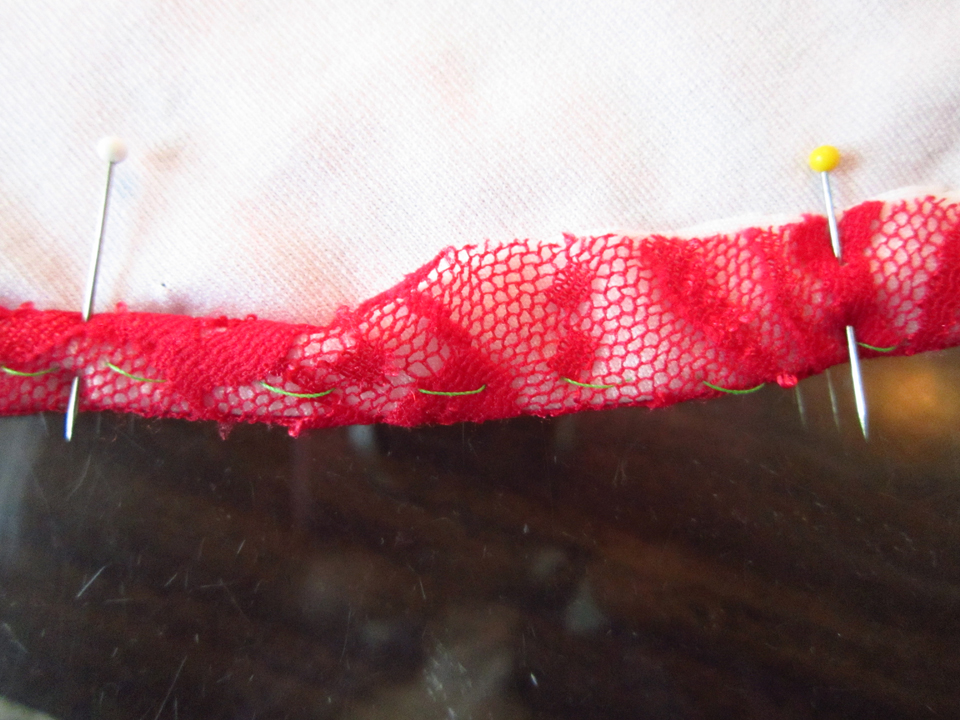
So… moving right along, remember all that hand sewing I was talking about? It starts when you are done cutting out the lace pieces AND the underlining pieces. ALL the lace pieces have to be basted to their matching underlining pieces (in stitches that can easily be removed) and then handled as single pieces. I did not take pictures to share because I was too busy basting and forgot! I used green thread that looked obnoxious which was my intention because then I could easily see it to remove it! When I finished, I begin the assembling.
For finishing the seams, I decided to pink the seam allowances so there would be less bulk. I think I need new pinking shears because they kept catching on the two fabrics.

After attaching the bodice to the skirt, I was ready for the moment of truth…would the front and back neckline adjustments be positioned properly and would the shoulder straps be where they were suppose to be? YES!!!!! All was right in the world EXCEPT… I did not like the red over-lay look nor did I like the way the skirt hung. Remember what I said earlier about the fabrics I used? The way too red snaggy lace and the heavy swimsuit fabric… Well there was nothing I could do. The dress was almost done. I would not blame myself I decided. These were the only fabrics available to me at the time and being the determined person that I am, I gave them a whirl. Now I felt like whirling the damn dress into the garbage! But… I decided I would be better than that. I would think positive… see the glass still half full! I had successfully made a dress hadn’t I? It fit perfectly, and as my daughter timidly added, “it would be real nice to wear for a day on the beach”. Okay – so there it was. It’s not a french-ness dress, it’s a “beach-ness” dress and I can live with that, I think? So all that was left now was to sew in the hem.
Oh yes, more hand sewing, lots more hand sewing! Why not use the machine? Well… early on I had decided that the lace overlay would have a richer look if it didn’t have machine stitches in it which proved true when I hand sewed the neckline and armholes. Therefore, I decided to hand sew the hem as well. It took a while but eventually I finished. I then hung the dress in my closet for a few days before looking at it again to decide how I felt about it. With a little reluctance, I decided to have the official photo shoot so you could decide for yourself. Is it a “french-ness” dress or a “beach-ness” dress?

Personally, I have concluded that it is definitely a red wine drinking dress so with that… it’s time for a glass of Pinot Noir!
Salute! Jessica
Read MoreShirtmaking Part 2

So… as you may have already figured out, the shirtmaking continues and it’s quite Da Bomb! (slang for excellent 🙂 ) My son is eager for me to make shirts for him so he has been very cooperative and so far, patient. Hopefully our recent live draping will help get me to the point where I have a working pattern so I can get busy and be a shirtmaker! You are wondering how the live draping went huh? Well that’s what I am about to talk about but first I need to bring you up to speed.
Like I said in my last article, I made a muslin using the McCall’s 6044 pattern.
MCALL’S 6044
When I had my son try it on, he was swimming in fabric. So…while stewing on what to do, I perused the internets and stumbled across “Drafting The Men’s Shirt Block” on the BurdaStyle.com forum website. It was provided by gedwoods, a Canadian scientist who has a passion for sewing. It took me a bit but I was able to figure out the instructions and drafted a decent pattern. For giggles, I laid the McCall’s 6044 pattern pieces on it and they were quite close. Too close, so I didn’t see any point in repeating history by making another epic fail muslin. At this point I was sort of at a loss, so I threw in the towel that day and went to the library with my son.
My spirits however, were lifted on that library excursion. I FOUND the book “Shirtmaking” by David Page Coffin. I could kiss that man! He shared so many words of wisdom in that book and even provided instructions on how to drape a live person! I had a hallelujah moment! I just recently finished taking some draping classes, and while not a master draper as of yet, I could easily see how draping a real person could be so beneficial. I would just have to go easy on the pinning!
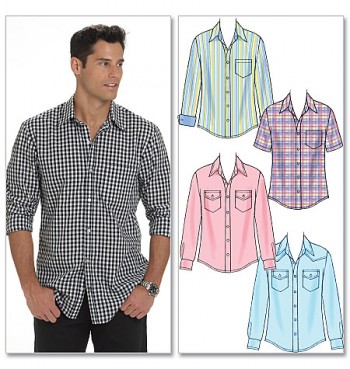
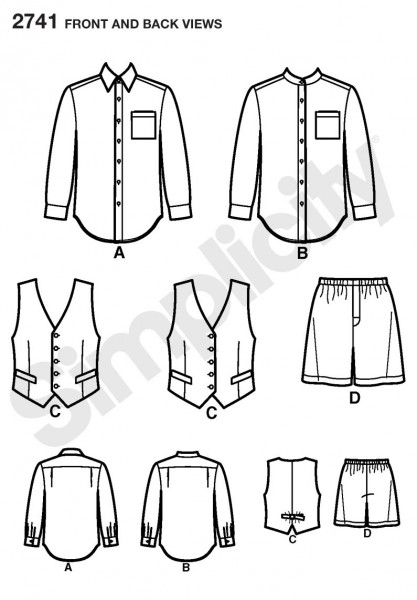
Mr. Coffin gives a list of things needed for his draping method that of course requires muslin, of which I was fresh out of, so this meant a trip to the fabric store. While there, I thought I would check out the Simplicity patterns since they were 5 for $5.00. Guess what?!! They had a mens shirt pattern (also for ladies) and so I picked it up as well.

This new pattern comes in medium, large and extra large which was another OMG moment because it turns out that my son’s shoulder width is about medium, even though his neck is an extra large. We were both pretty surprised by this discovery.
Mr. Coffin’s draping method starts with first fitting the yoke on your subject. He feels the yoke is a basic element of a shirt and so feels it’s an important starting point. The McCall’s 6044 pattern did not have a yoke that you sewed onto a back piece section to make a whole back piece, but rather a decorative western yoke that you sew on the full back. However, the Simplicity 2741 pattern did have the actual yoke so I opted for using it as my jump off point. In the picture below, the back of the shirts show the yoke that I am talking about. In the diagrams, just below the yoke are knife pleats. Another version is the box pleat where the same ease of fabric is pleated exactly at center point.
So it was last night, after I prepared my front, back and yoke that the draping commenced. Oh yeah! Almost forgot. There was also another item on the supply list. The bribe!

So with all my supplies gathered up, yesterday evening my son and I headed for the kitchen. The place a guy doesn’t mind being stuck in for a while. I think a kitchen is sort of like a man cave in that you can find comfort in the food and beverages located there!
Step 1: We started with the yoke of course!
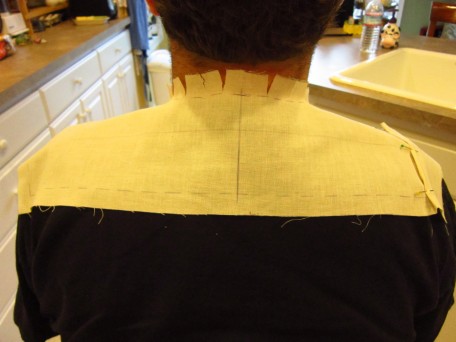
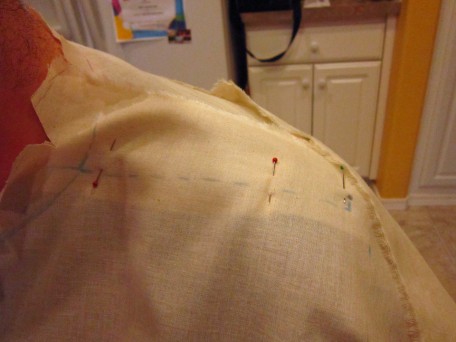
See (above) how the yoke was too wide. The left side is still hanging down over the shoulder but on the right I have already pinned in a pleat which I will do for the left side too. This is not really the proper way to do this but I didn’t want to leave my son sitting and waiting and take the risk of losing him as my model. I pinned out the length as you can see on the right.
I simply made a 1/4″ pleat on each side making a total of 1″ that I removed from the width of the yoke.
Also, when cutting out the muslin yoke, I allowed for 5/8″ seam allowance on all sides except for the neck which was 3/4″. As I smoothed the fabric down from the center point, working outwards towards the shoulder ridges, I clipped down the allowance around the neck one section at a time, being careful not to clip below the actual seam line. As you clip, you can see where the fabric begins to relax and smooth out. Eventually I ended up with what you see. Here is the yoke at the proper width and positioned in place with pins…
All ready for step 2: Draping the front
So to do this, you have to prepare a piece of muslin that is the half the circumference of the fullest part of the body (chest or waist) plus several inches extra on each side and the length desired plus about 3 inches. Next, fold the fabric exactly in half lengthwise and draw a center line starting at the neck and drawing downwards. (The author gives so many details that sometimes I think the directions get a little confusing. I am trying to share with you as much as I can about how you do this, but some of it, while not really hard, is just hard to explain. You need to actually see it being done) Anyways, I drew the line the full length of the muslin piece. This line is not only your center-front but also your grainline or point of reference. When you are pinning it to the front yoke sections, that line should always stay perpendicular to the floor when your model is standing. Mine actually sat a lot! He sort of had to though because I am 5″3″ and he is 6″3″.
Mind you the neck I found to be a bit tricky. I am still not sure what Mr. Coffin was telling me to do. You are suppose to use your thumb and forefinger to measure the distance around the front half of the neck and then apply that measurement minus 1/2 inch for drawing your neckline. I sort of winged it. The important thing here is that you will need to draw a small u- shape or more of a half circle at the neck position, but the fabric needs to fit as snug as the model will allow! My son was feeling like he was wearing a bag and wouldn’t let me take pictures of his face and neck. I get it though and I won’t fault him.
Next, you want to pin the front fabric piece at the center front line you drew, to the model’s center front TIGHT t-shirt that you have conned them into wearing for this wonderful experience! A second pin should be placed as well at center waist holding the fabric to the t-shirt.
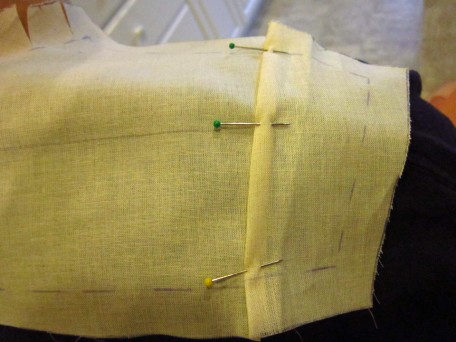
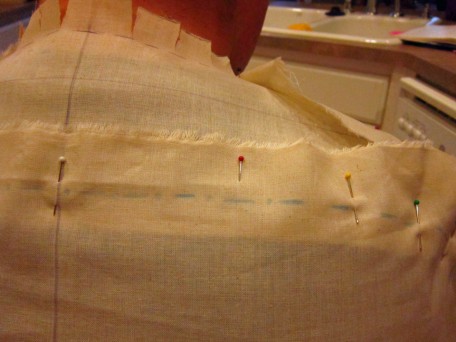
So here is the front piece pinned to the right front of the yoke. I started by taking that corner on that side of the fabric and lifting it to remove drooping and smoothed it up over the yoke front, making sure the grainline was perpendicular to the floor. While doing this I had to snip the neckline a bit just like I did in the back of the yoke to get the results I wanted. Notice next to the green straight pin on the right that I marked his shoulder ridge. I did this just because I wanted it as a reference point for any reason I may need it for!
When you have finished fitting the front on both sides, you need to mark at the point where the yoke seam meets the front from neckline to the armscye ends with dots or dashes. Also make sure to crossmark at the armscye ends. I also marked as best I could, the center front armhole (armscye) point (where the center screw is in a dressform) and the underarm point where it meets the side-seams.
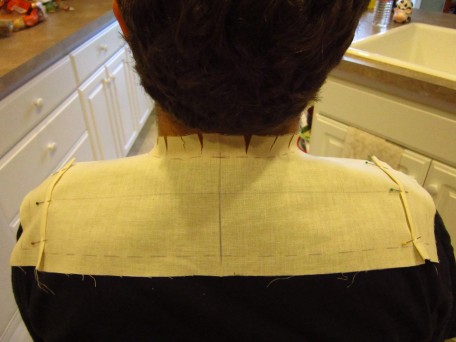
Step 3: Draping the back
Now you need to cut or tear a piece of fabric that is the other half of the full circumference of the widest point of the body (chest or waist) plus several inches extra on each side that you will also mark with a center line like you did for the front. You don’t need to worry about building in pleats at this point in time. Those can be added later when drafting the final pattern. The center line has to stay plumb or perpendicular just like with the front, only this time it should be a bit easier because you are only fitting to the bottom of the back yoke. Start by pinning the fabric at the marked center line to the center back yoke seam line with about a 1 inch over-lap. Also pin the fabric at the level of the back waist to that tight t-shirt. Then continue draping by lifting up the corners, one side at a time and gently pulling them up and over the yoke pinning as you go.
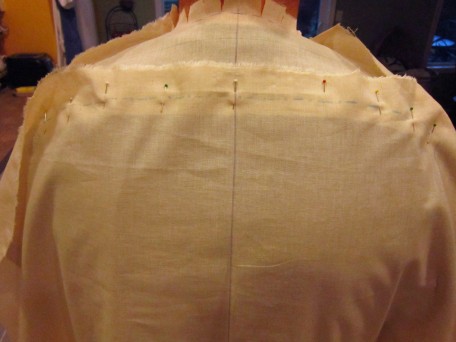
Once you have the back piece fitted and pinned the way you like, then mark with dots or dashes or both like you did on the front yoke shoulders. Also be sure and cross-mark at the end of the armholes (armscye). Here again, it is helpful to mark a point at the underarm and center back armhole (armscye). It won’t be super accurate, but at least you have a reference point.
The beauty of Mr. Coffin’s shirt draping method is that after you finish these steps, you have essentially finished with the draping. The next step is to return to the shirt pattern of your choice and transfer the armholes (armscyes) from the pattern to your draped shirt muslin. He gives instructions on how to do this, but his instructions get a little murky for my understanding so I will have to leave you to it at this point. As for the sleeves, cuffs, collar and type of front closure, there are an abundance of suggestions and tips in the book, but as a designer, you are on your own or you can fall back on a commercial pattern if you want to. I know this doesn’t help those of you who need further directions and I am sorry about that. You see, I am totally at the winging stage now and so I don’t want to take you off course or give bad instructions. Actually, I didn’t know I was going to write a “how to”. It just sort of happened! Consequently there may be some weaknesses in my instructions so please send me an e-mail with any questions you may have and I will do my best to help you out.
My draping muslin is hanging on Elizabeth (my dress form) right now waiting for my son to get home from work so we can put it to the test! I will give you an up-date soon along with a pattern review for McCal’s 6754 and McCall’s 6745. But for now, I have to go make tacos for dinner. Hmmm…wonder what kind of wine goes with tacos?
Salute! Jessica
Read MoreShirtmaking Begins
Sewing for my daughter is lots of fun. Not just because I get to sew something and it happens to be for her… there is a whole lot of stuff that happens. There is the choosing of the pattern and fabric that gives us the opportunity to spend some time together. And then there is this communicative thing that happens between us. We talk about our likes and dislikes, our favorite colors, what trends we like and what we absolutely hate! We talk about what looks good on her and what looks good on me. She becomes my confidante/fashion apparel assistant adviser. And in all of this, the mother-daughter bond is ever strong (most of the time). So.. how do I improve the bonding power in my relationships with my sons using the sewing approach? Easy! By shirtmaking (hopefully).
Unless one is fortunate enough to have a shirtmaker mentor, you will be forced to start off like I did and visit your local fabric store, looking through the pattern books hoping there is a men’s pattern available. I did find one that I thought I could live with.
McCalls 6044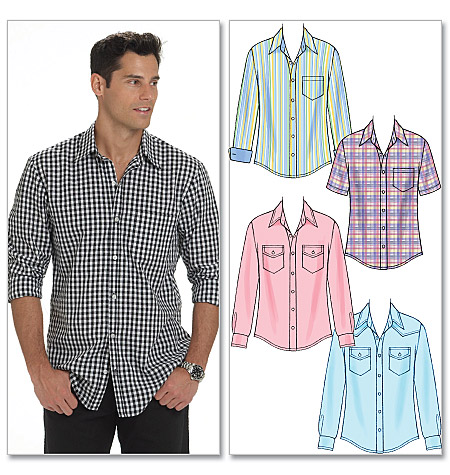 I could live with him. Hey! I’m human.
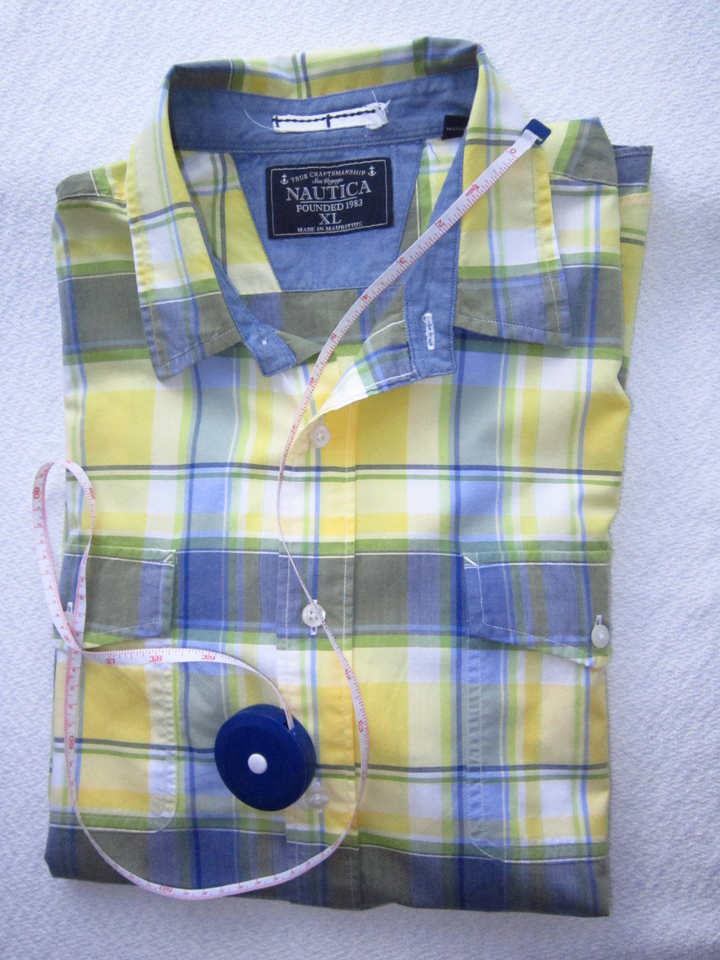
Ahem…My shirtmaking career is going to start with my first victim, Jared, so I selected an x-large pattern size because that’s what he wears in RTW (ready-to-wear) shirts. Now I know better than to think that this shirt is going to be an exact fit so before cutting out anything, I decided to get lots of measurements. First of course were my son’s. The next were from a shirt that fits him comfortably. I measured the neck, the shoulder length, the armhole (armscye), shoulder width, chest, waist, hips and shirt length.
The pattern measurements were almost identical to the RTW shirt so I figured I would push on to making a muslin (with a little tweek of course). I wanted a traditional yoke in the back, not a western styled one that comes with the pattern so I changed it. The result… well the neck fit really nice, but from there, let’s just say I was pretty disappointed. No…it was not because of my change in the yoke. You thought you had me there huh! These were the usual fitting issues that seem to happen every time with any pattern. The shoulders hung almost 2 inches over the ridge points, at chest level we needed to lose about 1 to 2 inches and the armpit area was full of extra fabric. “Awe crap” were naturally my first words. So then I made him try on his RTW shirt and discovered almost the same problems. I had a revelation! Besides the fact that I am finally figuring out fitting problems and recognizing them easily, more importantly, men have become comfortable wearing crappy fitted shirts!
This is where the bonding thing was suppose to be happening between me and my son but from his perspective, I think there is a bit of confusion. I think he is thinking, it fits him just fine so why not make the shirt and be done with it. I on the other hand want to make him the best shirt he could ever have. It’s a stale mate… a Mars vs Venus! So he walked off, thinking about cars, girls, making videos, drinking a beer.. whatever guys think about, and I did the only thing I could think of… I asked the Oracle (the internets!) what she knew about shirtmaking.
I learned quite a bit during my visit to the Oracle. There are some pretty nifty bloggers on the internets who share a wealth of information about shirtmaking.
Peter Lappin, of Malepatternboldness.blogspot.com is a very interesting gent whose blog I will continue to enjoy reading. He talked about felling seams when shirtmaking, totally groovy information that I hadn’t even thought of!
Pamela Erny, a custom shirtmaker who shared her split cowel collar design on her blog site, Off-the-cuff-style.blogspot.com that I can’t wait to try.
Geoffrey Edwards, blog writer who posts on the BurdaStyle.com forum website under the name, gedwoods. To my delight, one of his postings I found on the forum was “Drafting The Men’s Shirt Block”. Interestingly, he is a Canadian scientist with such a passion for sewing that for the past five years has developed and designed a new clothing line, “g-moda“. Last night I drafted a shirt for my son using this gentleman’s drafting instructions and it turned out quite well visibly. The next test of course will be to make a muslin.
And last but not least, David Page Coffin, author of “Shirtmaking”. His book was recommended in a number of the shirtmaking blog articles I have read.
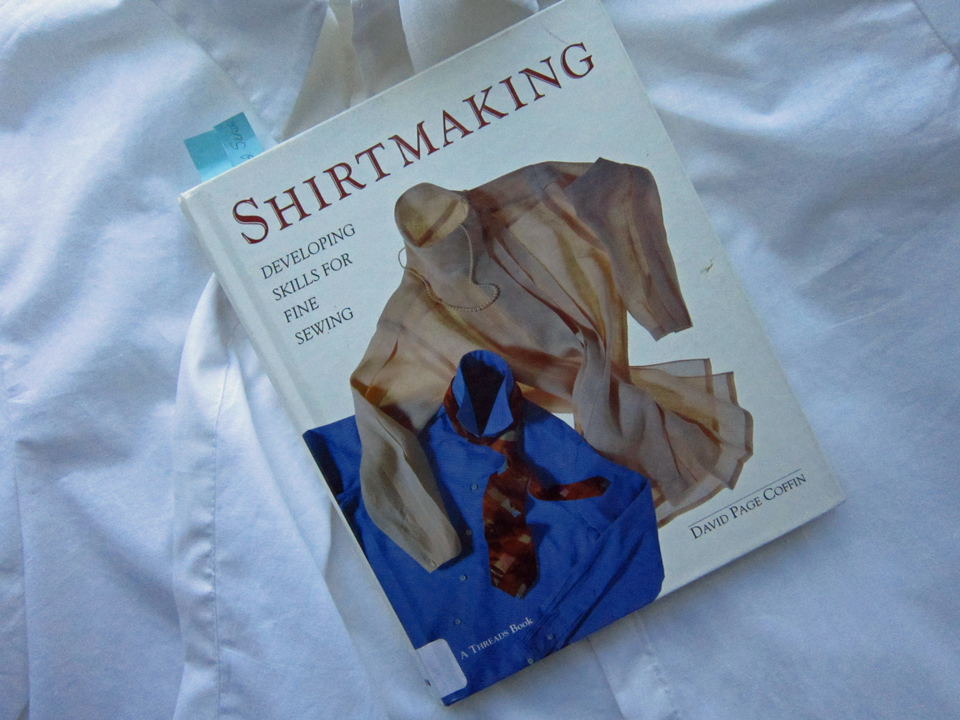
The beauty of this book discovery was that day-before-yesterday, while perusing the sewing book section in my local library not expecting to find much of anything, I stumbled across this very book! What a wealth of information. It’s so awesome that I have been reading it like a novel! It’s gonna be another one of my sewing library requirements! What’s more…he walks you through his draping technique, step-by-step, in the creating of a shirt, on a real man! You know what this means don’t you. I have briefed Jared of my intentions and noted a rather grim look on his face. There is no doubt in my mind that a six-pack of Newkie Brown Ale will appease his concerns and sweeten the deal! There will be an up-date soon on my shirtmaking career including the live male draping. Almost forgot to mention, straight pins will be involved!
Salute! Jessica
Read MoreDraping Fashion Designs
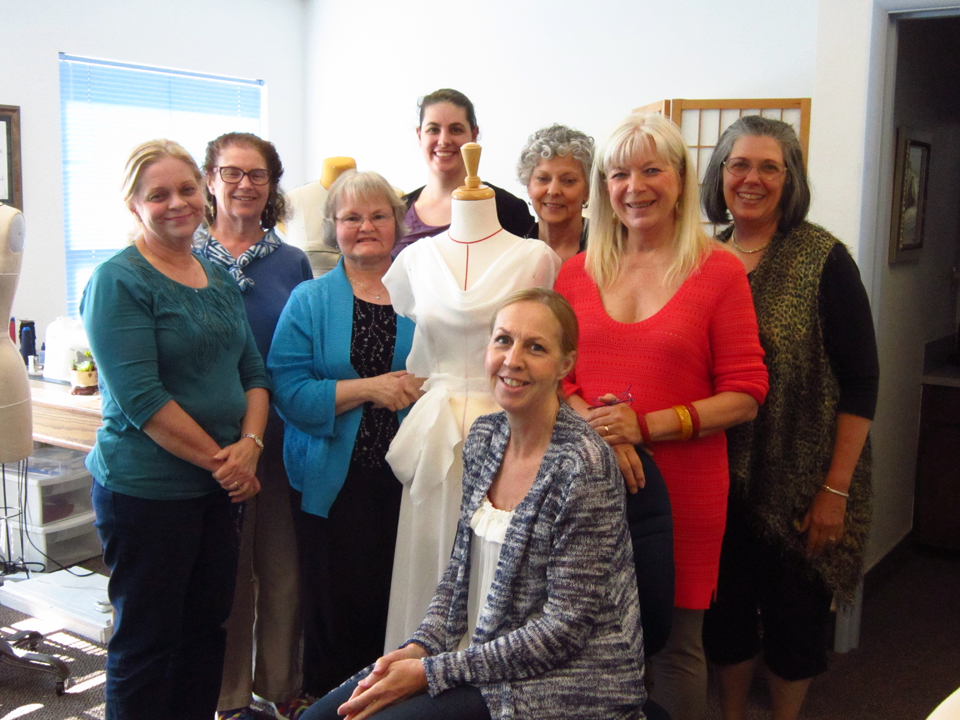
Some fabulous ladies to drape with!
Well…I have finished all my draping classes and learned right from the get-go that my biggest challenge was overcoming the feeling that I was wasting fabric. I am not a hard core recycle queen, not even remotely close, but as we cut, tore and marked our muslin and rayon for all the different projects we did, I had a struggle going on in my mind. Kinda weird, I know. Maybe this was in part due to the fact that at times it’s hard for me to find the extra funds to purchase fabric for my own sewing projects so to use up almost 14 yards of muslin and rayon for these classes gnawed on me. I had to keep reminding myself of what I was gaining in this process and believe me, I truly gained a lot!
To start off, let me first officially introduce you to “Wolfee”. Her and I worked quite well together. Since she is almost exactly my size, this means that everything I draped, with a few small adjustments, I will be able to use to make garments for myself. Pretty cool eh!
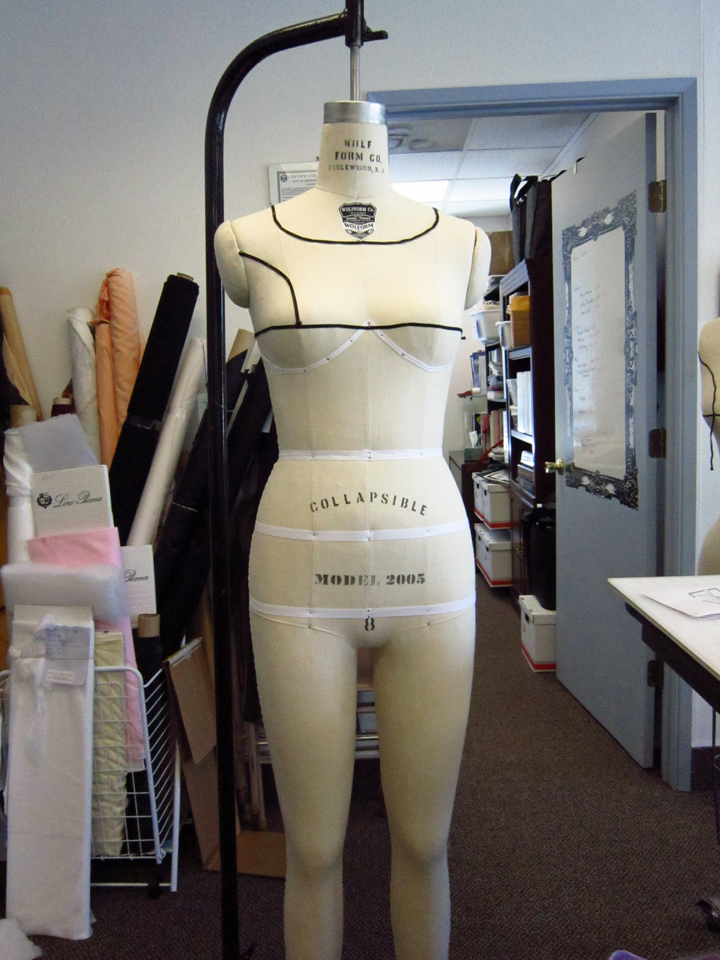
She is wearing black soutache braid for style lines.
Our instructor, Catherine Stephenson, Custom Couture Clothing, was awesome. She shared a wealth of information as she walked us through our draping projects, providing both group and individual guidance.
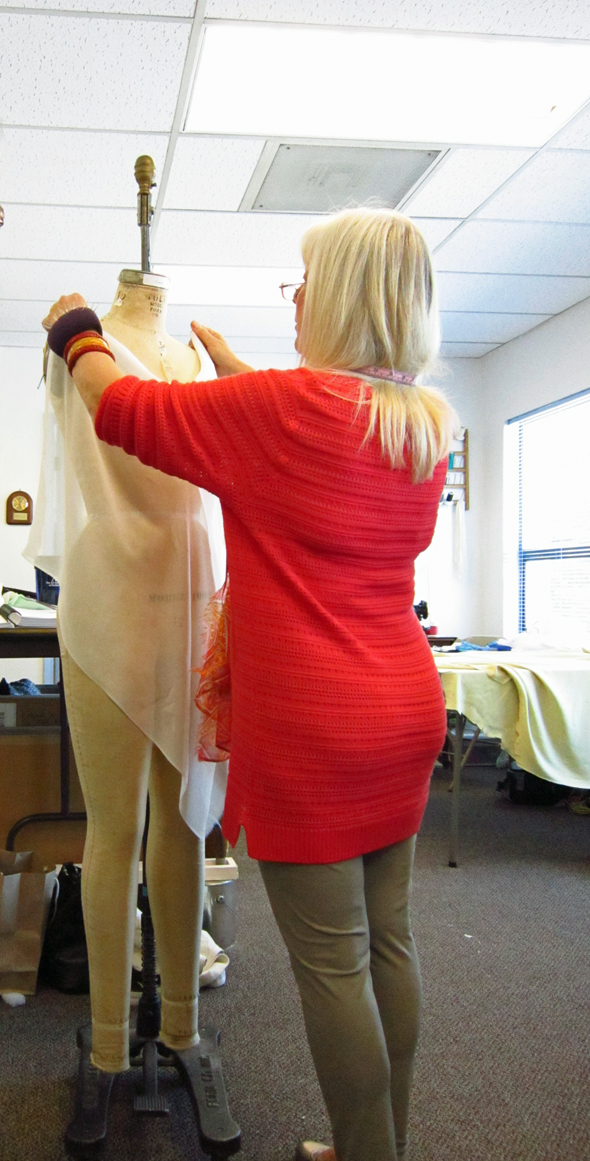
Catherine showing us how to drape a cowl neck.
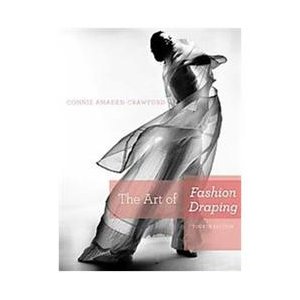
Some of the draping techniques Catherine used were from the book, “The Art of Fashion Draping” by Connie Amaden-Crawford, a designer for The McCall Pattern Company under the Butterick label. It’s a bit spendy but will certainly be part of my sewing library one day soon.
In the first session of classes, we learned the importance of grain lines and cross-grain lines since these play a major role in the draping process. Another crucial part of draping is being precise and consistent when marking the draped and pinned muslin pieces since these markings are the lines, notches and bust, waist and hip levels that we rely on to construct the garment. The learning curve started flattening real fast for most of us with this part of the draping process. It’s kind of difficult to take pieces of fabric off of a dress form and then pin them together to form a garment if you can’t figure out what your markings mean!
I think our Christian Dior jacket was one of our high points in our draping projects. After finishing, I knew where I should have been a bit more careful in my draping, but nonetheless, I think that if I can fix a few discrepancies, it could serve as a functional pattern to make a jacket for myself…aside from the crappy collar. I was not happy with it at all. It was a project we did earlier and I didn’t know that it was going to be what we would use for the collar of this jacket.
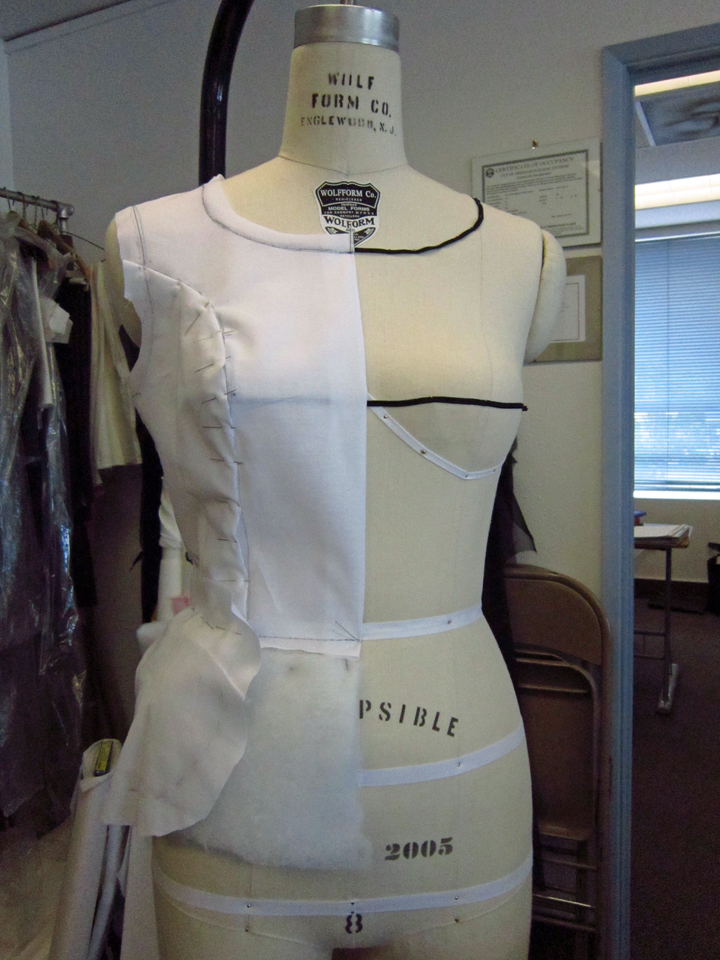
Princess bodice done and now making peplum.
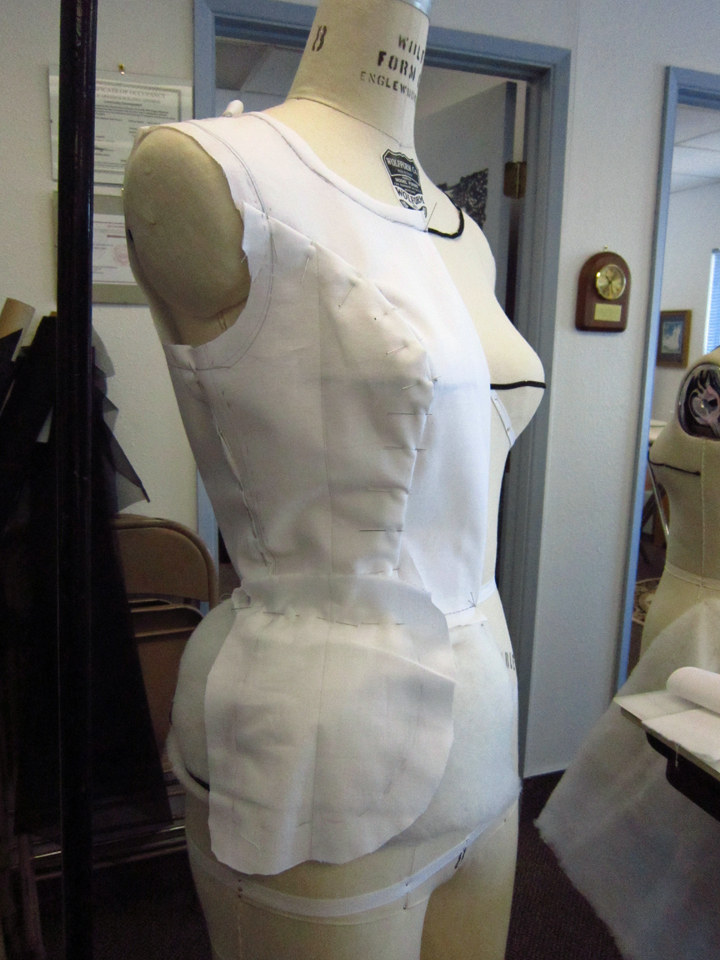
Notice the batting around hp area. It was to ensure more fullness in the peplum.
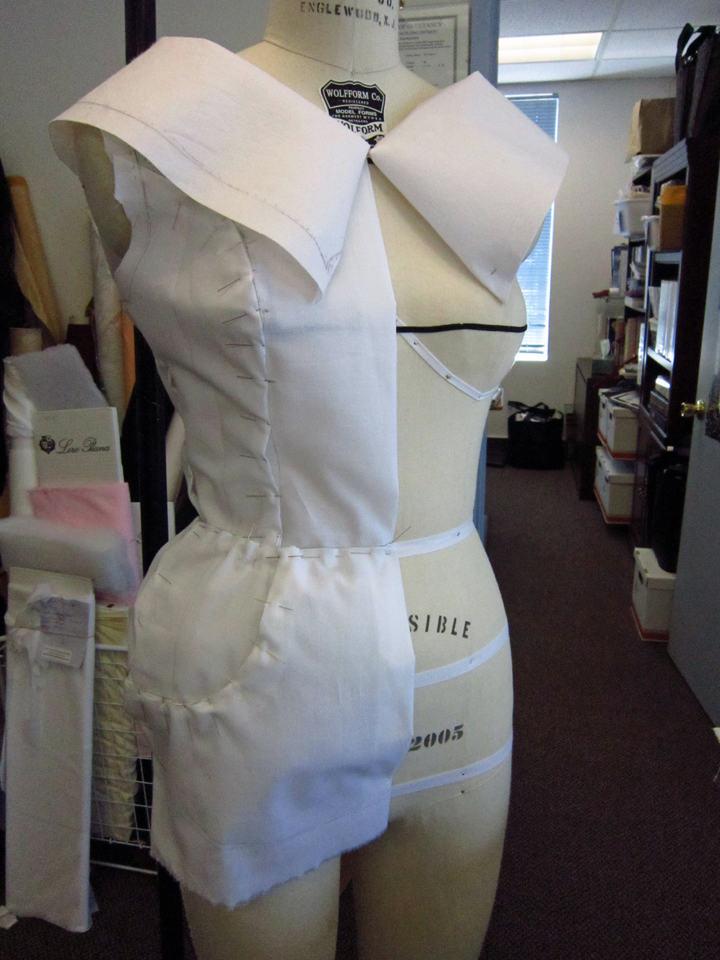
Finished front of Christian Dior jacket with my crappy collar!
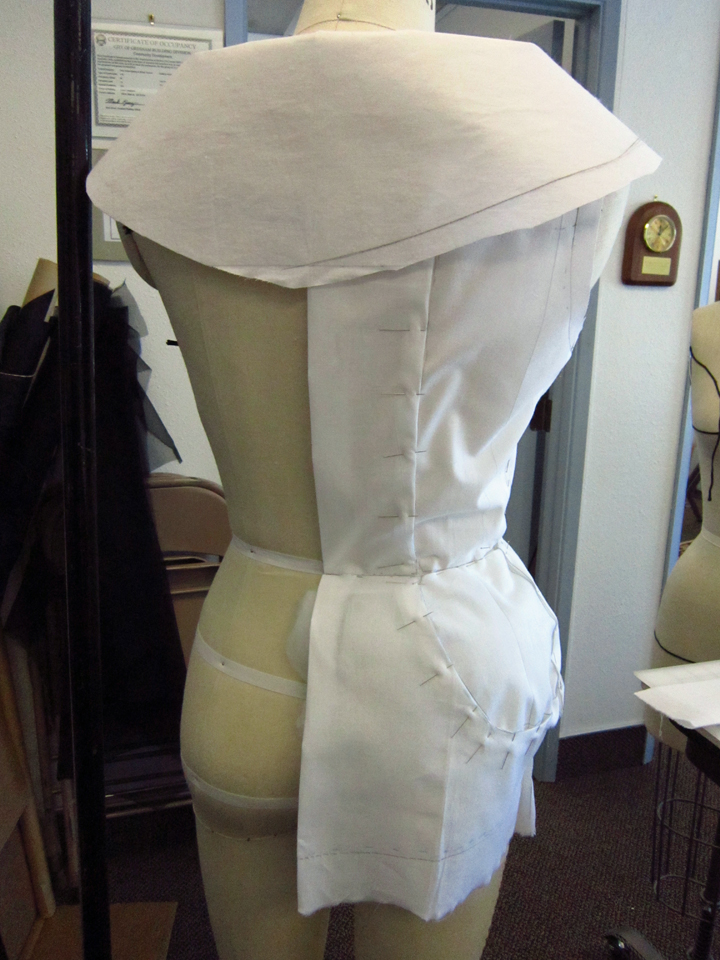
Back of Christian Dior jacket.
The final garment we draped was done on the bias! I have not worked much with bias though have been wanting to. I didn’t realize the complexity of just what happens when you cut fabric diagonally. Sheesh! One thing for sure, I will definitely have plenty of stay tape of some sort on hand when I create a bias garment
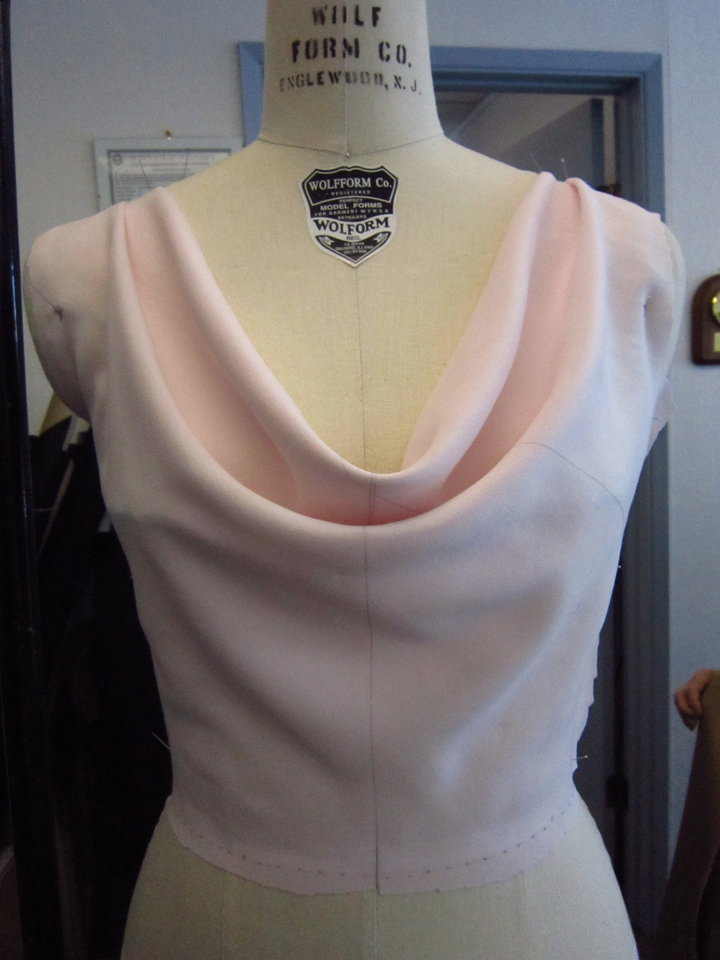
A cowl Neck
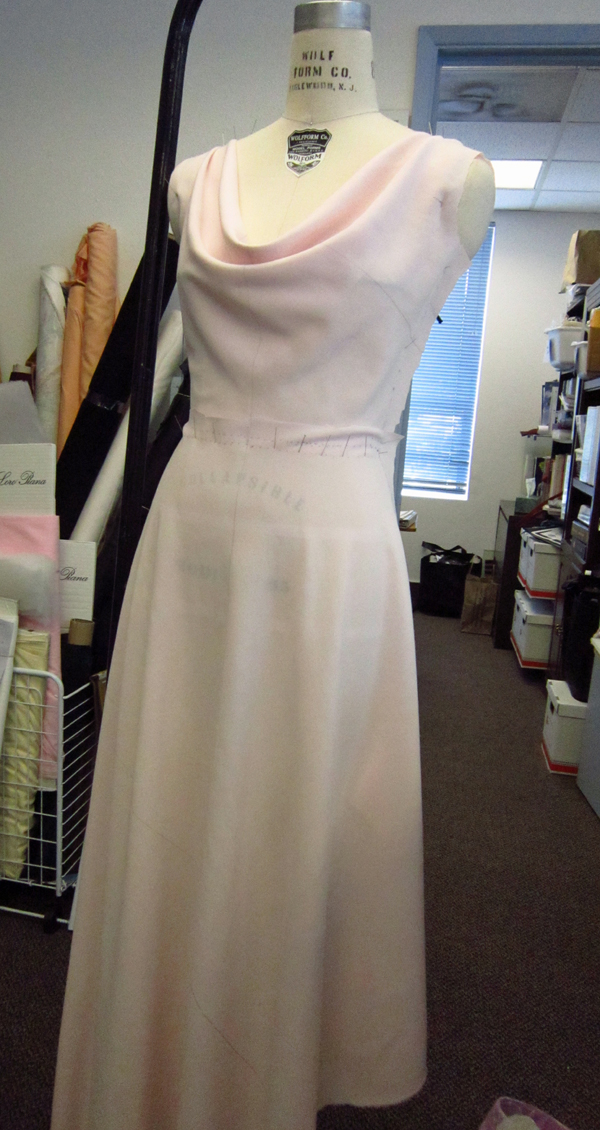
And the potential dress with a cowl neck
So guess what? Draping is a dying art. Many accredited fashion schools have removed draping from their fashion design programs because they feels it’s an obsolete technique. Since much of the design work these days is taken from drawings to computer pattern design programs, I guess technology is draping’s downfall. And get this…the ability to sew is not considered a requirement of a fashion designer. If you are talented enough to be able to design, you leave the sewing to someone else. Hmm… It sounds to me like being able to construct a garment through sewing is not considered very honorable let alone glamorous. Right about now I bet you can feel a rant coming on cuz I sure do!
Well I suppose I better show you that my draping classes were successful in showing me how to drape. If you are a returning visitor, you have seen a picture of some pastel green fabric with embroidered pink polka-dots. If this is your first visit, well…I used this fabric to make the princess-seam line dress that we draped in one of our classes and here it is.

I wore this to one of our last draping classes since Catherine had challenged me to make it and I knew I couldn’t chicken out. I felt a lot of sweating going on when she said take your sweater off and let me see. Fortunately this was not a full fledged test, but if it had been, from the smile on her face, I think I might have got an “A”.
Salute! Jessica
Read More
About Me
 Portland, Oregon,
 United States
Hi there! I’m Jessica Brandon and I am a clothes-loving sewing artist. When I am not sewing, blogging or shopping for shoes for my creations, I fill in the remainder of my days spending time with my children, playing ice hockey, gardening and making and drinking wine!


Up Coming Projects:
Vogue 1426

Vogue 7881

McCall's 7089

Vogue 8997

Vogue 1431

Vogue 9006

Vogue 8991
