

Okay… so I have started working on the Vogue 1051 pants project and…and…was fortunate that I used some old stash fabric for my first pair! I discovered the error in my ways and will make future adjustments for fit in the proper location. There, I admitted it – I messed up!
 moving right along…
Note to self: Since my goal is to make pants that truly fit me, are comfortable, look professional and make my butt look good, then the number of re-dos is immaterial! Ha! What a play on words.
Now on to cutting out muslin #2 for second pair of pants.
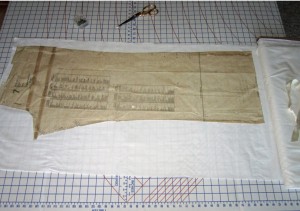
Yes, still using scissors and not a rotary cutter. (I admit that I am a coward that needs more courage!)
I folded the tissue above the crotch line (the fold nearest the waist) to raise the crotch line to the fitting point that I found comfortable with the first muslin. For me this was a 5/8 inch fold that adds up to 1 ¼ inches being removed when I cut the muslin fabric. Yes…I am sort of short, sort of!
The second fold in the tissue (the one at the crotch line) is now in the proper place, uhem… which is why muslin #2. It is also 5/8 inches for a total of 1 ¼ inches of fabric that I am removing because the top of the leg is where there is bagginess under my derrière.
Sometime later…
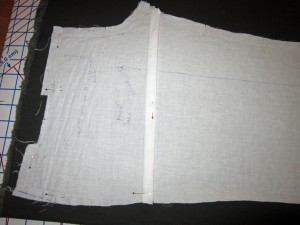
Well this is interesting…tried on the basted together muslin #2 and there is still some bagging happening at the base of my back side so I decided to take up a smidge more of the fabric. I made a 5/8 inch fold (okay, a little more than a smidge) just below the crotch line, basted it in place and then tried it on. The muslin fit so well that I decided to use it as my main front and back pattern pieces.
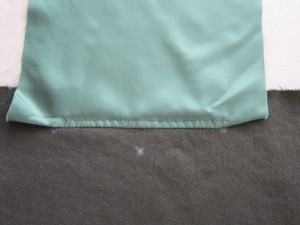
Here is the front muslin pattern piece with the additional 5/8 inch fold basted in.
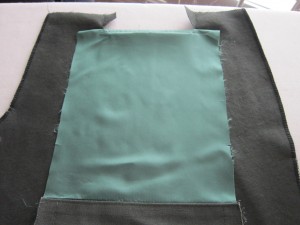
And here is the back muslin pattern piece with the same 5/8 inch fold.
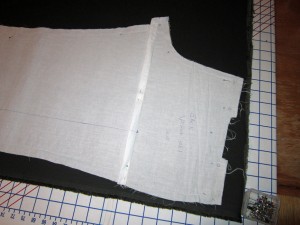
Notice the crotch section where there is a gap below the fold. I pondered on what to do here. I knew that I didn’t want to shorten the crotch length because it fit perfectly and I didn’t want to add any extra fabric under the rear end and bring back the bagginess that I was trying to get rid of. I ended up making my cut, starting from the crotch point and easing into the top of the leg adding very little extra fabric. My finished pants overall fit well but I think I may have been a wee bit too aggressive with the 5/8 inch fold toward the center crotch point. It feels like the back waist may be pulling down slightly. There is also the question that the fashion fabric responded differently to my fitting than the muslin fabric did so some consideration may be given here as well. I will take all of this into account for pants #3 because they have to fit just right! (Please refer to Note-to-self above)
Welts and Loops oh crap!
Let me say for the record to anyone who says that doing welts is easy…I call BULL! I am sure they are easy after you have done…say…50 or more! But I know there is always some practice involved in just about anything we do before it starts to get easy! That being said, on to welts and loops.
Construction of the welt pockets vary between the front and back. This is because the back has an added feature of a loop. On this 2nd pair of pants I became so absorbed into the construction of the front welts that I forgot to take pictures in order to share the process. Fortunately I remembered soon after I started working on the back and so have a few pix for your perusal!
Making welts comes with a bit of a learning curve for me but I think I am starting to work out some of the bugs. Let’s see, I have now made 8 in total which leaves me about 42 to go before I think I can sort of consider myself an expert! I only hope that the white pencil marks come out because until I become a pro at this, I am finding myself relying heavily upon them.
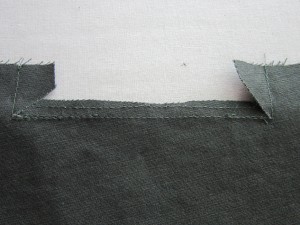
Here is a view of the inside of a back after sewing the corners and clipping diagonally to the center point. Also shown here is the previously prepared back pocket stitched in place and trimmed. Remember that I said I started taking pictures AFTER I started working on the back… hence – this picture shows several steps already done. 🙁
This view is of the pocket being understitched before turning to inside between clipped ends.
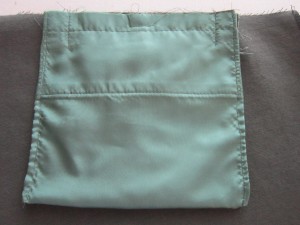
This is the pocket turned over to the inside and pressed. Note the “pocket facing” on the lower end.
Now we have hit the moment of loops! The pattern instructions tell you to use a needle and thread to carry out the task, but I have never found this to be very easy. Of course I have tried various sewing tools designed for this job, but I am not consistent with the use of them either. Then I discovered this…
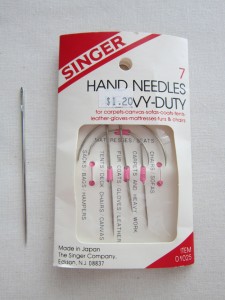
Notice the package next to this amazing nifty needle. It’s for sewing tents, lawn chairs etc. It is so perfect for making loops.
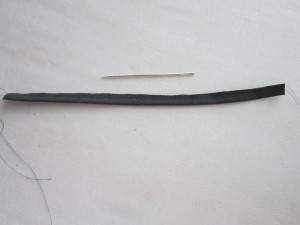
The pattern instructions ask you to fold the fabric in half, lengthwise and then stitch. No problem here, just a 5/8 inch seam. When done, trim to 1/8” inch. It seems close to the stitches, but there is still enough remaining fabric in the event of fraying.
I leave the threads on one end long enough after I’ve sewn the strip so that I can tie them on to the uber needle.
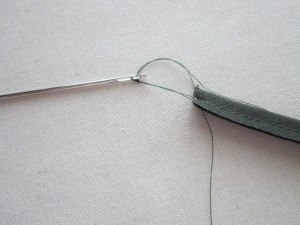
After tying the thread firmly on the needle, begin by inserting it, eye first, into the loop, easing the trimmed edge in. This does require some patience, but you can do it!
The hardest part is getting started but once the end moves into the inside of the loop it will begin to get easier. I will stick the needle into a pin cushion at this point till I get things working a bit because it really smarts when you poke yourself.
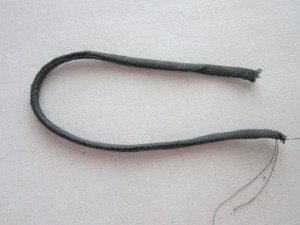
Finally…the finished product!

Now you just cut two sections, each 3 ¼ inch long and then shape them for the pockets.
Believe it or not, I think these are fun to do. Loops for fasteners over buttons are just too cool!
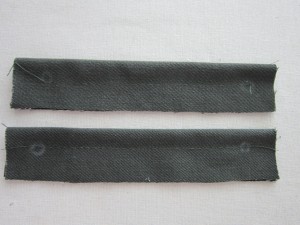
The loops are then sewn onto the pocket “facing” as shown.
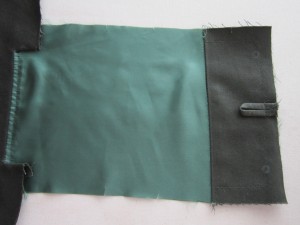
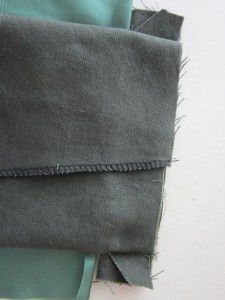
Now the infamous welt…You start by folding it in half and then basting it closed. Note the white circles marked on the ends.
These circles are matched to the pocket facing circles by laying the folded side of the welt along the top of the back or finished edge where you stitched on the pocket and then lapping the folded wings over each end of it. It will look like the picture below. 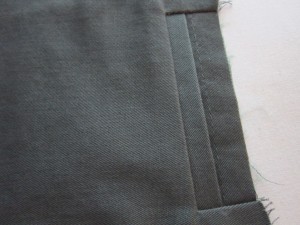
*Note that the lower strip is the welt and this is how it should look before pinning and sewing it in place.
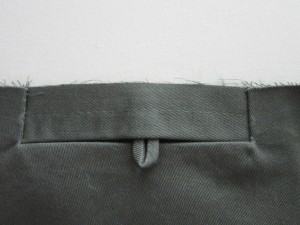
Now you turn this section over and sew the pocket facings or wings and welt ends along the facing seam lines.
Unfortunately this is not the best picture because on the inside, the pant back is not flat enough to see the wings on each end, though the bottom one is a little more visible.
Technically the welting is done and now is time to finish the pocket. The instructions are pretty clear from this point on and when finished this is what you end up with on the inside.
And finally, a finished welt pocket. See the right bottom corner…gotta work on that!
About Me
 Portland, Oregon,
 United States
Hi there! I’m Jessica Brandon and I am a clothes-loving sewing artist. When I am not sewing, blogging or shopping for shoes for my creations, I fill in the remainder of my days spending time with my children, playing ice hockey, gardening and making and drinking wine!


Up Coming Projects:
Vogue 1426

Vogue 7881

McCall's 7089

Vogue 8997

Vogue 1431

Vogue 9006

Vogue 8991
