

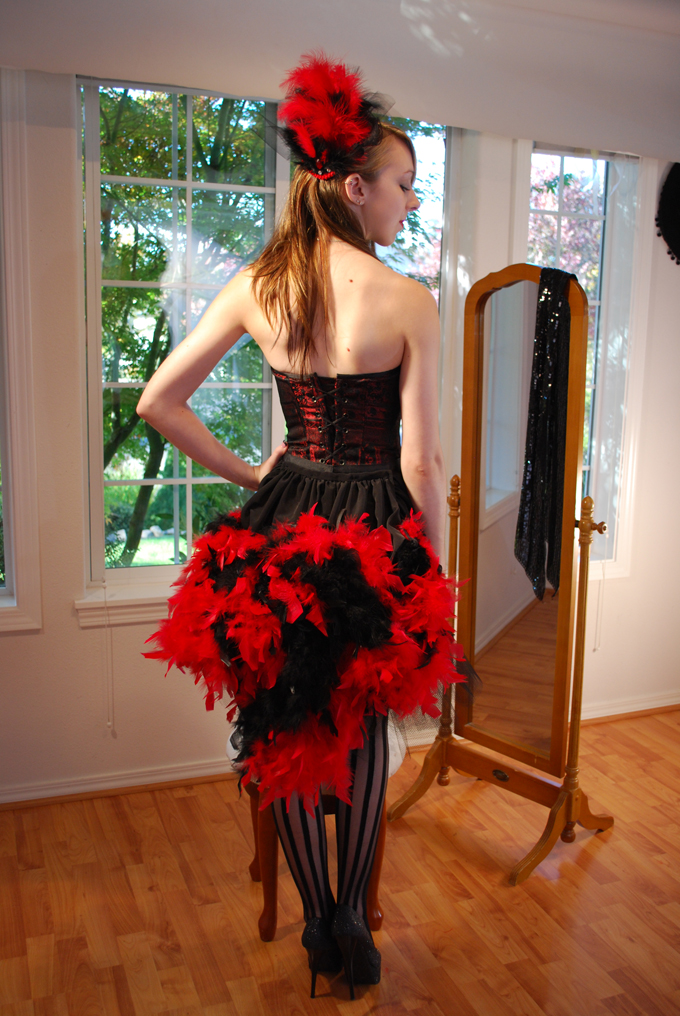
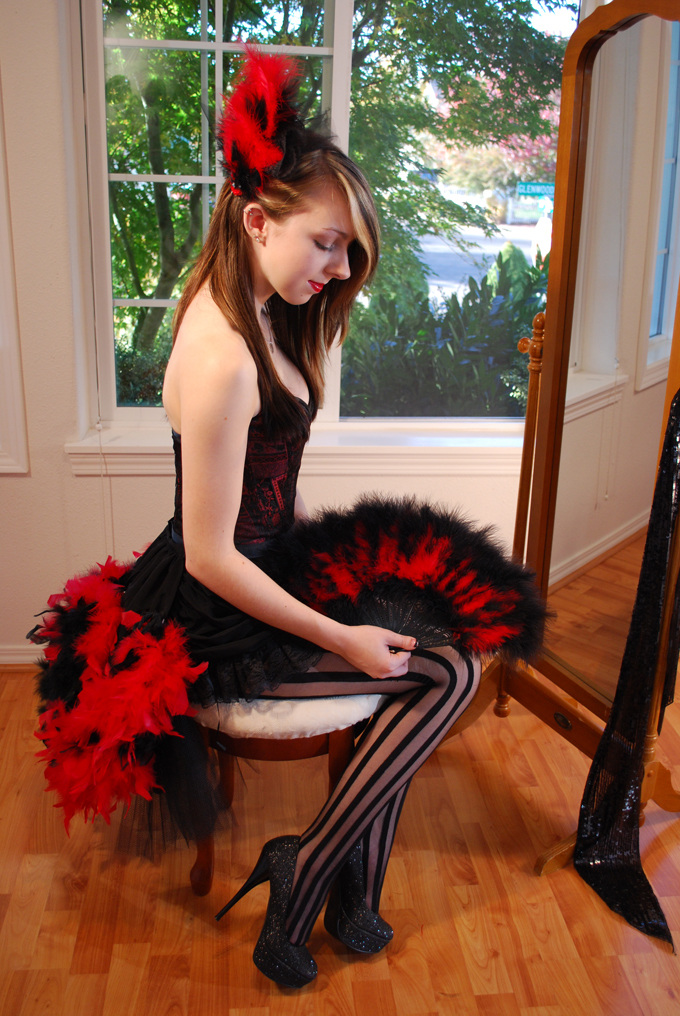
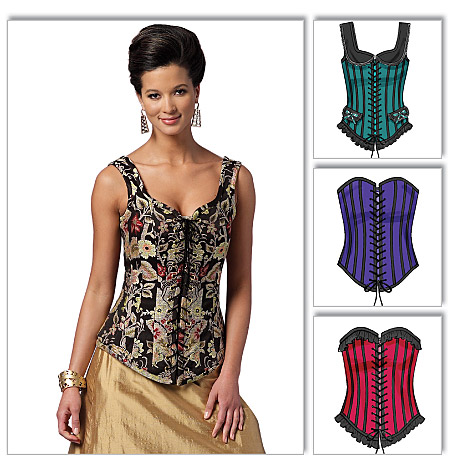
Black Diamonds Costume My Way

That special evening is almost here! The count down has begun and we are preparing. Carved pumpkins will be our sentries standing guard at the threshold of our front door and there will be candy treats for our evening visitors. This is only part of the evening of fun. At our house, everyone dresses up on Halloween and we celebrate with a harvest supper! This year, turkey and stuffing, rosemary potatoes with gravy, candied yams and baked apples! So what is my costume going to be? Well… have you seen the movie “Moulin Rouge“?
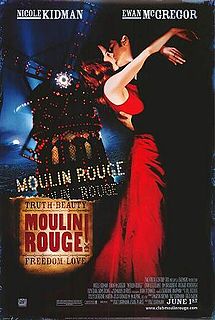 Photo: Wikipedia.org
It is an Australian-American musical that came out in 2001. At the time, I was attending Linfield College and this movie was one of the hottest topics around campus! I have watched it enough times through the years that I’ve lost track of just how many. Why? Because I loved the songs and I loved the acting, but even more, the costumes were phenomenal! The one that caught a lot of eyes was this one… the Black Diamonds costume.
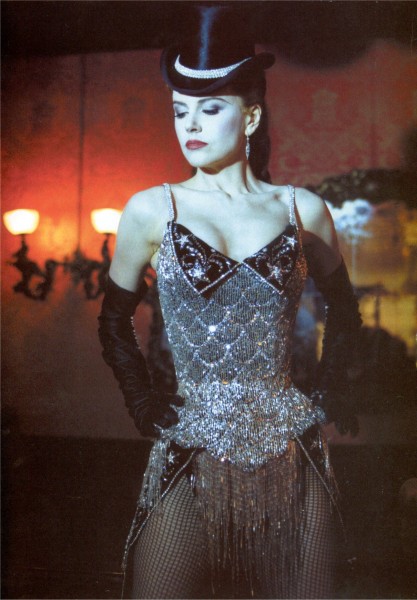 Photo from: Costumer’s Guide to Movie Costumes
You can find it done up on a number of costume maker sites in their renditions, each as gorgeous as the other. I am therefore certainly not alone in my “black diamonds costume” infatuation.
I do have to share a word of warning though to any of you that would be interested in creating this costume. It requires lots and lots and lots of bugle beads, rhinestones and bugle bead fringe so be prepared to bead heavily for weeks,unless you are one of those super-dooper beaders, and plan on spending some money.
There is obviously not a pattern for this costume. I spent a great deal of time searching the internets and studying pictures and any other postings that shared any details relating to it. My version is what I thought I saw, utilizing what I could find available. I purchased my supplies as I moved through the making of the costume so that it wasn’t a cash crunch all at once. I have worked on it for several years now… wore it to one of my costume parties. But… the tails were never done properly to my liking because I got tired of beading and couldn’t justify spending any more money. Then several months ago, I decided that I wanted to share it with you and so knew what I needed to do first. I removed the tails from the corset, rebuilt them, purchased MORE 3 inch bugle bead fringe from Fultons Trims, then attached them back onto the corset. My “Black Diamonds” costume is now ready to wear tomorrow night and to share with all of you!
So starting at the beginning… the shape and style of my corset came from Simplicity 5006.
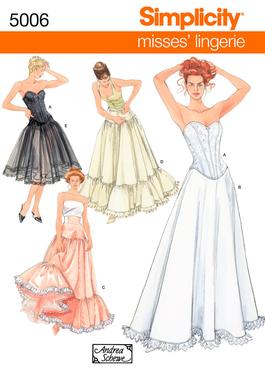
It’s made up of 10 pieces, three for each front side and two for each back side. I didn’t follow any of the constructions directions since I spring boarded off into my imagination after cutting out the pieces! I used 11 (eleven) strips of 1/4 inch spiral steel boning (center, front, front sides, back sides, back and back edges) cut from yardage I purchased along with casings from Corsetmakingsupplies.com. The outer layer of the corset and the tails were made with Faille fabric that I purchased from Mill Ends in Beaverton, Oregon. I underlined the Faille with Coutil from Tutu.com. For the lining, I used black Batiste though I don’t remember where I purchased that.
Before I lined it, I begin sewing the rows and rows and rows of strings of bugle beads. After this, I used sew-on Lochrosens Austrian Crystals in 4mm, 5mm, 6mm and 7mm sizes purchased from Fulton’s Trim, in sort of a fish scale pattern over the entire corset and the binding along the bottom after the corset was finished. I noticed that my link shows these crystals to be closing out. 🙁
 Photo: from Fulton’s Trim
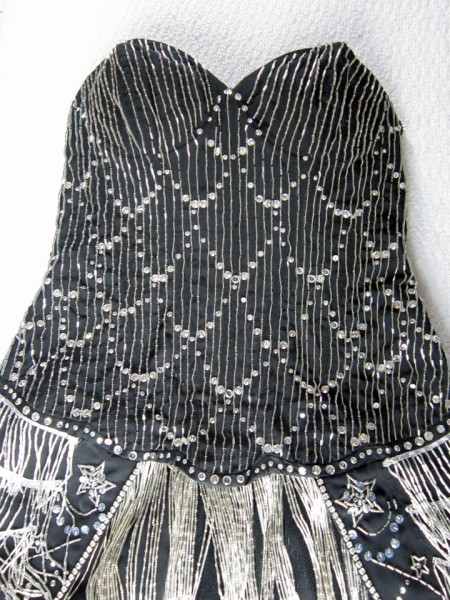
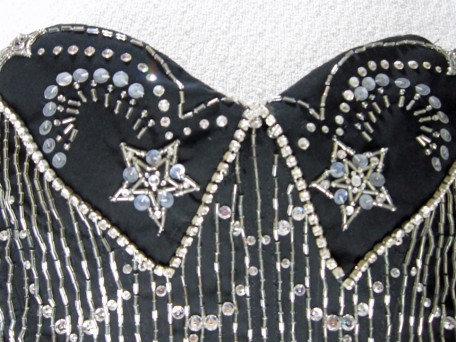
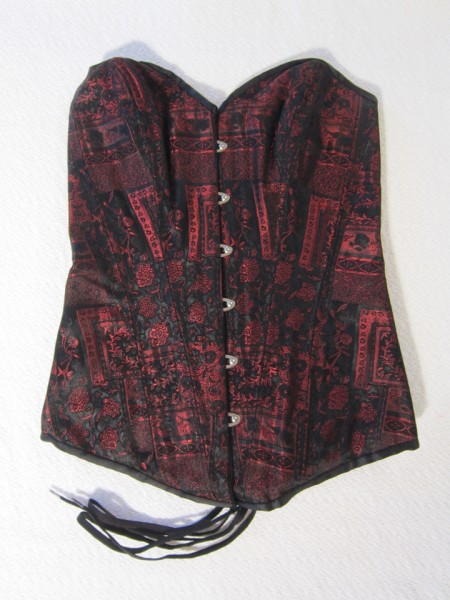
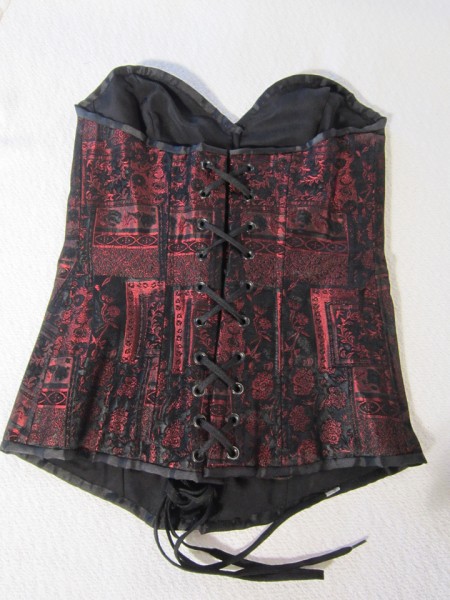
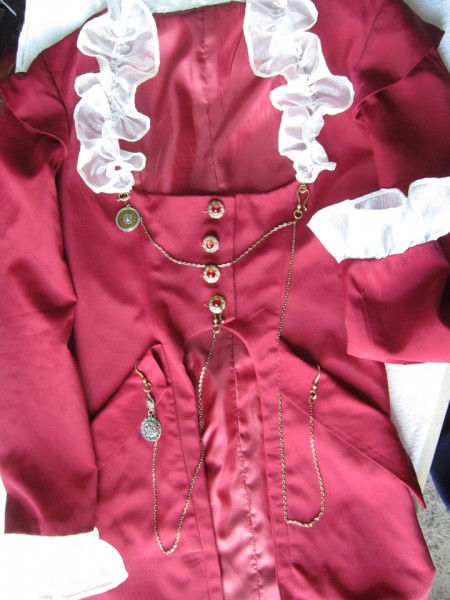
It is hard trying to take pictures of the corset with all its amenities but for starters, here is the front of the corset itself.
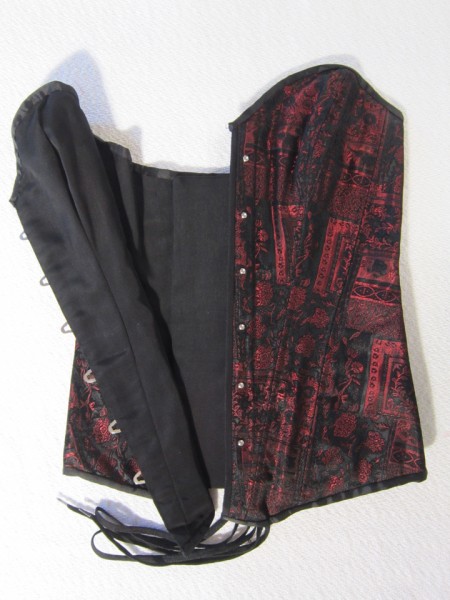
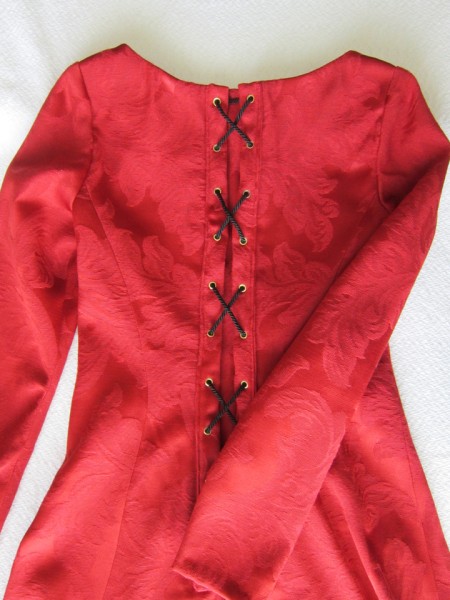
And the back.. I chose hooks instead of lacing.

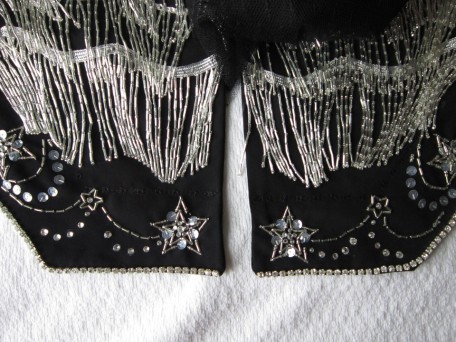
The lapels are shaped similar to a peter pan collar but are actually individually sewn onto the corset. The pattern of beads, sequins and glue-on flat back rhinestones from Fulton’s Trim are in a pattern that I felt somewhat matched images I’ve seen.
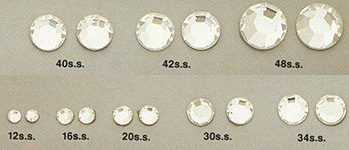 Photo from: Fulton’s Trim
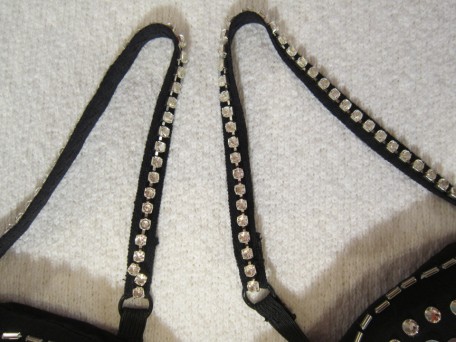
They are trimmed with silver crystal rhinestone chain #24 purchased from JoAnn Fabrics, however I purchased it in the store in the trim section.
The straps are constructed from the same silver crystal rhinestone chain. I sewed a strip of it on each strap made from the faille fabric I made the corset from. I also sewed a short strip of elastic on the back end of each strap for comfort before applying them to the corset.
At the lower front you can see a mass of layers of bugle beads strung in individual lengths. Yes… I beaded it all! My understanding is that this is called a modesty panel. I made my fringe modesty panel using 1/2 inch heavy twill tape.
There are several layers that I sewed together before attaching the whole unit to the front of the corset. The lining comes down over the twill band so it looks finished inside.
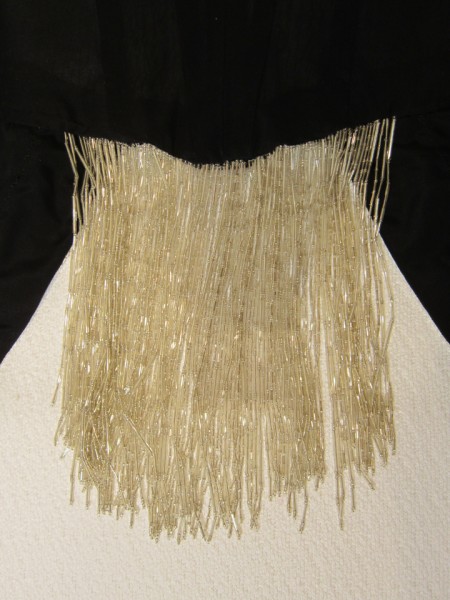
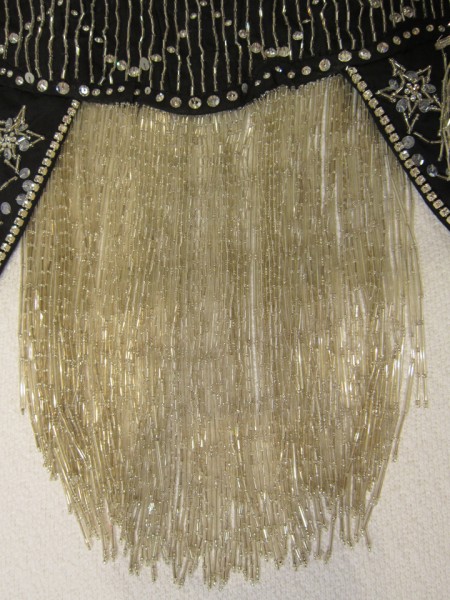
The tails start at center back, following the bottom edge of the corset towards the front of the hips. They are covered with layers of 3″ bugle bead fringe that I also purchased from Fulton’s Trim. Hey! I was tired of sewing bugle beads… I think you can totally understand!
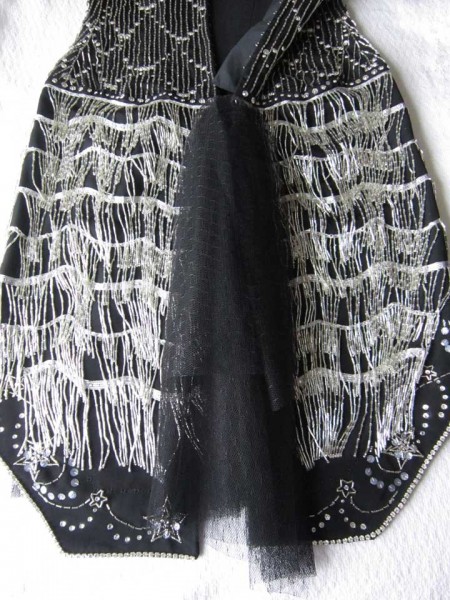
Glued along each band of fringe (except for the top band) are rhinestones in 3mm, 4mm, 5mm and 6mm sizes, all purchased from, yes, Fulton’s Trim again. But I did order a second batch from Dreamtime Creations. Clearly I needed a form of modesty for the back so I made a bustle of netting that snaps to the corset on the inside but peeks out between the two tails in the back that you can see above. The original costume tails were more narrow leaving a wider space between them for JUST the netting! I decided to not be so bold except I think I should have made the netting shorter.
There is a border around the tails made up of bugle beads, regular crystal beads, more rhinestones and french sequins. The edges are trimmed with the silver crystal rhinestone chain #24 that I used on the lapels and straps.
Now… it is time for the accessories! Oh yes… they are what bring it all together!
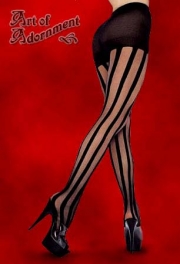
You have to have stockings of some sort. I was going to wear fish net but I can’t locate my pair. Ended up wearing Hue hosiery in stripes.

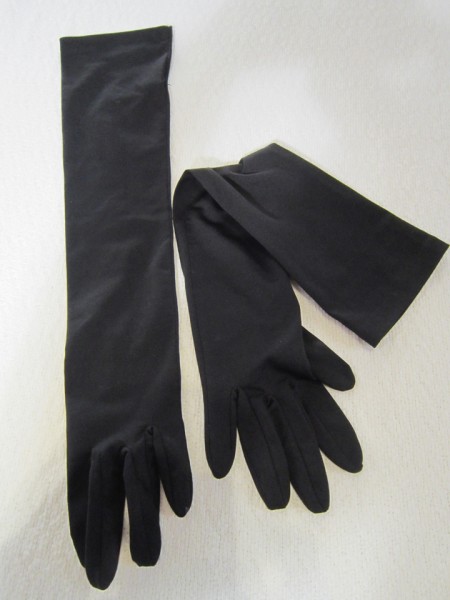
Long opera gloves are in order. The actual gloves for this costume were leather which would have been sweet but too spendy for my budget. Besides, I never wear gloves… except for snowmobiling!
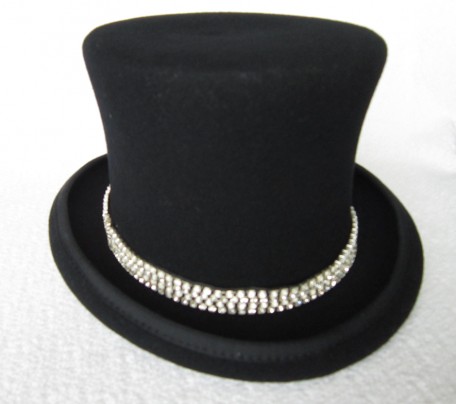
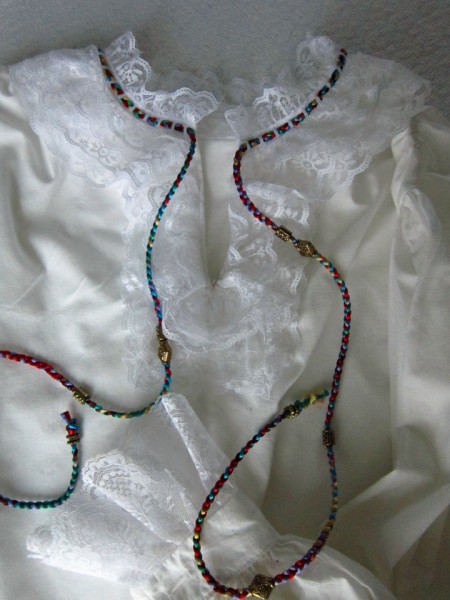
Of course when there are tails involved, you must include a top hat! I needed a fancy hat band so this required a bit more of the silver crystal rhinestone chain that I sewed together into a triple strand.
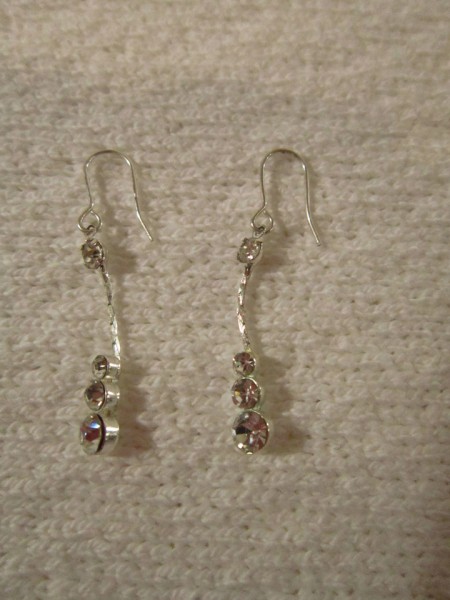
Jewelry most definitely! Earrings to be exact. My daughter got them for me and they are so perfect for this costume.
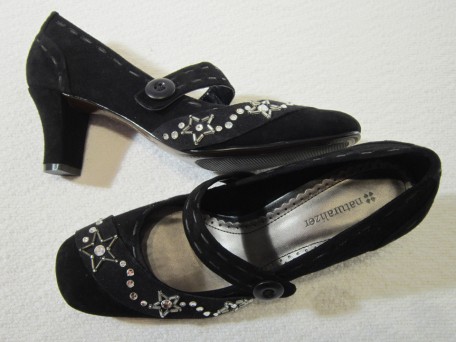
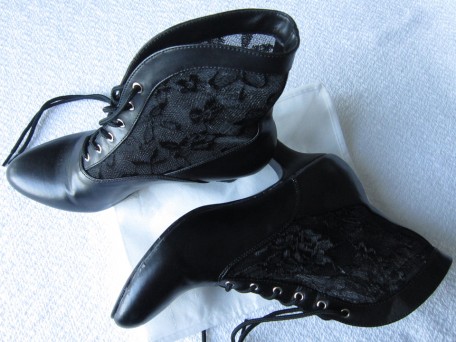
There is still one more important thing needed… shoes! This was a bit of a challenge for me. I hunted a while and finally found the perfect pair of bare black suede shoes from Famous Footwear. Then.. the real fun began when I started decorating them.
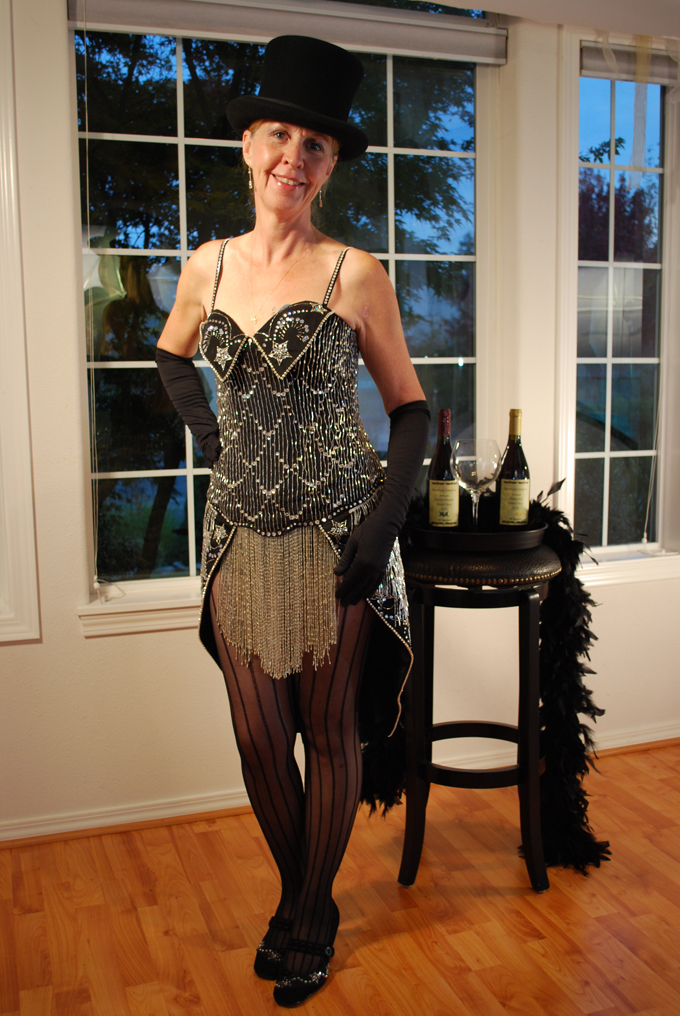
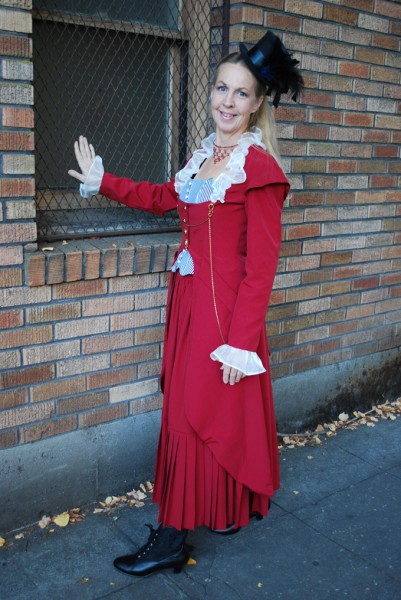
Now all that’s left is showing you the real deal. I just love blingy glitzy glam! It’s too bad that Halloween is only once a year!
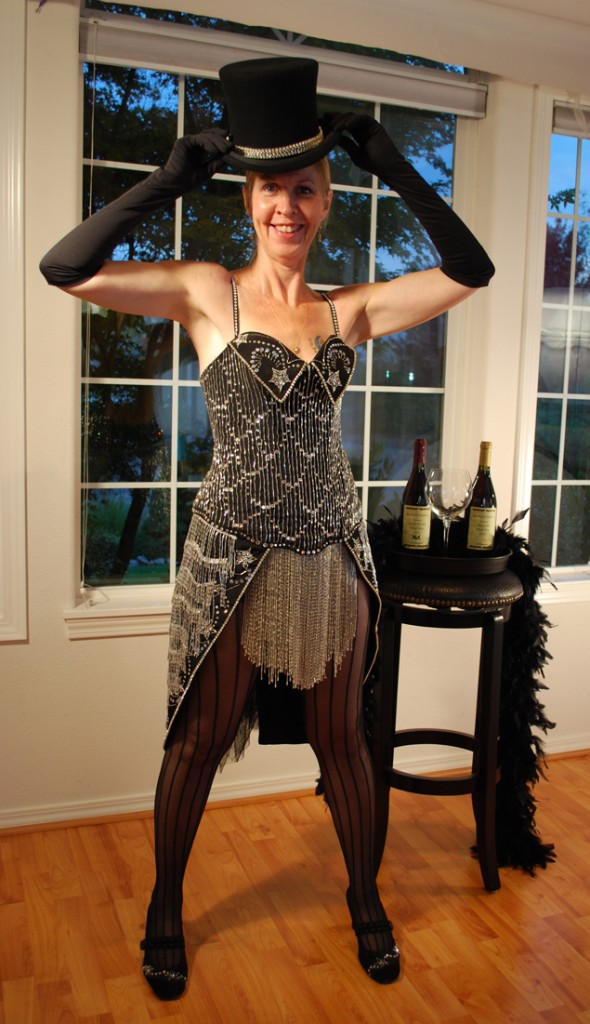
Okay… guess I’m having too much fun. How about this?
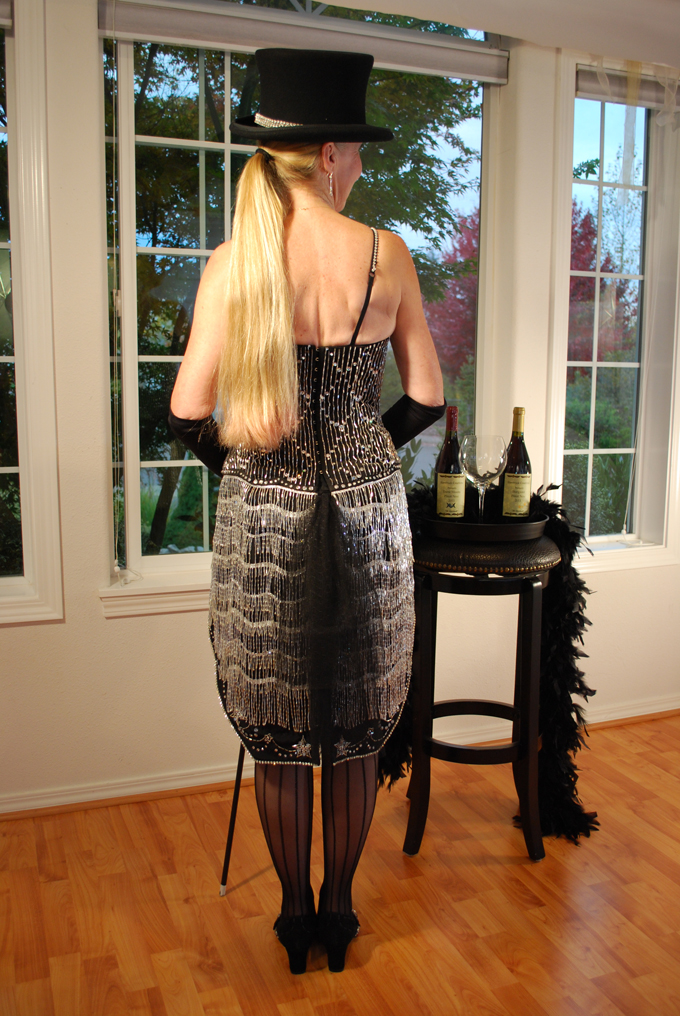
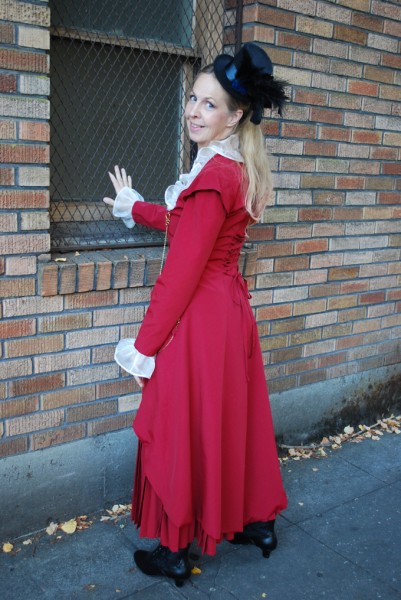
The tails from the back… still not liking what I see. Maybe a bow? Hell! Who likes to see their back side!
Fun is increasing with self-medicated chardonnay!
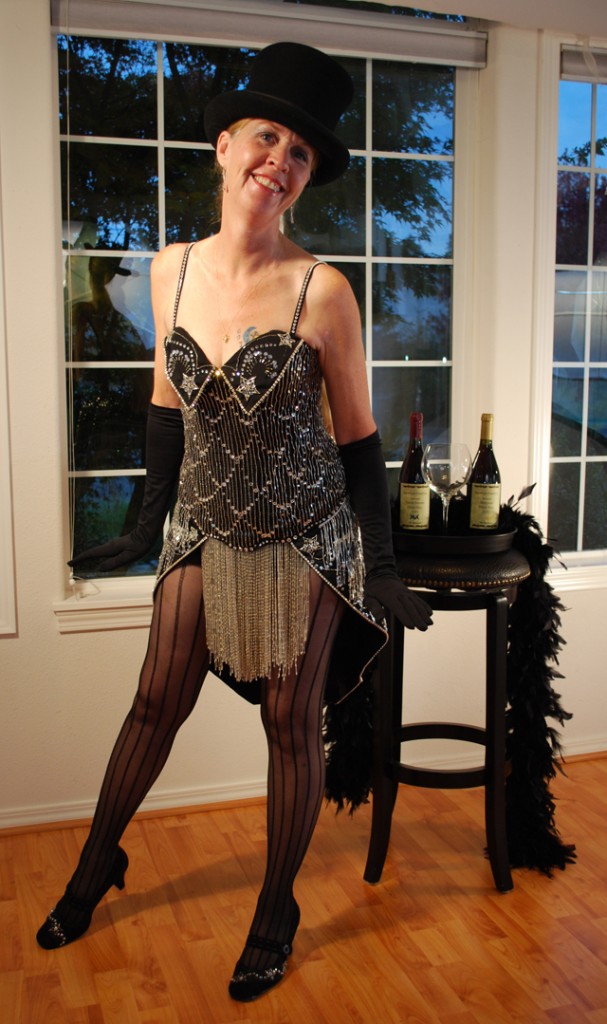
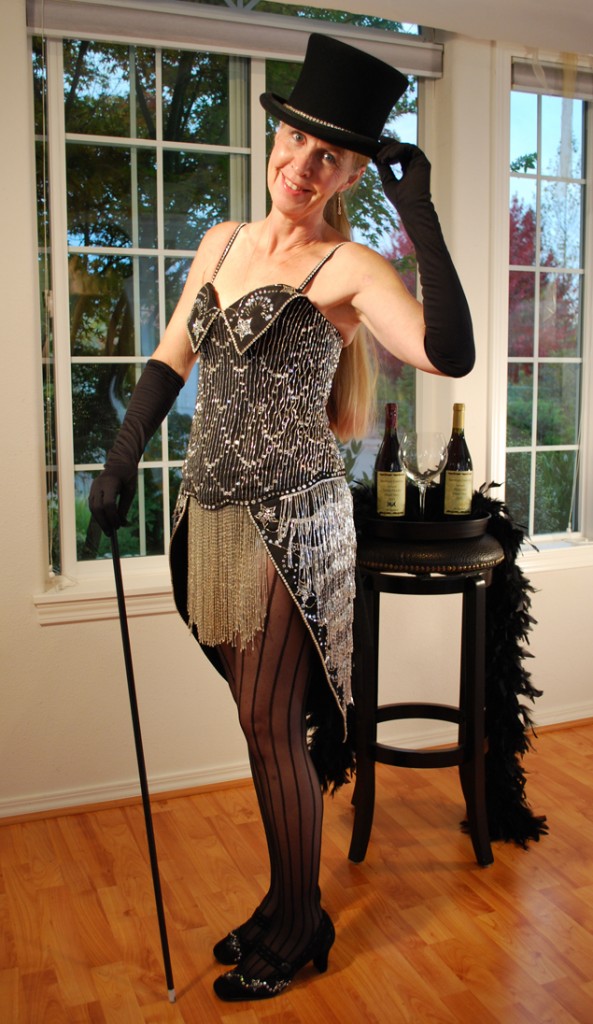
Just having way too much fun!
So I guess this is the end of my 2013 Costume Fashion Show. Hope you have enjoyed it. It’s been a lot of fun but I am getting sort of antsy to get back into sewing clothes that can be worn in public!
As a side note, all my grape must has gone through primary fermentation and quietly resting until it finishes its business. In a couple of months we will be bottling it up and then let it lay until it’s time for the official coming out party. Mmm… can’t wait! With that.. Have a fun Halloween!
Salute! Jessica
Read MoreSimplicity 2851 Feathered with 2966
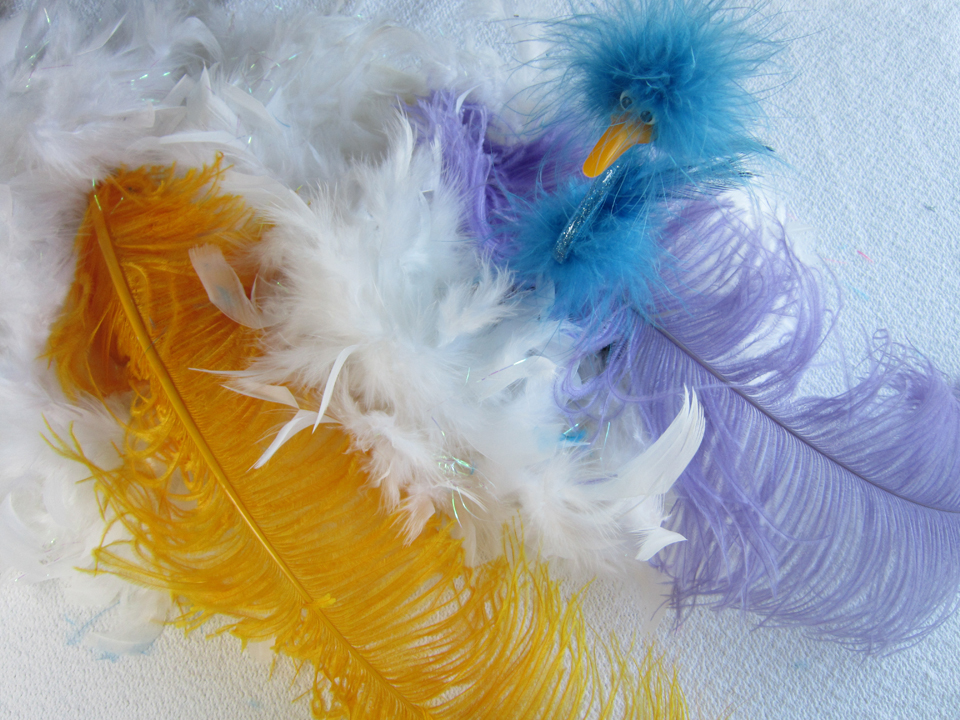
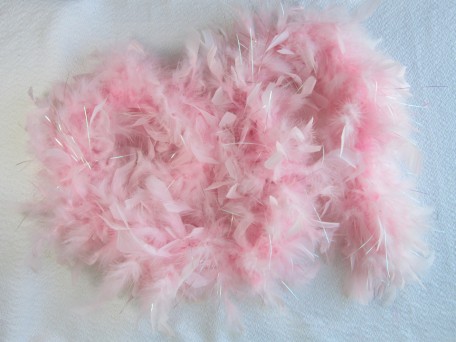
Feather fashion is said to date back to the 11th century with the birth of plumes in head dresses of the wealthy. Twelve century venetian masks were adorned with them. Through the middle ages, feathers were a wardrobe staple for high society. However, when the 1800’s rolled in, feathers were for everyone! AND… the boa stepped into the spotlight! They were actually an accessory in the 1700’s but didn’t catch on very well. Thank goodness some dear soul was determined not to give up! I Love boas and would own dozens if my practical side wasn’t so dominating! I saw a beautiful pink one at the Oregon Fabric Depot in Portland a few years ago. It was $55.00 and about a foot in diameter. It was gorgeous and I remember how I longed for it but there were many other things that my family needed… things that cost less than that boa! Besides, it would likely have ended up in the basket with all the other boas that I do have… but they are special boas.
This one I wore several years ago at the Seafood & Wine Festival in Newport, Oregon along with about 10 other ladies wearing them too!
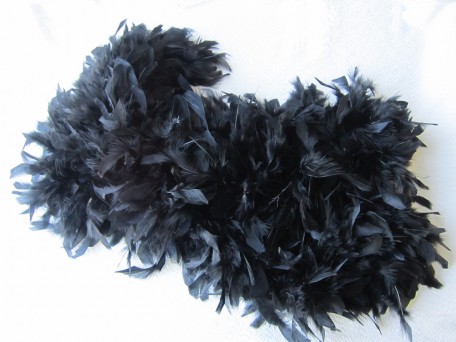
In 2008 I visited Trinidad and stumbled across one of the biggest Carnival supplier shops in Port of Spain… Samaroo’s Limited on Abercromby Street where I found this black one!
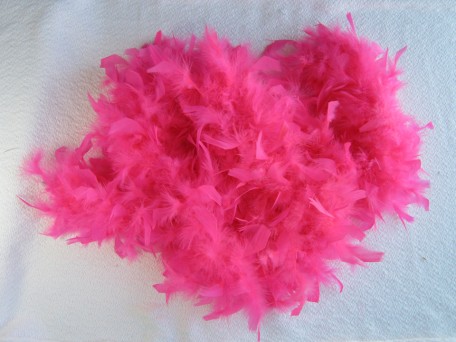
This one was my daughter’s that her grandmother (my mother) gave her when she was about 10-years-old. A few years ago she was reorganizing her room and stumbled across it somewhere in her closet. She asked me if I wanted it because she grew up and was not into pink anymore. I told her Y-E-S – I want it!!!! Does a bear poop in the woods! End of discussion and now I have a pink boa!
So about now you are asking what all of this has to do with a costume! Well… this next costume I want to share with you is a cornucopia of feathers! To start, let’s take a flight with Simplicity 2851.
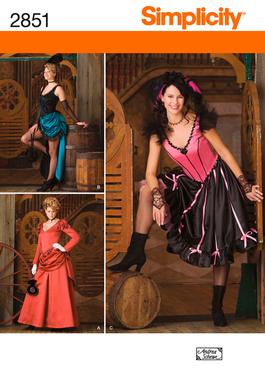
This costume pattern includes what they call an apron. When I think of an apron, I think of what you wear when you’re cooking in the kitchen however, the apron you can create using this pattern is a whole lot different, really cute… AND certainly perfect for a Moulin Rouge costume!
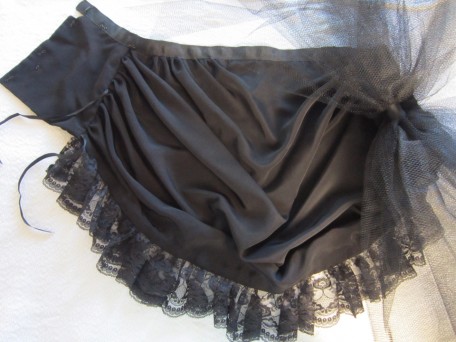
I started off constructing apron B, using black fabric that I chose for it’s draping qualities but for the life of me don’t remember what it was. I do know that I didn’t want to use cheap fabric so I was picky when I chose it. I was happy with the way it turned out but I knew that we needed some extra poof in the back, bustle poof to be exact so I made a giant bow out of black petticoat netting and fastened it permanently to one side with a snap that fastened to the other side when worn.
When it came time to sew the train, I knew that it was going to be too long for what I had in mind. I used only one puff and sewed the long train onto it just like if it was puff number #2. The train was still a little too long so I gathered the sides from where it was sewn to puff number #1 and down about 10 inches on each side. I took a picture to share but the picture looked so stupid and confusing that I decided not to post it. I think it would be easy to understand what I am saying if you were sewing this.
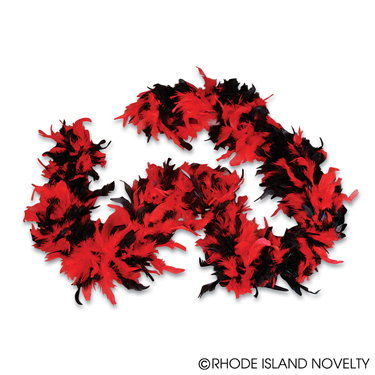
Now that I had got the apron/puff/train finished, it was time for my daughter to try it on. It just wasn’t working. Then an idea hit me… wasn’t sure how I was going to do it, but I saw feathers all over the back somehow attached to the puff/train. To the internets I went and after a bit of surfing, ordered three six-foot 60 gram boas. from Rhode Island Novelty. Why here? Well, they were the only ones that had a red AND black boa.
I spent an hour or two figuring out how I was going to attach them and when I finished, had my daughter try it on again. It was DA Bomb! This is it and the puff/train that it’s attached to is underneath.

Now that the bottom half of the costume was taken care of, it was time to create a top. We already had a vision… a corset of course! After much thought, I decided not to draft a corset and instead used Simplicity 2966.

I had already made a few corsets and I knew the proper way to construct them so I used the pieces of this pattern but did my own thing for all of the construction. I used a Brocade for the outer fabric; underlined this with Coutil that I purchased from Tutu.com; and lined it with black cotton batiste. I think lacing looks cool but I wanted the corset to be a one-person job, in other words, I wanted my daughter to be able to dress herself! I therefore decided to use a 12 inch busk for the front which I purchased from Corsetmaking.com.
Below is a picture of the front of the corset. To finish the edges, I made bias strips to encase them using remains of the black fabric that I used to make the apron/puff/train.
This is what the busk looks like when it is opened.
I put lacing in the back, but it doesn’t have to be undone so it gets to stay put and look cool!
If you are a regular reader, by now you know that I really have a thing for accessorizing my costumes, a condition which all my children seem to have developed… even in their everyday attire! Calley and I decided that the right hosiery was necessary for our version of the Moulin Rouge costume so she chose these from Art of Adornment.
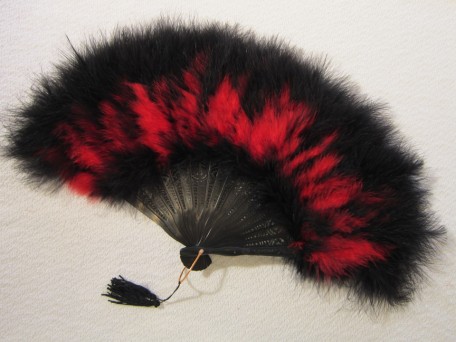
We thought a fan was in order!
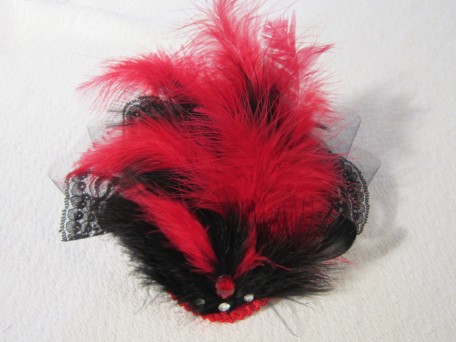
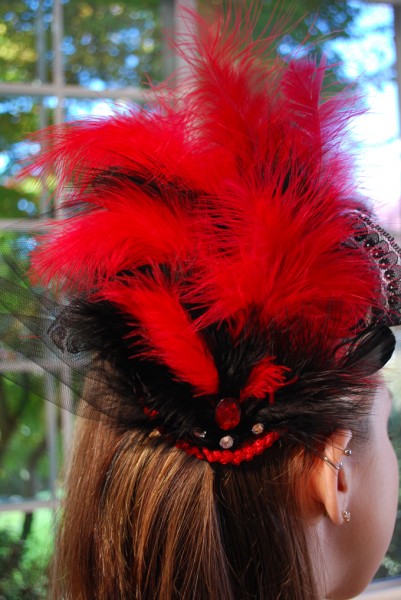
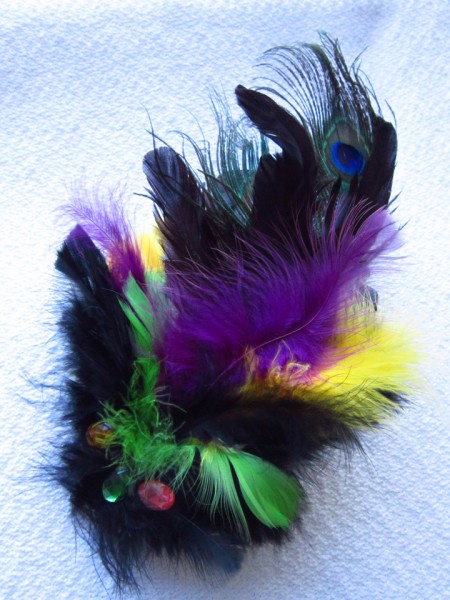
And there has to be something to adorn the head so I made this using sinamay, satin, lace, netting, red trim, lots of feathers, a red jewel and rhinestones.
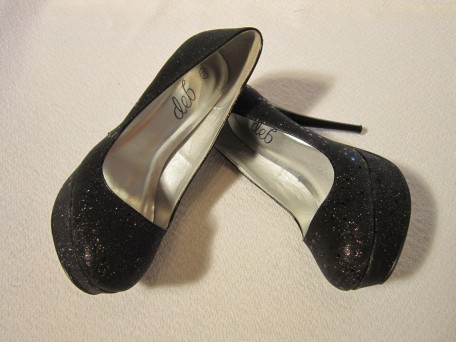
For shoes, she chose these.
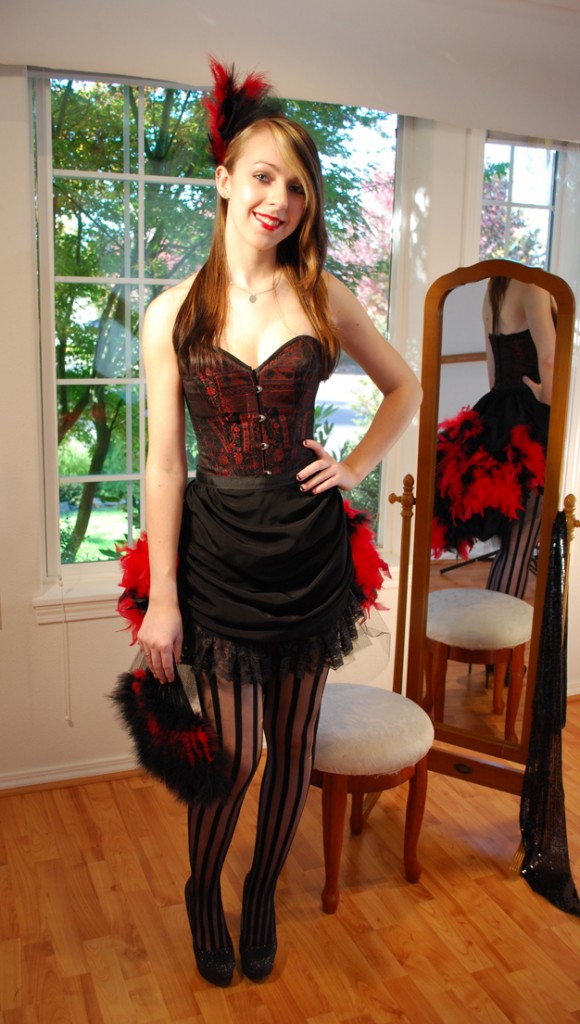
And… when you lump it all together.. Voila! You have Lady Calley!
The bustle of boas!
Hair adornment…
And a picture of my lovely daughter that was just too pretty to pass up.
Well… there it is, our version of a Moulin Rouge costume. Next week is zooming in fast and of course the grand finale of my costume presentation… It has taken me months to make this last one and is definitely an eye catcher in the light! Until then…
Salute! Jessica
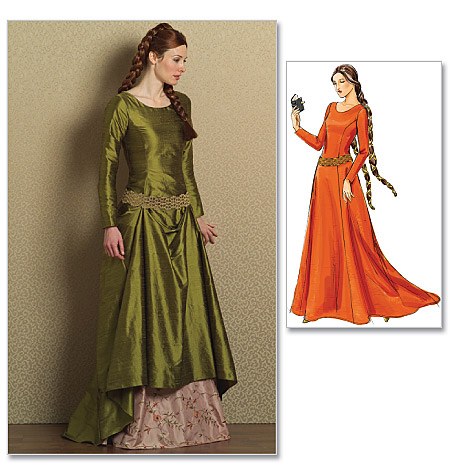
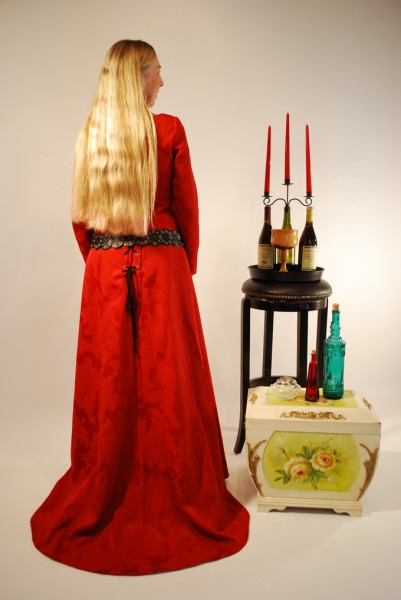
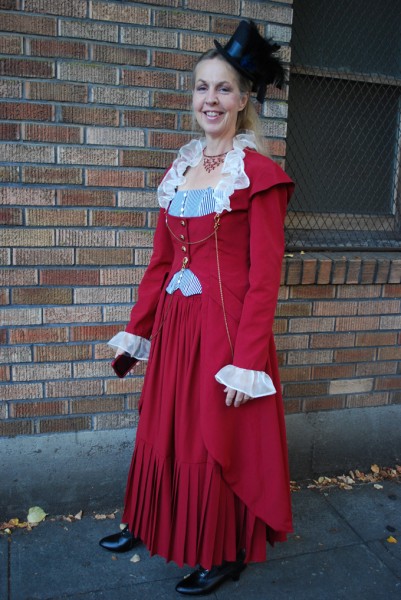
Read MoreButterick 4827 Medieval Dress

Here is my son in total bliss in the vineyard. You might think it’s because he is spending the afternoon outdoors on a beautiful day. But nope… that’s not it. He is laughing his derriere off because he knows that he’s dragging home 300 MORE pounds of grapes for me to make wine out of! As of today while writing this, I have almost 500 lbs of grapes fermenting in my kitchen! We are going to be very happy people for the next year!
So there it is… since I’m knee deep in grapes, I’m a little bit late posting costume number4 for you but better late than never eh! In my last post, I mentioned that I was going to show you something renaissancey! I should clarify that what I am actually going to show you is medieval. The difference between Renaissance and Medieval is really nothing more than two different periods of time in history with the medieval period coming before the renaissance period. There… now that I have that covered, we are off!
The Butterick 4827 pattern is a very nice put-together medieval dress ensemble.
The only challenges to making it, from my perspective, are in the fitting and putting in the eyelets if you happen to get some of the crappy gold ones that I used! (Sorry to say it but I think they were a Dritz product) They did not set well and so have snaggy edges that are messing up the cording that laces up the back, replacing the need for a zipper. Yes! No zipper, but… be eyelet aware! They have some very nice grommets in assorted colors at corsetmaking.com which I have used since making this dress and they are definitely worth the trouble ordering. Grommets are just a little bit more heavy duty than eyelets but so is a zipper! Oh.. also a bit of warning… since the back laces, you will need help getting dressed AND undressed but that’s none of my business!
For the dress I used drapery fabric, a little heavier than I would have liked and which may have have played a little part in the eyelet disaster, but I loved the look of it and couldn’t resist!

The instructions are pretty easy to follow though I did get tripped up a little when it came time to make the bands that the eyelets are inserted in. The instructions talk about “the band” and it’s not until step 21 when the instructions say to apply eyelets to each band! Maybe I was just having a dork moment but there it is just in case it’s confusing to any of you.
The finished dress has princess seams with a small chapel train built into the length of the back. As I mentioned earlier, the zipper is replaced by lacing down the back.
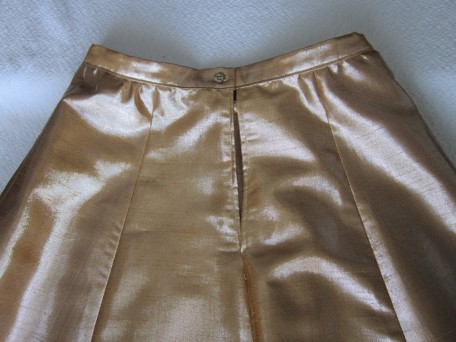
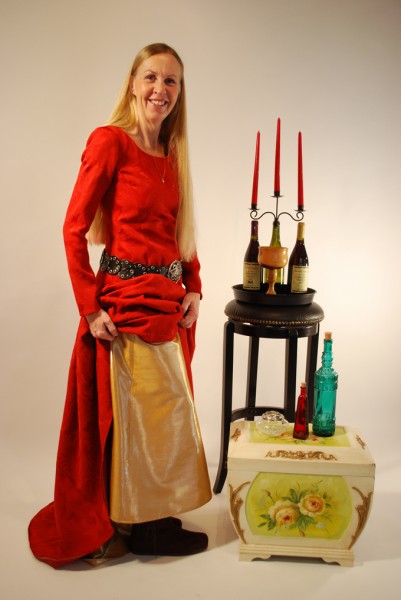
I made this dress several years ago for an SCA event and at the time did not make a skirt so to give this pattern a fair review, I decided to go ahead and make the skirt. I envisioned some sort of gold taffeta fabric with embroidered somethings on it but the fabric gods were not interested in helping me out! I had to keep reminding myself that it was just a costume so I found myself settling for some gold metallic fabric. I had many reservations, clear up until it was time to cut out my pieces. Following a glass of wine, I decided “who cares!” and started cutting. It was actually really fun sewing with it and I am quite happy with how it turned out. No zipper here either… just a button and buttonhole though you can finish it with hooks or whatever type of fasteners please you.
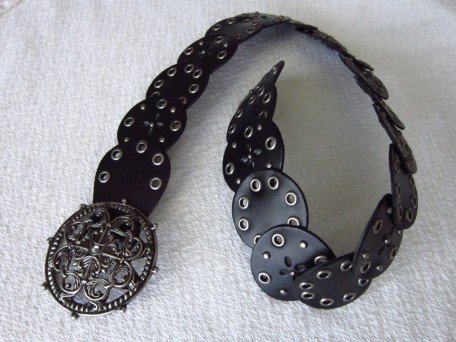
I loved the look of the belt that the model is wearing on the pattern envelope and assume it is made using the belt pattern pieces included. However… where do you find that kind of fabric?!!! Once again, I detoured and decided to go with something that I had stuffed away in a costume basket. I don’t know where it came from but I think it use to belong to my daughter.
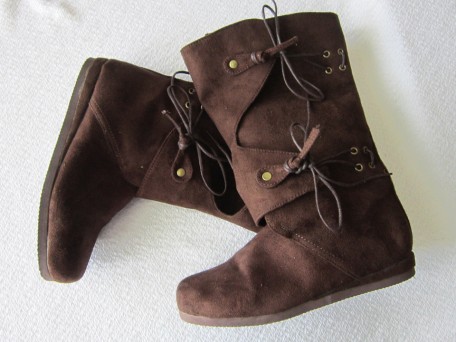
Of course there is footwear that must be considered! I purchased these medieval boots on-line at Costumes of Nashua. You have to scroll down a ways before you see these.
Okay! So there’s the necessary garb for a medieval female. And here she is doing her best to not look too tired! LOL

The fabric of my dress was too heavy to really look good hanging over the gold skirt. Fortunately it is being held up with safety pins that I can easily remove!
No skirt, but now you can see the dress and train.

Of course there is the interesting back…
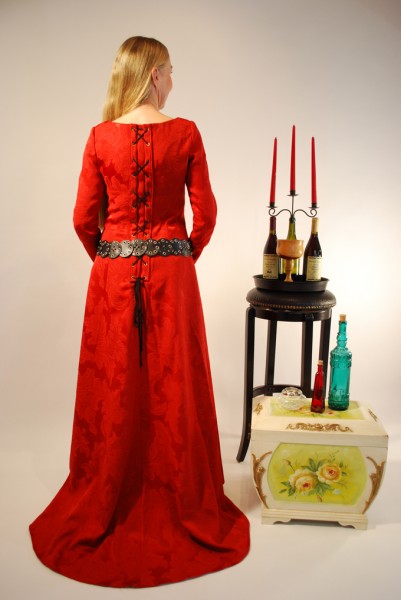
And one with my hair. Hey… it’s about the only thing that I was born with that I half like! I keep toying with cutting it off though…
And you always have to have a fun one! I was trying to show some boot!
Okay then. That’s it for this week… I hope this is helping give you some ideas for your Halloween debut if you haven’t already set to work creating something fabulous! Next week’s costume line up involves lots of feathers! Will see you then. Now I have to go check on my wine… and have a glass to celebrate finally getting this posted!
Salute! Jessica
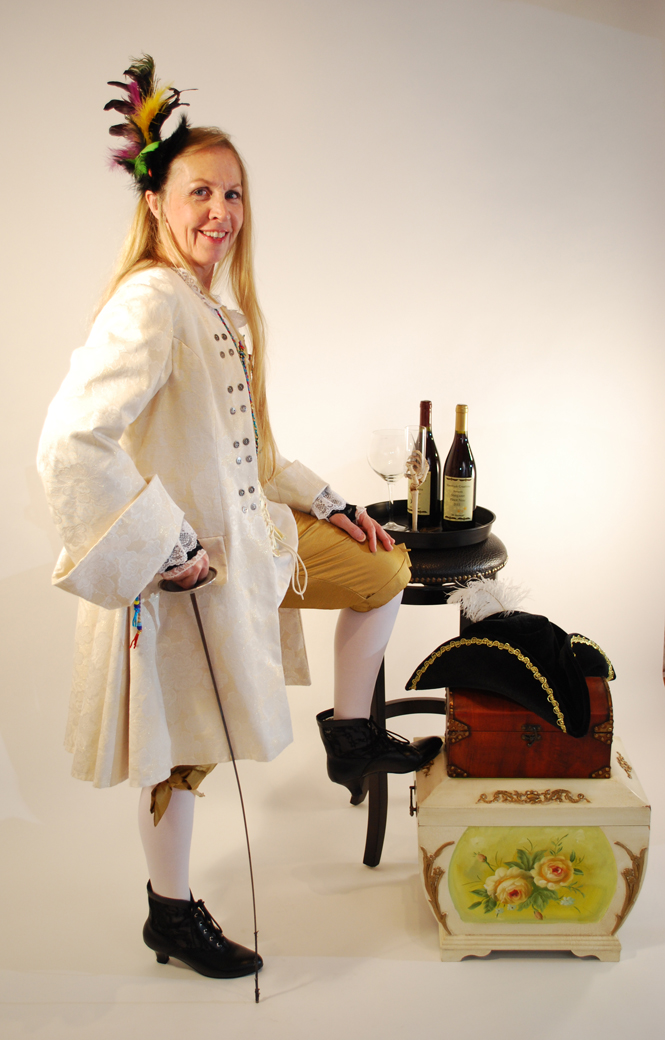
Read MoreButterick 5662 with Simplicity 3677 For a Pirate
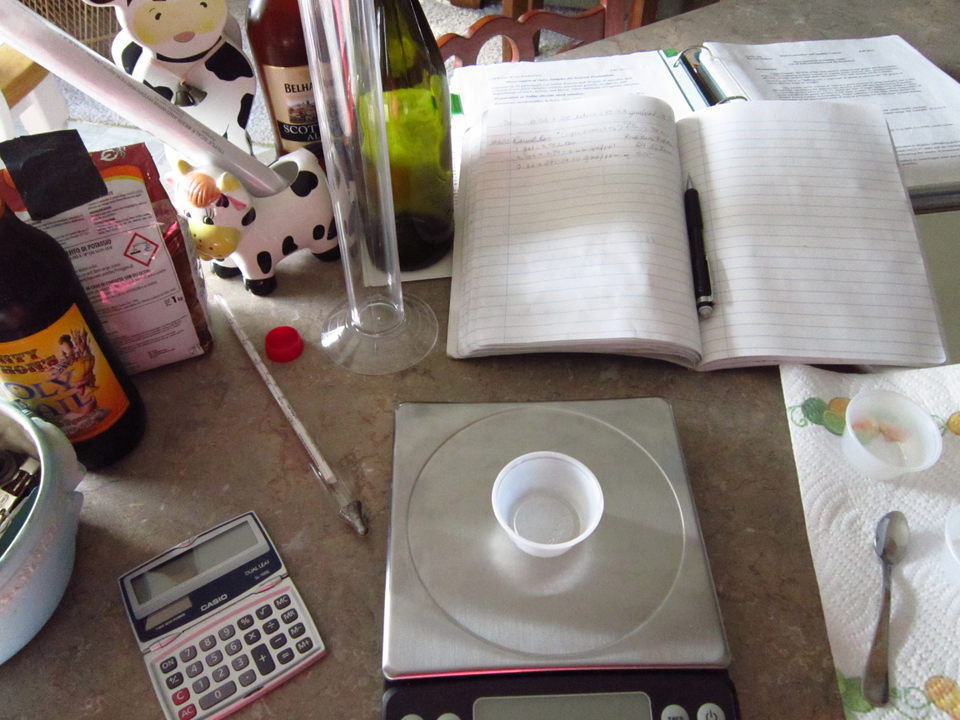
What you see above is a few of the tools of winemaking. Yep! It’s that time of year. I get to make believe that I am a genius chemist while brewing up my wine (Einstein would roll his eyes!). Tonight the first batch of grape juice gets inoculated and fermentation begins. For the next few weeks, my son Jared and I will be spending time taking temperature readings, punching down the popping up grapes, doing lots of taste tests and drinking a bit of wine and beer in the process! Certainly a good reason to love the fall season, but not the only reason! Besides the winemaking harvesting mash-up that occurs, there is also the cherished evening where everyone dresses up in all sorts of sorts, Halloween!
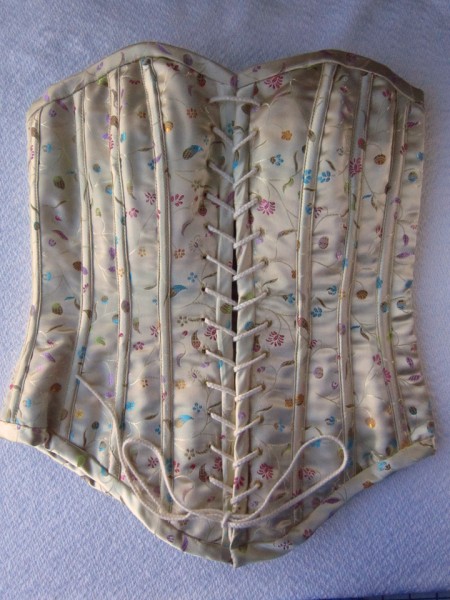
Yes… it is creeping up fast and I have got to stay on task and do what I said I was going to do. So… this week’s featured costume is my interpretation of a sassy fancy Victorian pirate! It’s made up of 3 different patterns and a few accessory purchases. I think we will start with the Butterick 5662 pattern.
Corsets are a always a good topic for discussion among women. It’s quite entertaining to listen to! Some women absolutely hate the whole idea of them and have a bazillion reasons for why. Then there are those of us, myself included, who have a fascination with them. Why? Well… they are feminine, pretty, and just too cool to not like!
Before we go any further, I should clear up any confusion you may have. In brief, a corset is designed to cinch in or narrow the waist and the bustier, a more modern style, is intended to boost the bust! For me, I really have no interest in the squeezing or boosting part because I just want to feel comfortable. This is certainly do-able with this pattern.
I should also mention that the true traditional corset would use spiral steel boning and either strong cord for lacing or a busk. With regards to the boning, I have used the plastic featherlight boning and it just doesn’t have what it takes like the spiral steel does. As for corset closures, I have tried metal grommets, metal eyelets, creating eyelets by using an attachment for my sewing machine or using a busk such as this one from Corsetmakingsupplies.com.
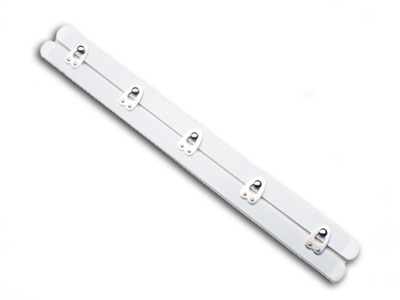
Photo: Corsetmakingsupplies.com
All of these work but if you apply grommets or metal eyelets and don’t install them properly with the required pliers, they can snag your lacings. (Yes, I have learned this first hand 🙁 ) Corsetmakingsupplies.com does offer grommets that install quite nicely and they do also carry spiral steel boning, cording and lots of other goodies too!
I will buy strong cording by the yard from a fabric store and then cover the tips with shrinkable corset lace tipping which is nothing more than skinny plastic tubing that you melt onto the ends of the cord (another tidbit at Corsetmakingsupplies).
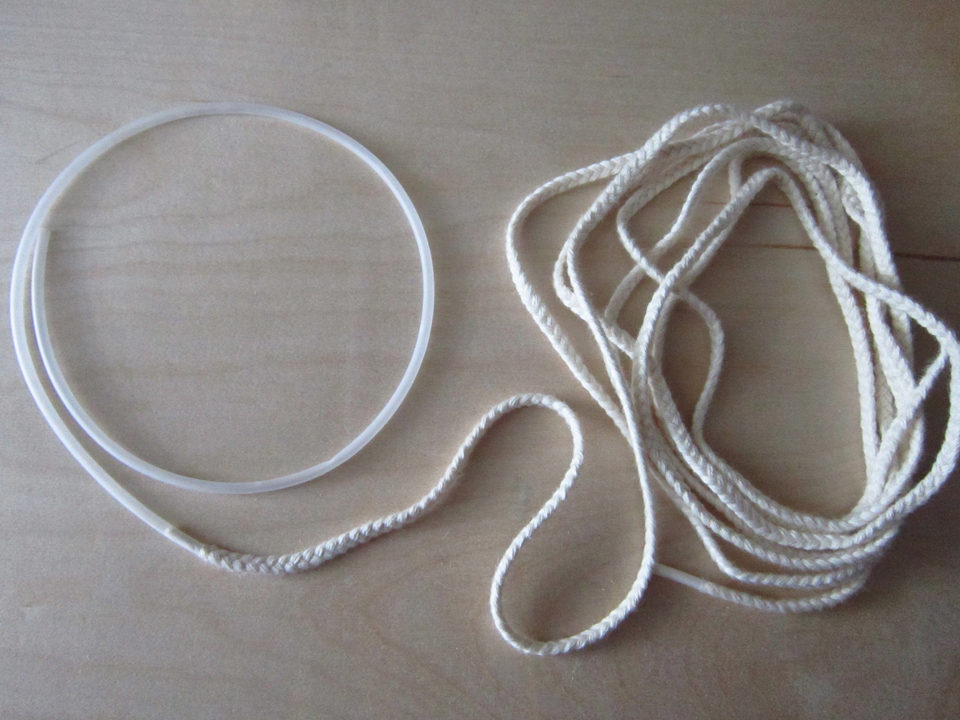
Last but not least, a traditional corset would be made of or at least under-faced between the outside fabric and lining with Coutil. My source for this is Tutu.com.
The Butterick 5662 pattern can be made as a traditional corset using any of the things I just mentioned but you can certainly make it out of whatever you choose. Be prepared however when doing this pattern because if you follow the instructions exactly, you will be making your own boning casings which you sew on the outside! My advice if you want it – get yourself a Clover Bias Tape Maker (range in sizes 1/4 to 2 inches) and will make things easier, especially when pressing your biased cut strips for the casing.
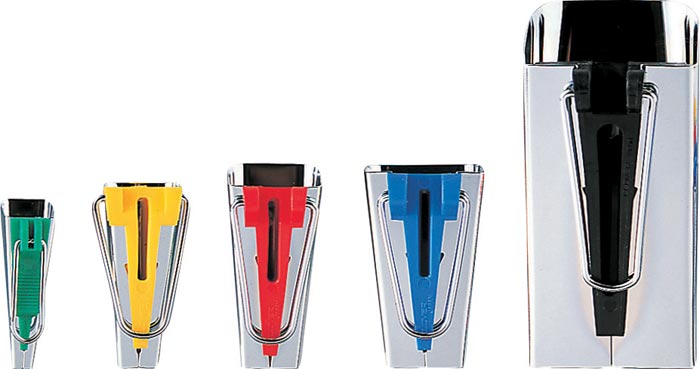
Photo: Clover USA Bias Tape Makers
This is my corset with a view of the inside of the front so you can see how the extension or flap is sewn so that it lies under the cording. I should say that there is a proper way to lace the cording and when you look at my picture… it is NOT done properly!

It ties in both the front and back which is nifty so there is an extension or flap for the back lacing as well.
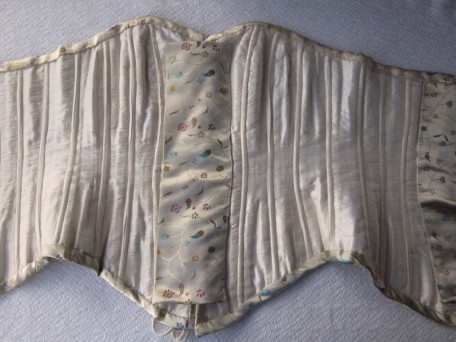
I made the casings from the same outer fabric of the corset, a brocade.
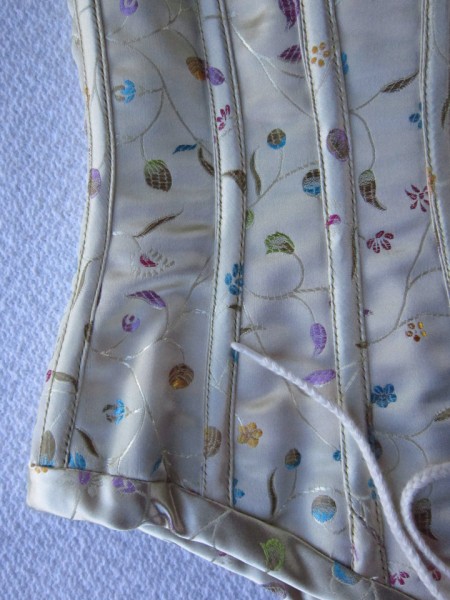
The front of the corset.
Then there is the Simplicity 3677 coat and pants that we have to talk about!
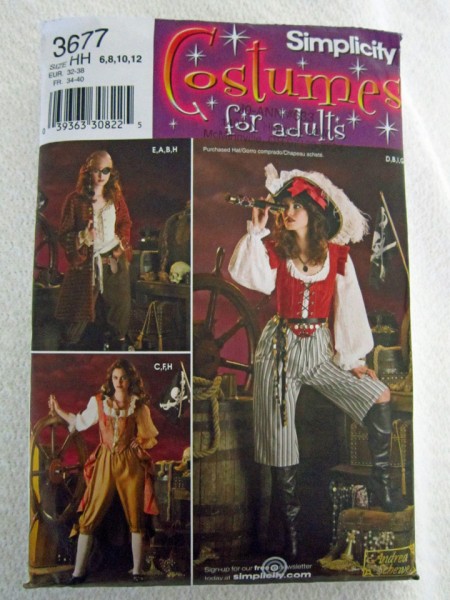
The coat in the top left corner grabbed my attention and I knew immediately what fabric I was going to use.. a bargain special from the Red Tag section at JoAnn fabric store that I purchased and stuffed away several years ago! It’s sort of a brocade but sort of not. Likely it is a drapery material that has gold metallic embroidery. Being that I am “Queen of Lining”, I lined it in Ambiance or Bamberg though I kind of complicated it more than necessary when working around the godet in the back. It all worked out though.
The sleeves are way to cool! I love the big cuffs. I would so like to just wear this coat with everyday wear. The pattern gives instructions for adding a flap as shown in the picture but I went one step further and also installed pockets. Hey! I needed a place to stash candy!
I saw the pants in my mind so clearly under the coat, in gold… I always have such big visions that sometimes send me landing on my butt! Once again I ended up with none other than drapery fabric I think! The cardboard bolt label had silk printed on it… what kind of silk I know not!
There is the matter of a “doilie shirt”, a name my son Dylan has dubbed them because of his dislike of the ruffles they have. Making mine was sort of a process. I started with making the top from the Simplicity 8855 pattern. Unfortunately it’s no longer available, even in the out of print section of the Simplicity web site though I have seen it offered at various on-line web shops.
It was simple looking and went with the skirt and vest that I also made. However… I needed a pirate shirt so I liberated it from the rest of the outfit and converted it to a “doilie shirt”. I went a bit nuts sewing ruffles all around the neck! Then I decided that it needed color so I dug through my craft drawers and found cording and baubles!
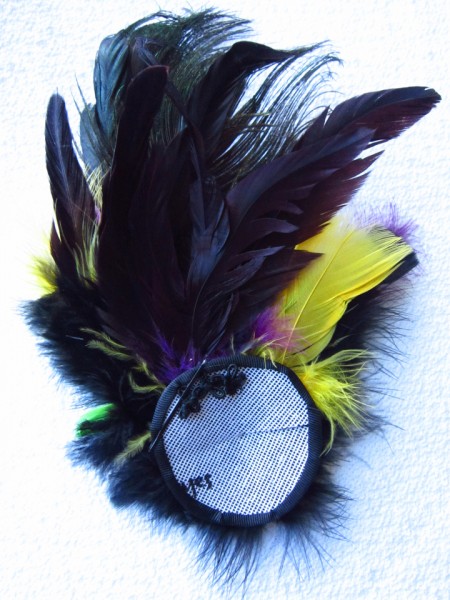
Keeping in mind that my costume is a sassy fancy Victorian pirate, I decided I needed some additional panache so I created a fascinator.
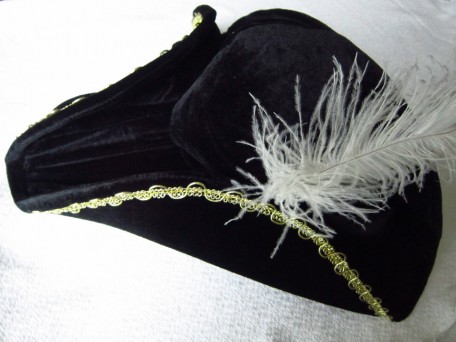
And of course a tricorne for good measure though I did not make this but ordered it from the internets!
There is the stockings and gloves that I just had to have! Compliments of Icing and Claire’s respectively though I do not see them on either on-line web site. I purchased them last year so that is probably why.
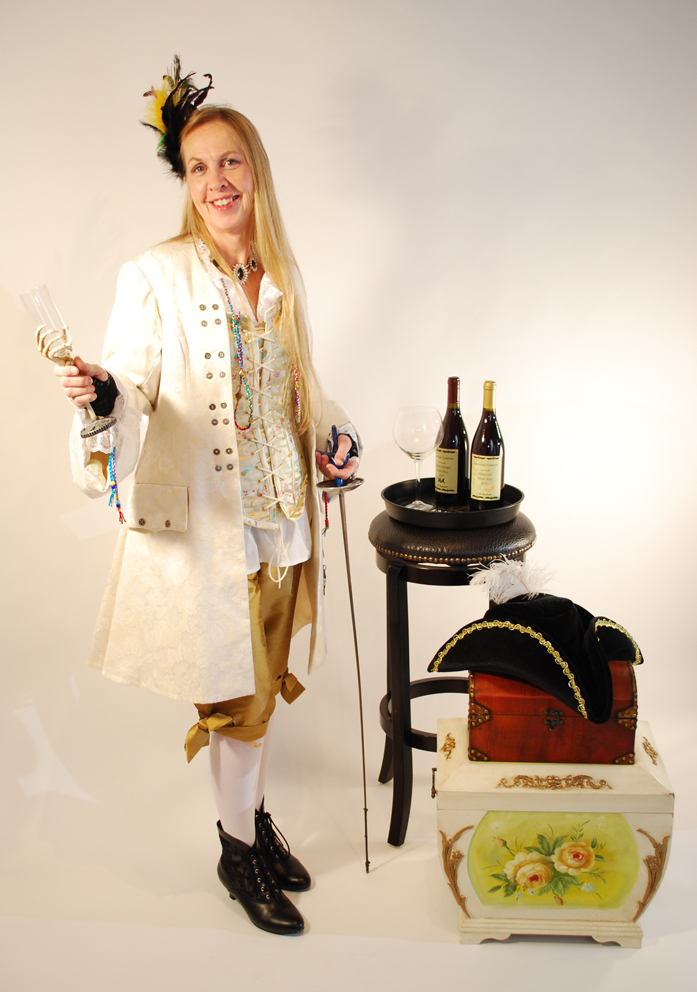
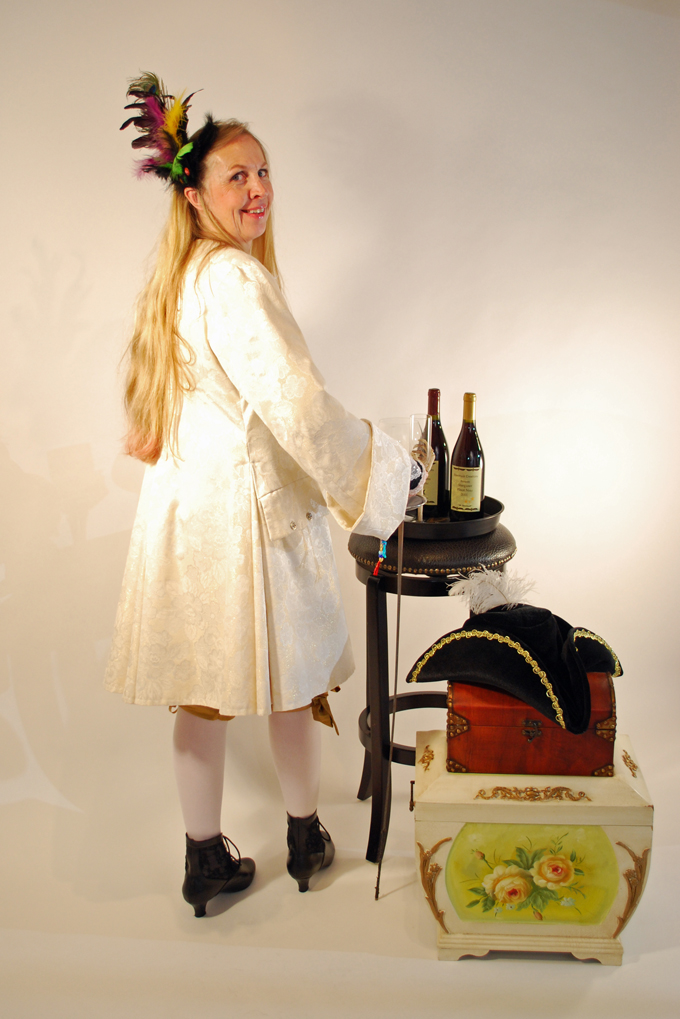
So here the sassy fancy Victorian pirate in all her shiz!
The coat has a godet in the center back.
I guess that wraps up this post. For next week I think we will roll the clock back even a little further and try out some renaissance wear! Until then… Adieu! It’s now time to get back to work on our wine!!
Salute! Jessica
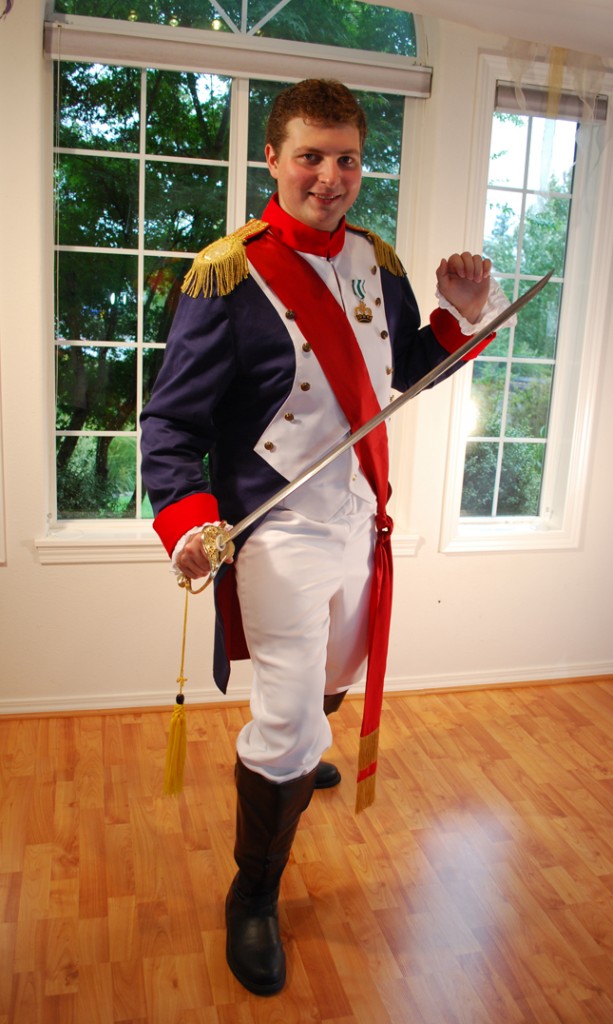
Read MoreButterick 4891 Bonaparte Style
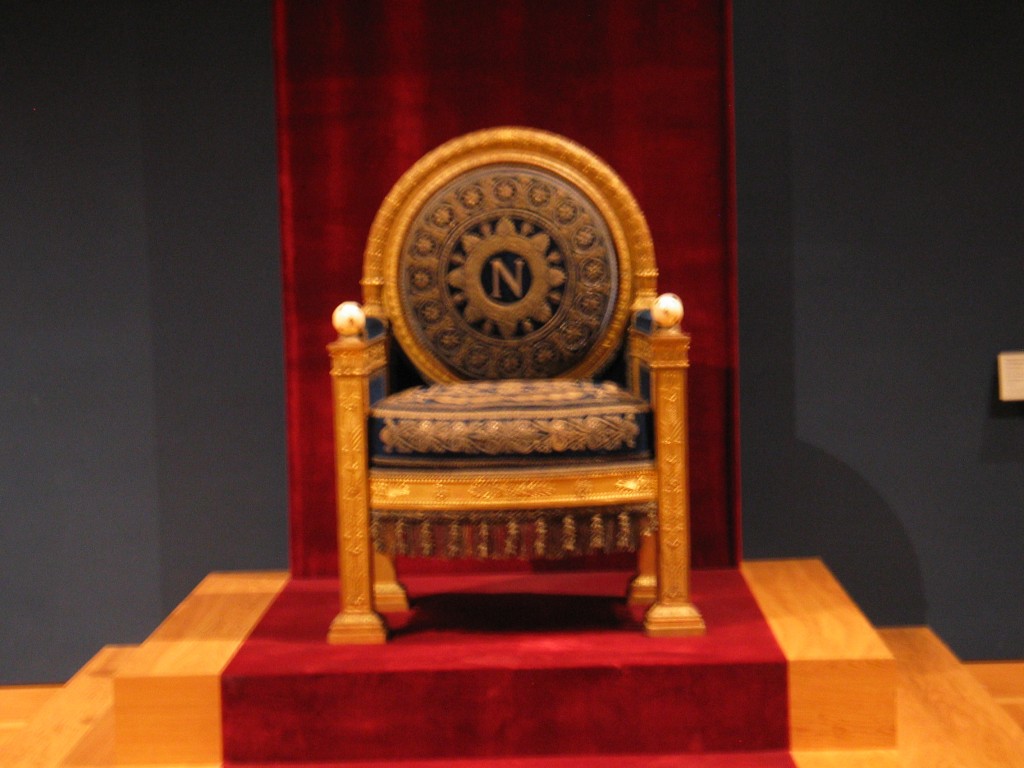
Napoleon Bonaparte’s throne
I think most everyone knows who Napoleon Bonaparte is and what you see in the picture above is his throne displayed in the Louve in Paris, France. There is an entire apartment within the Louve dedicated to all things Napoleon and it is breathtaking to see. My son, Jared, loves history and so it was a given that during our last visit to France that we had to visit the Louve and most definitely not miss this!
There is lots to read about Napoleon, lots of history, lots of tidbits which makes him interesting enough to style a costume after… such as the Butterick 4891 pattern.
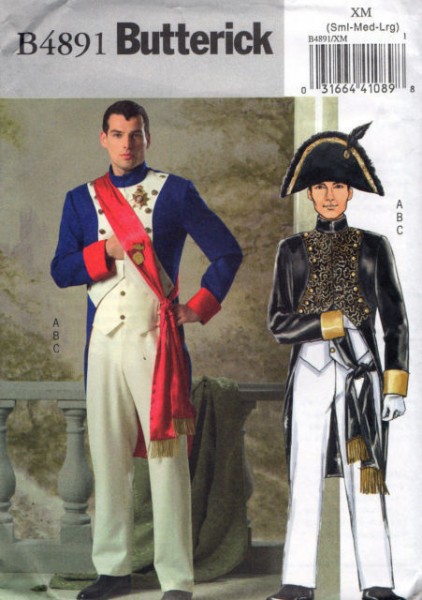
I thought this would be a fun pattern and costume to share with you and so included it in my scheduled line-up of costume posts. Then when it was time to dig it out of the costume closet and begin writing this article, I experienced several shockers! First, I have discovered that the Butterick website no longer has this pattern. It is not even listed in the out of print section and is spoke of on the internets as a vintage pattern. It’s selling anywhere from $26 to $38 dollars… Qu’est-ce que c’est? (English…What is this!) And secondly, I made this costume for Jared a few years back and… well… his sizing has changed… A LOT! Once again, what I thought would be quick and easy has turned into a laborious job but hey – since I have been making shirts for Jared, I have learned some things about fitting him which has saved my butt!
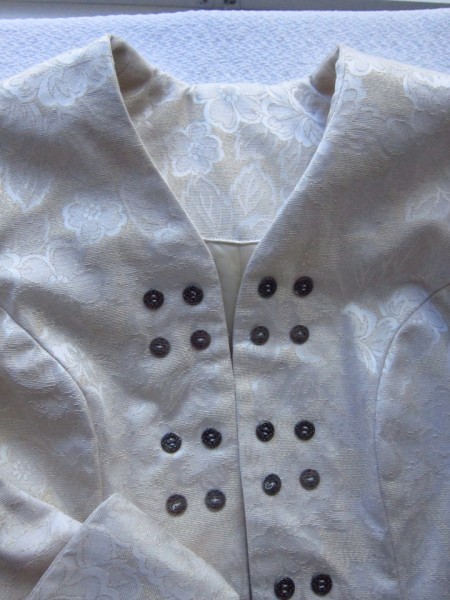
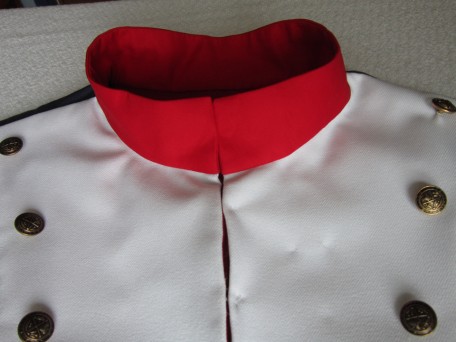
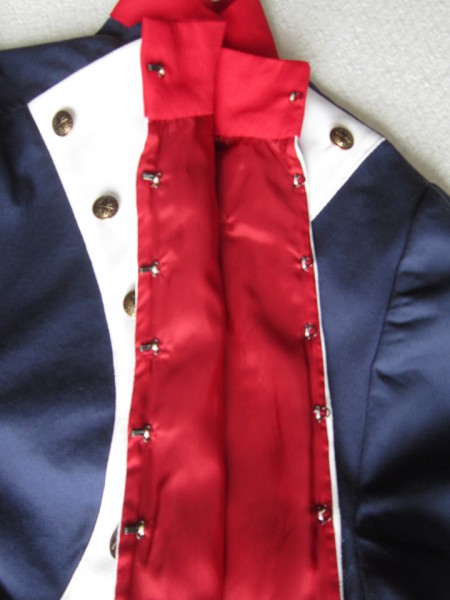
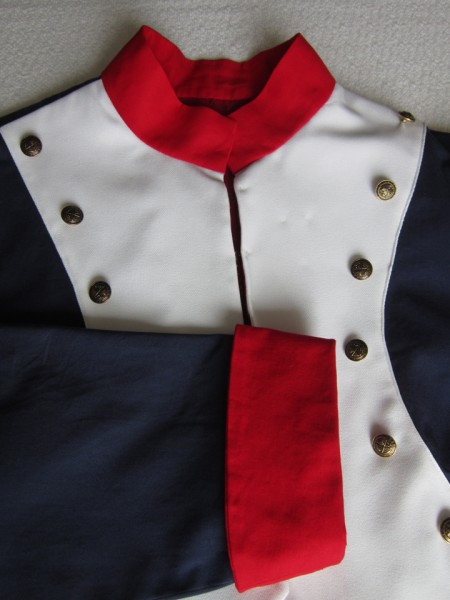
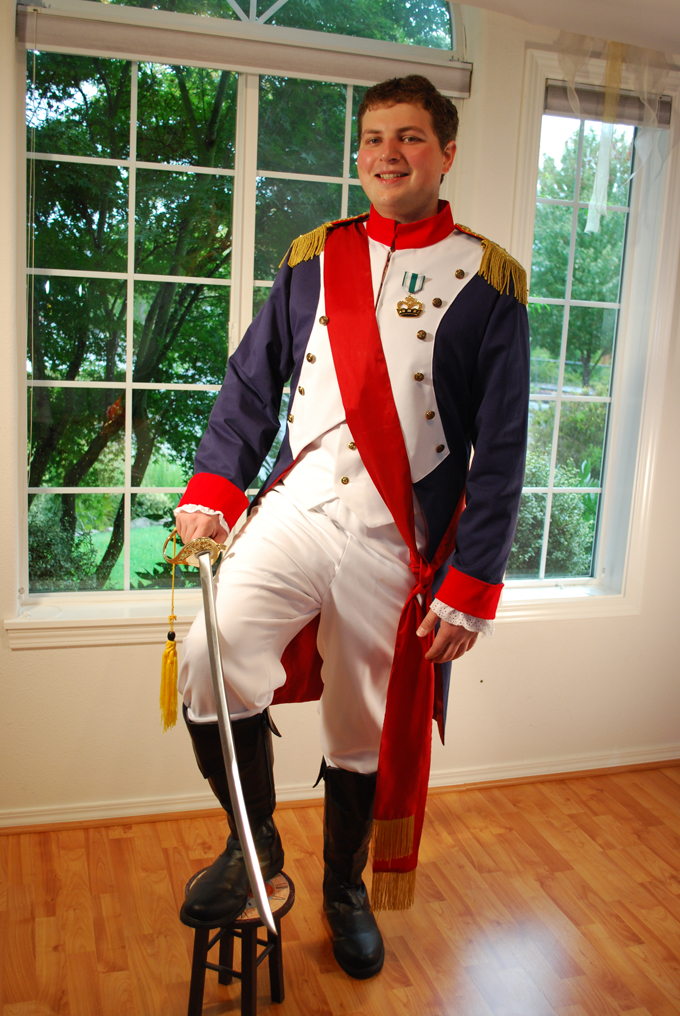
The jacket was my biggest obstacle to change up. Fortunate for me, while this pattern is considered a historical costume of a Napoleon French Revolution Uniform, it is not exact nor does it use period garment making techniques so I had free range on how I managed the changes. The pattern instructions are easy to follow and the design of it is well put together and an enjoyable sew. For the main part of the jacket, I used a royal blue denim and as per the pattern added a white garbardine overlay to the front. It is a lined jacket and so I chose the only obvious color to line it with… red! I loved working with the contrasting colors and for the first time, sewing on buttons was a treat because that’s when I began to see the jacket really become officially a uniform!
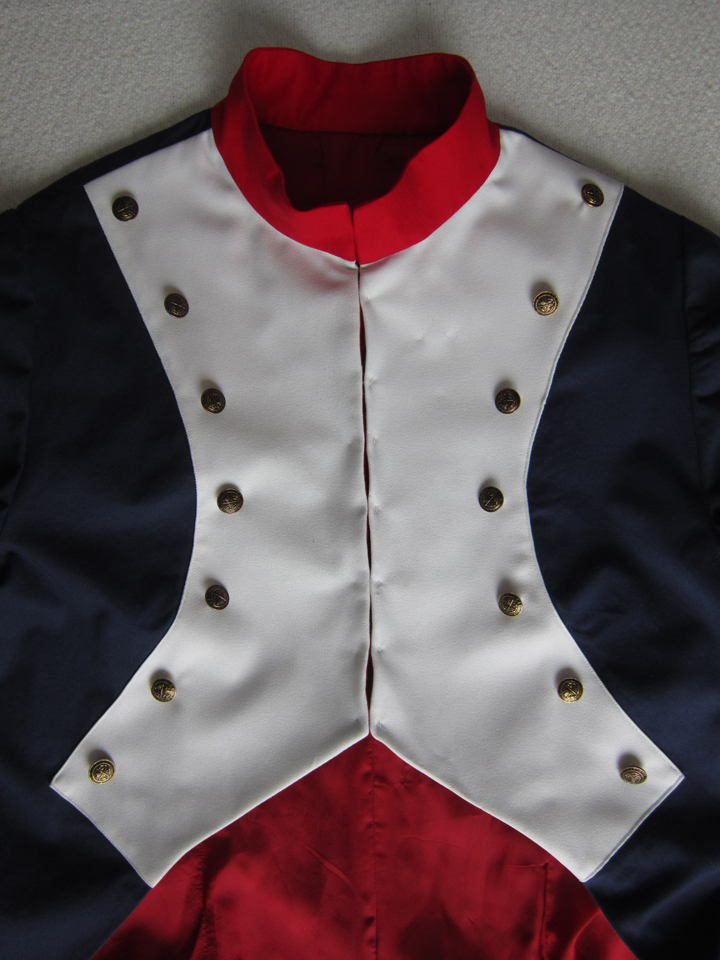
As you can see in the picture above and below, I chose to make the collar in red since that is what all the Napoleon images on the internets show it to be. I think the mandarin style makes it quite attractive. I do wonder though when the mandarin collar was introduced into military fashion. I guess I have a homework assignment!
Given that this is a mens garment, I chose to use big jumbo hooks for closures.
Of course the red cuffs brought it all together.
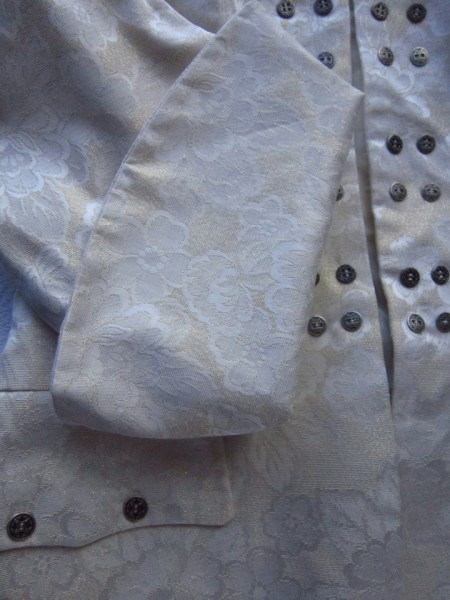
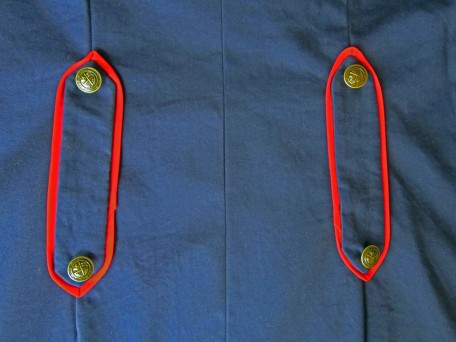
When I first made this costume, I didn’t do any research to see how close to the real deal it was, I just followed the instructions and made it! Now that I’m back re-doing it, and at the same time searching on-line, I’ve discovered that the shape of the tails, the cuffs, as well as the kind of buttons, etc, may not be correct so you can’t very well call this a true historical period costume but it certainly is easy to adapt it to what you need. For instance, the back of the jacket seemed so plain that I decided to borrow a detail from some of the images I viewed and with some scrap fabric I had left, did this.
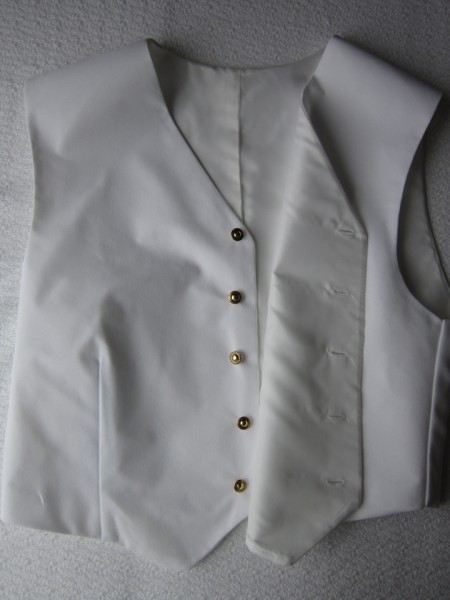
Next is the vest. It is simple and quite traditional. As you can see, I did it all in white using the same gaberdine fabric as in the pants and jacket.
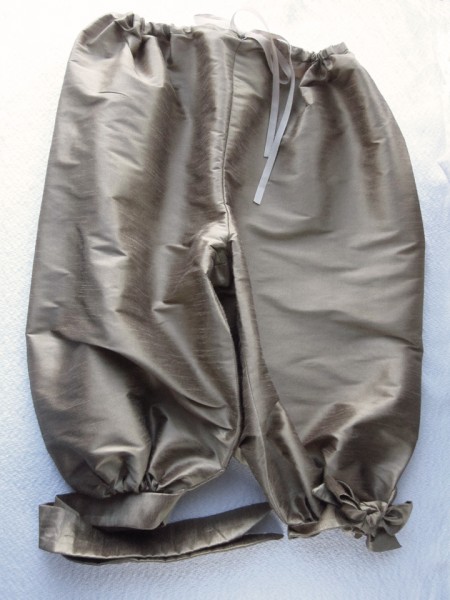
The pants are nothing more than two legs with an elastic waist. I hate elastic but when I made these pants, I was following pattern instructions so I just went with it. And… the costume was for my son and I knew he didn’t care one way or the other as long as he had a costume! I thought the Gaberdine fabric I used was too thin so I lined the pants with Bemberg (Ambiance) and this made a big difference. I didn’t take a picture though because… because… I’m a nerd and forgot!
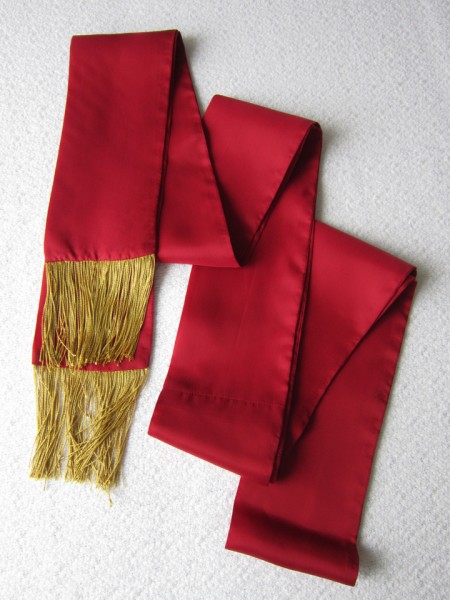
The sash definitely gives this uniform some panache! I used a lining fabric from the JoAnn store that cost me $12.99 a yard and it was not silk! The gold fringe is oh so uniform.
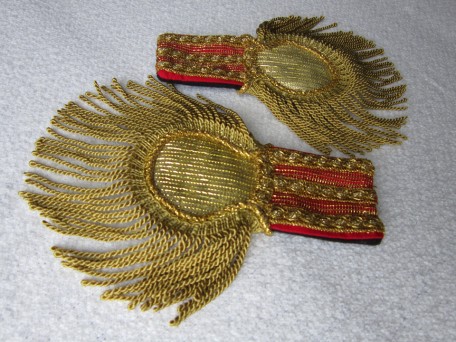
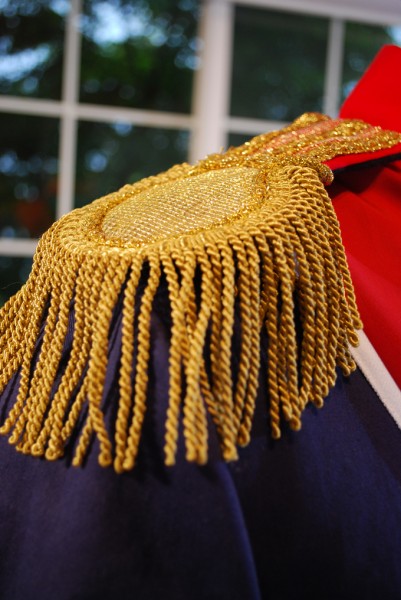
Shoulder boards seemed to be in order as I was re-working this costume. I found a gorgeous pair on a historical costume site for 400.00 euros but… I decided that it might be better to eat and have electricity so decided to try making them myself. This is what I ended up with.
Now – there is the matter of a bicorne hat. Long story short… after spending most of the week rebuilding the costume and another day making the shoulder boards, I decided to bypass the bicorne and get this posted! The hat sure would have made the costume complete but I am choosing not to stress! I think you all would agree with me! 🙂
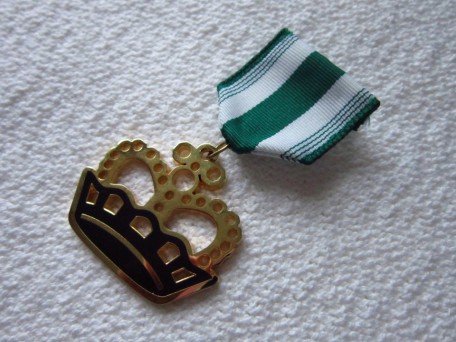
We dug up a shirt and a pair of boots from our costume collection but for the life of me, I can’t remember where I purchased them from. I do know that I found both on-line. The shirt, my son Dylan calls a “doilie shirt”. You know… like doilies that you put on tables and set nicknacks on! He has an attitude huh! We tried to find medals that looked like what Napoleon wore that wouldn’t cost a fortune… it didn’t happen. It was compromise. I created something from what Jared decided he could accept.
Now it is the time for the man of the hour in all his regalia that his mom made!
On the back are the bands that I added. They are really suppose to be a little longer based off the historical images that I’ve seen but I was working with scraps!
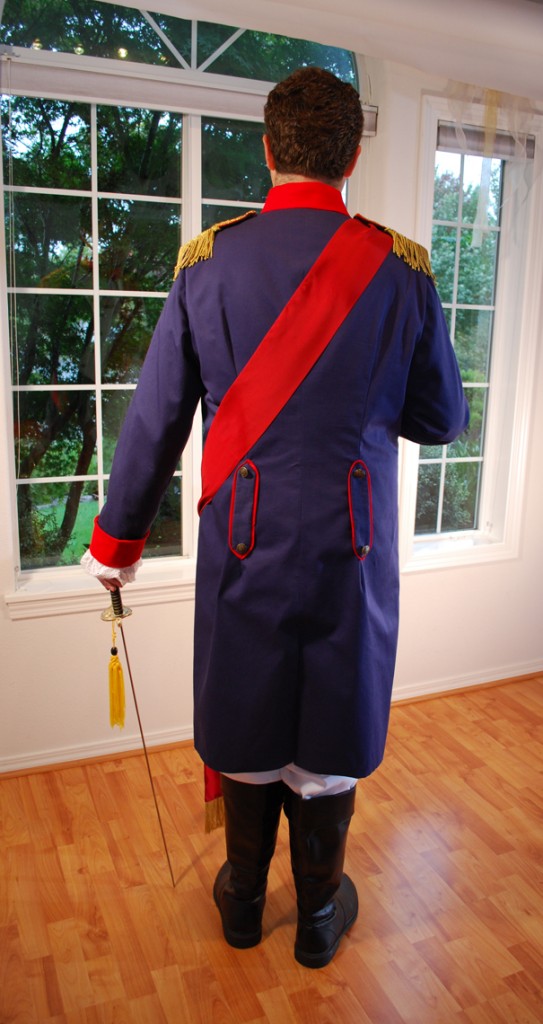
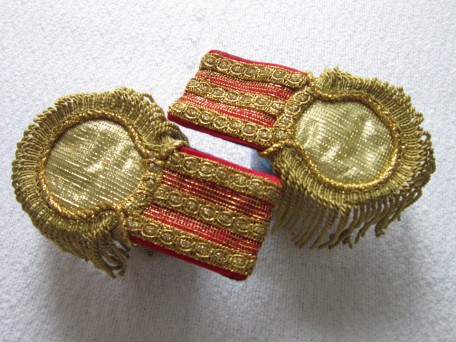
I think the shoulder boards or epaulettes really stand out on the costume.
Probably need to include this one…

Jared is a fencer and so is having a bit of fun here!
Well…it is 4 1/2 weeks until All Hallow’s Eve and I’ve already started counting down! I hope you are enjoying the costumes so far. Next week’s show-and-tell will be a bit of a mix-up… a little bit of pirate, a little bit of Victorian and a whole lot of fun!
Salute! Jessica
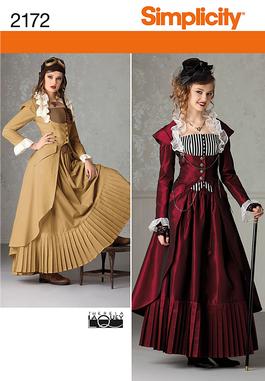
Read MoreSimplicity 2172 Rocks Steampunk
Yes in deed! I made it to Oktober Fest and had way to much fun. The Weingarten was fine, however… the Biergarten was a hands down winner! It felt like we did a non-stop conga until the cows came home! There were lederhosens everywhere (mens attire). There were also some very pretty Bavarian maidens wearing their dirndl dresses. All of this Bavarian regalia reminded me of another important up-and-coming event… Halloween! This is my most favorite time of year. It is the one day that you can be whom ever you want and wear a fantastic outfit – or in Halloween terminology, a costume.
Sewing costumes opens the door to the creative part of my mind and I become so involved in the process. I find myself pouring over details. I think that’s why I have fallen madly in love with steampunk and with the Simplicity 2172 pattern.
About 1 1/2 years ago I started making this costume, the jacket to be exact. I had planned on wearing it to the 2012 Mardi Gras in New Orleans except that didn’t happen. Well the Mardi Gras part did, but I never wore the jacket. This has turned out okay though because now I can finish this ensemble exactly the way it’s suppose to be!
The fabric I chose was something I have had for over 15 years! No kidding. I don’t even know what the fabric is exactly but when I purchased it from Sprouse Reitz (don’t think they even exist anymore), I was going to use it to make curtains for a camper! Now that’s rocking steampunk philosophy eh … re-invent, recycle, re-use and make it better!
The pattern includes the jacket, a skirt, and a bustier. They are not the easiest garments to make and no matter the skill level, I think it will take some time so I would advise getting started now if this is what you would like to wear for Halloween 2013. Since I made the jacket some time back, I unfortunately can’t offer up many tips. One thing I might say about it though is that the pattern piece that is provided for making the back tie for lacing is not long enough. In my situation, this may have been because I didn’t want the jacket so wide that laces would have to pull tight to fit so I fit the jacket exactly to my back width. I wanted the lace just to be decorative and so I needed a lot more length.
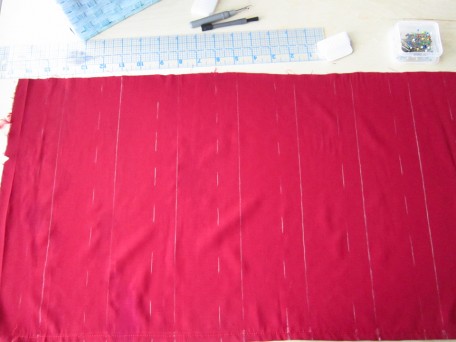
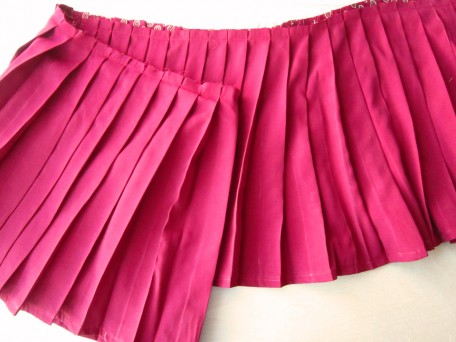
As for the skirt, get ready to do some pleating… LOTS of pleats, 108 pleats to be exact! There are 9 sections that you will have to sew end-to-end and each will hold 12 pleats, the 12th overlapping onto the next section.
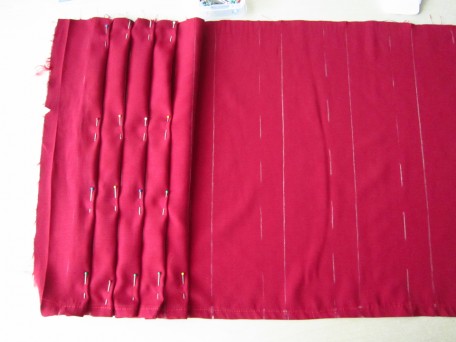
TIP: I did not sew all the sections completely together into a ring or circle. Instead, I left one seam open so that I could work on a flat surface which made things a whole lot easier. It’s a little tricky sewing that last seam once you have the pleats finished because there’s a lot of bulk but I still say it’s worth it. It’s totally up to you though. There is no wrong way, just what ever ways works the best for you. I made snips at each pattern marked pleat along the top when cutting out the sections but I didn’t snip on the bottom because you have to sew in the hem before making pleats. The pleats are each 1 inch. Once you start, it doesn’t take long to find your groove!As you can see in the picture, I used chalk. Chalk is your friend!
In the picture below, I have started pleating.
When I was done pleating and pinning, I laid the whole “shabang” on my sewing table that fits my sewing machine.
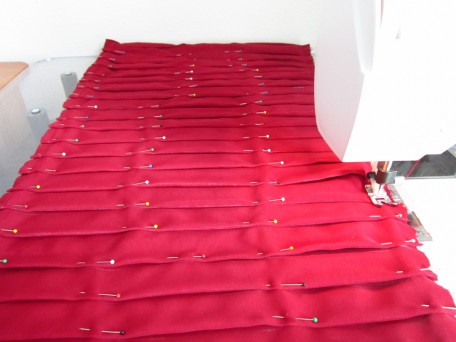
The best thing I can advise is to relax, be patient and realize that when you are done, you will feel like you have done something amazing!
The pattern instructions tell you to iron the pleats in before basting but I decided to baste them first. When I finished with the basting, I laid the pile of pleats gently on my ironing board and section by section, I removed the pins and ironed as I went. The thing that kept flashing in my mind was how much work it would be to iron all these pleats back in if I ever launder the skirt! Maybe I’ll be lucky and the pleats will stay even after a cleaning. Sheesh…given my luck though, this is probably a NOT!
So here they are all finished!
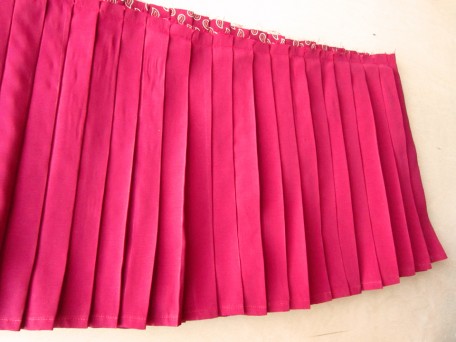
I was so fascinated with the pleats that I kept taking pictures! I know! I”m a dork!
So as to not mess up my nicely pressed pleats, I made the main skirt with the yoke and waist band separately and when they were finished… then I sewed on the pleat section. After I did this, the skirt was finished! I did have to remove a part of one section of pleats however because I shortened the skirt and I didn’t take into account that the width of the skirt would change at the bottom. However, trying to figure how this would play into the length needed of the pleat section would likely have broke my brain!
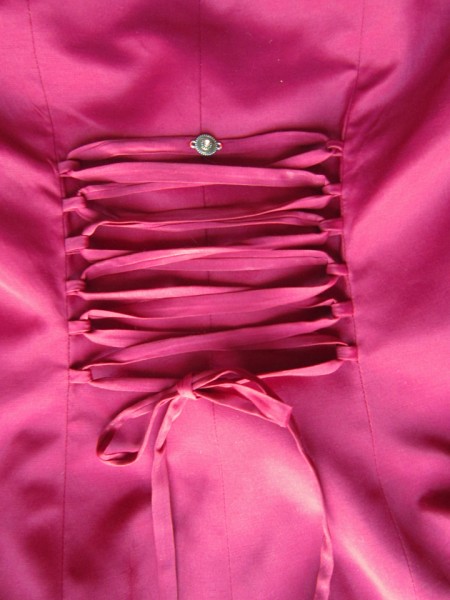
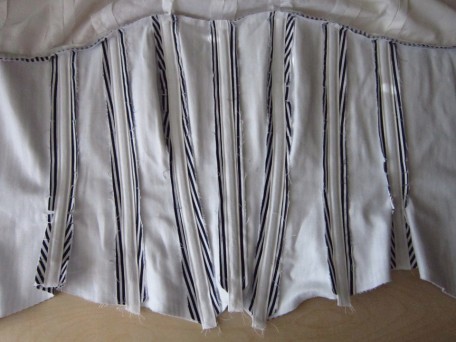
So the next order of business was the bustier. I have made more than a few bustiers and corsets and so happen to have on hand a number of corset making supplies. One of my favorite places to buy all my special goodies is Delicious LLC., Corsetmakingsupplies.com. They have pretty much anything you need. The Simplicity 2172 bustier is a really nice design. The finished front bottom reminds me of a vest and looks really spiffy under the jacket. Instead of interfacing, I used Coutil which is a fabric intended for corsets, etc. For the boning I used spiral steel boning that I purchase by the yard as well as the casing that holds it. You can buy metal ends to cover the boning after you cut it since it is pointy, but I have trouble getting them to stay on so I put glue on the ends instead. Below is a picture of the inside of the bustier after I sewed in my casings and put in the steel boning. I sewed the lining to the top, then trimmed the seam and pressed the lining flat like it would be when finished because I thought it might look better in the end. Alas… in the end I don’t think this was necessary but now I know.
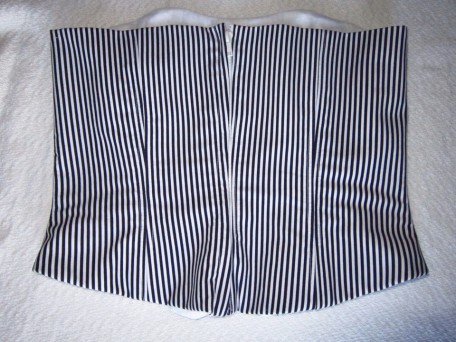
I did change up the way I installed the zipper because I wanted it more hidden though this made things a bit challenging… not to mention that my separating zipper was a MASSIVE white plastic one! (I should have known better!)
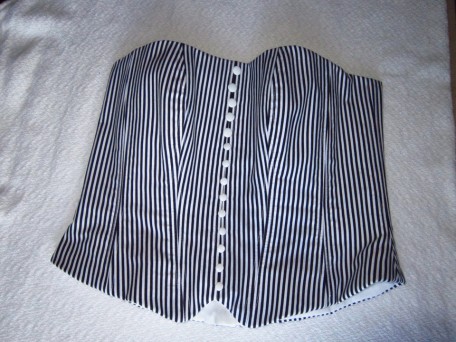
And the front…
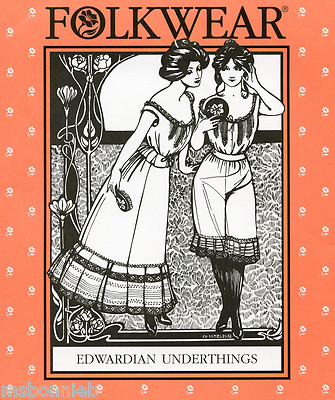
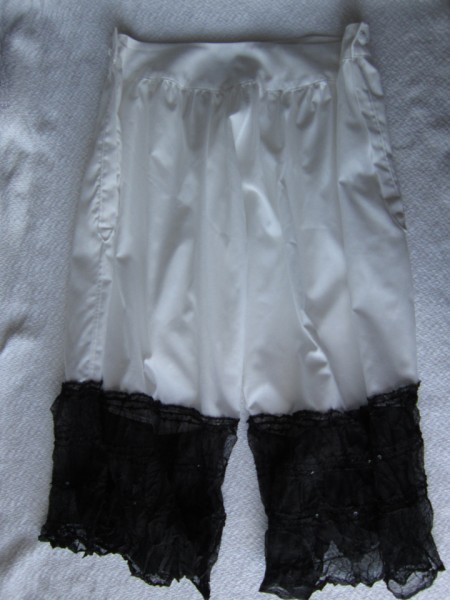
Now… remember how I feel about details. If I am a steampunk lady, then my ensemble will not be complete without accompanying the bustier with drawers! Yes, that’s what they were called. Edwardian drawers to be exact. Maybe you know them by the name “bloomers”. The pattern I used to make my drawers was the Folkwear 203 pattern.
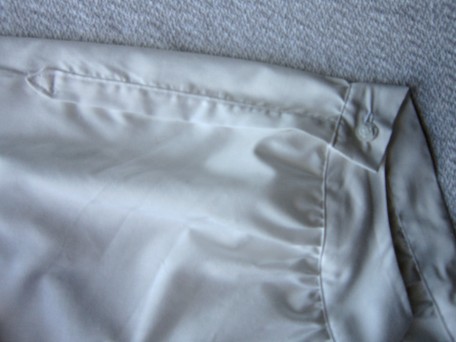
The drawers in this pattern have plackets on each side, similar to long sleeve shirts. So far, I stink at plackets which is why I have been stalling making long sleeve shirts. Also, it is recommended to finish the seams using flat felling. I figured out that if I make a whole bunch of drawers, it might help me with my shirtmaking! Hmmm…
So this is the finished placket on one side. Notice that the back waist band folds over the front waist band (yes, they are separate) and fastens onto the button sewed on the front. The placket with the point is sewn on the back and so is not connected to the front. I am sorry but I forgot to get a picture showing how they open up… Crap!
For the flounce, I decided to use some lacy fabric that I have had FOR-E-VER! The width was not quite what the pattern called for but hey… remember – this is steampunk and so you re-use, re-cycle and re-invent!
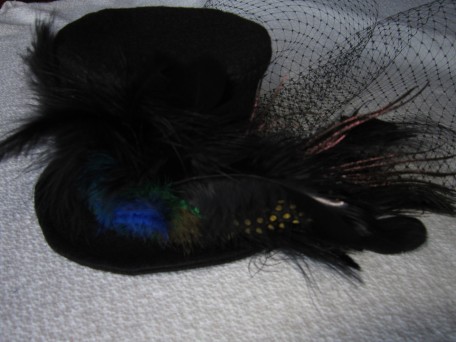
And now, last but not least, the finishing touches… A mini Top-Hat which I am still working out the bugs on… like a way to easily pin it on my head, myself!
Decorative goodies…all the parts I found at a Super JoAnn store on the 60 to 75% discount racks which was so totally awesome!
And the perfect shoes! Where did I get them? I’ve seen them on various sites but I purchased mine at Clockwork Couture.
Okay… so now I need to show you the real deal and since I made it all, I guess I will show it all! My pesty spammers are probably going to really give me fits but hey, a girl’s got to do what a girl’s got to do!
So here is my bustier and my drawers…

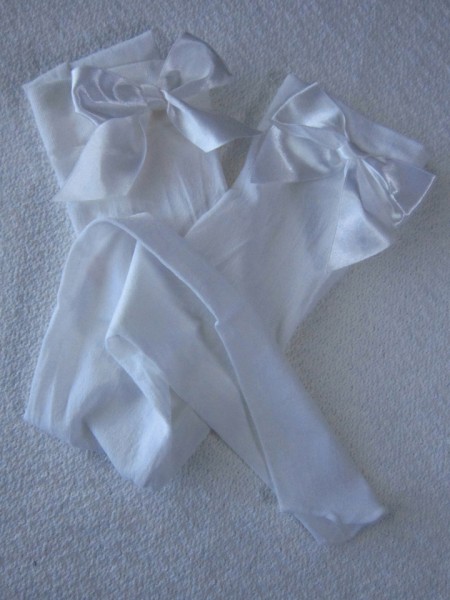
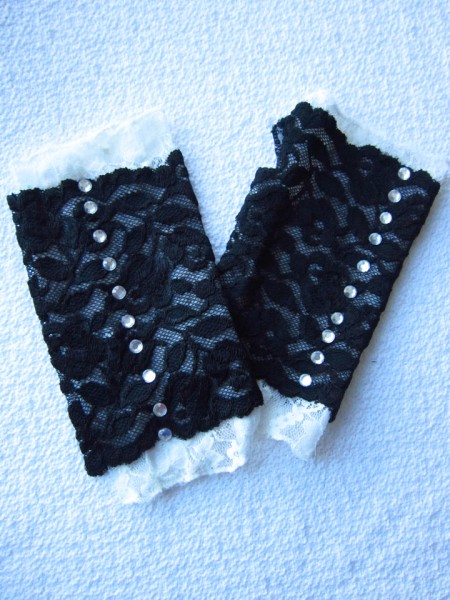
Now for the rest of the ensemble! Mind you I was in a bit of a hurry and so unfortunately forgot my lace fingerless gloves and walking stick which would have made the outfit so complete. Oh well… doodoo happens!
The back of course…
And the only prop I could think of was a phone. It’s not steam powered machinery but it’s sort of techy, I guess!
So there you have it. Simplicity 2172 rocking steampunk. If you decide to make any or all of the pieces in this pattern and you have any questions, please e-mail me or post a comment. I will help you anyway I can.
We have about 6 more weeks before Halloween which means I will be delivering up 6 more costumes for you to view! Be sure and come back to check it out. Next week is mens week! Until then…
Salute! Jessica
Read MoreAbout Me
 Portland, Oregon,
 United States
Hi there! I’m Jessica Brandon and I am a clothes-loving sewing artist. When I am not sewing, blogging or shopping for shoes for my creations, I fill in the remainder of my days spending time with my children, playing ice hockey, gardening and making and drinking wine!


Up Coming Projects:
Vogue 1426

Vogue 7881

McCall's 7089

Vogue 8997

Vogue 1431

Vogue 9006

Vogue 8991
