

Restyled Simplicity Runway 1798
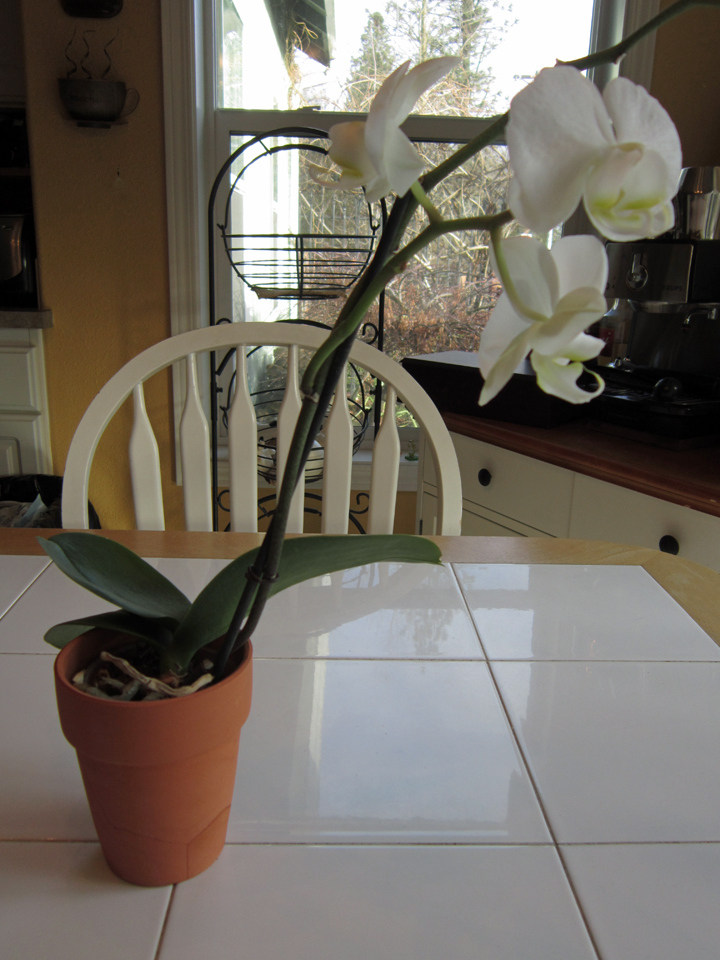
My daughter bought this orchid for me on Mother’s Day of 2015. It bloomed the most beautiful flowers again this month, January 2016! I hope this is the case for my new nose too!
Now that we are well on our way into 2016, I’d like to start things off by saying in today’s post that if you find yourself developing basal cell carcinomas on your face…take care of it immediately! Don’t fall into the medical insurance deductible trap and put off taking care of it until later, giving it time to spread! Just earned that T-shirt! I suppose I should be thankful that it was only basal cell, the “nice cancer”… but in all honesty, at this point in time, being thankful is not really working for me since my nose which is where the cancer was, is a “third eye on a cyclops” sort of scenario after the dermatologist and plastic surgeon got done with me. If Rudolph the Red Nosed Reindeer met me face-to-face, he would feel a lot better about himself! On a foggy night in the dead of winter during a snow storm on the arctic ocean I could hang off the prow of a ship as big as the titanic and lead the way! Yes…my nose is red! Bulbous! And it Glows!! And I’m four weeks post surgery! I have no idea why anyone would want to willfully endure a nose job to look better? The black eyes, swollen face and bruised cheeks that I got with the deal kept me housebound until a little over a week ago. And get this, tonight I have a concert to go to and on Sunday, a fashion show in Seattle! Yep…in the words of my daughter…”it sucks to be me!”
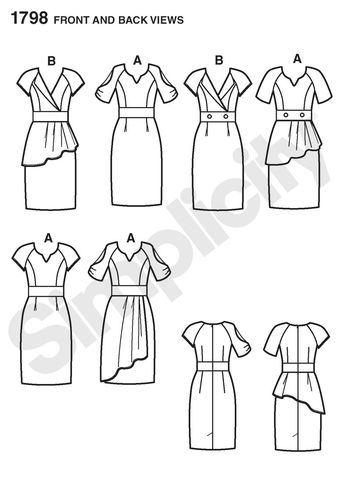
Well… ME got pretty tired of the whole ordeal about a week ago and decided to pull up my big girl panties, quit whining and get on with the program. I hit my sewing room and started a project which I had planned before Christmas. I purchased this pattern some time ago and what I really liked was the dress that had a front drape. It is the Simplicity 1798 and it is actually still available on their website!
It is the one in the bottom right corner in pale red?

Here is the pattern drawings. I made Option A with cap sleeves and a front drape (second row of A’s). BUT…I wanted a drape on the back as well which did not come with this pattern so I did a little re-designing!
*Note the back flounce on the bottom dress is just a peplum flounce, not the kind of drape I wanted.
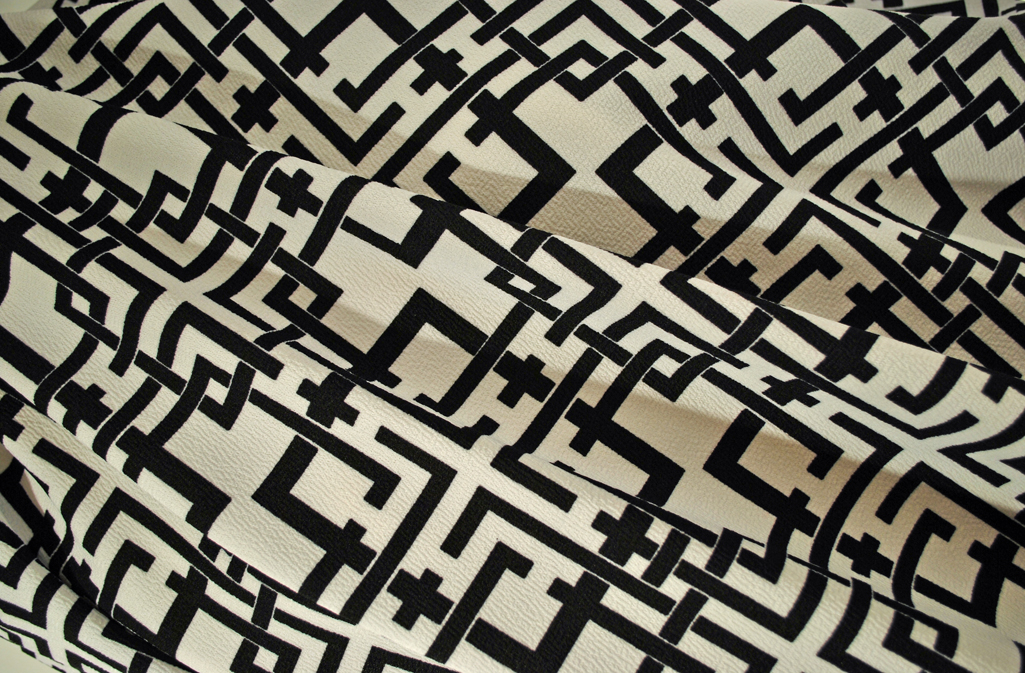
With this style and design in mind, I purchased the fabric for it back in late November which is shown in the picture below. The underskirt I decided to make out of black crepe which has a similar texture as this fabric. I envisioned wearing this new dress with black tights, black booties and a little red purse! I had absolutely no plans about including a red nose into the package but…well…I guess we’ll leave it at that!
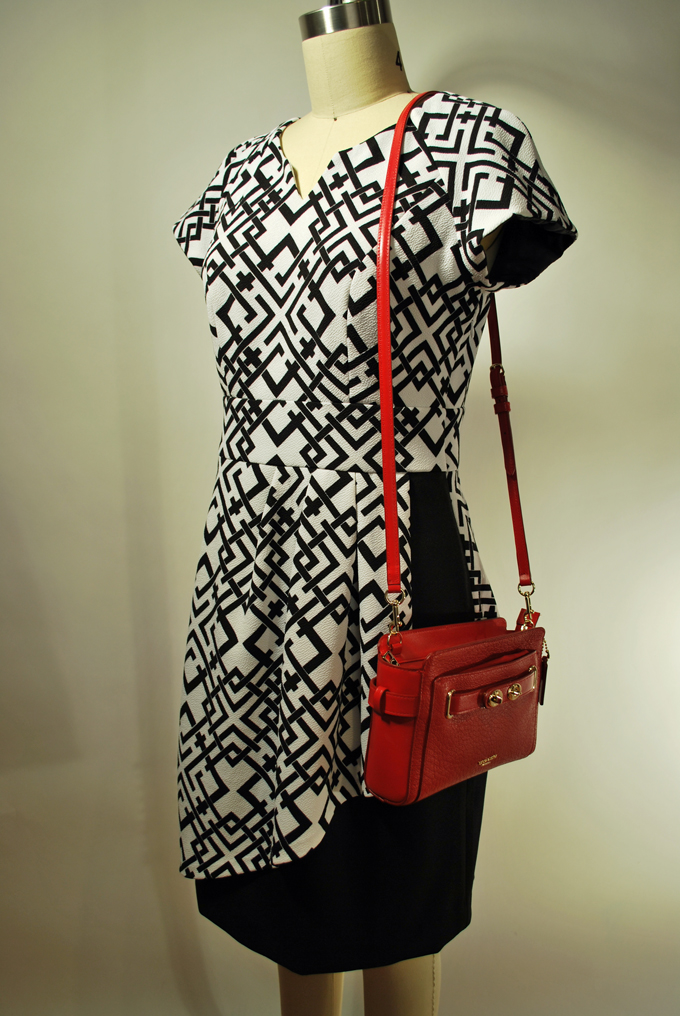
Remember the little red purse? Yes I did buy one, more specifically, a Coach Blake Crossbody Pebble Leather in Red. A little reward to myself for not committing harikari because of my seemingly impossible situation.

Because I planned to create a back drape, I knew that I definitely needed to make a muslin. Actually, an almost finished dress minus hems, interfacing or lining. Even though I started off with first drawing the pattern for my back drape, I didn’t realize until after I finished cutting out and sewing my muslin bodice that its back zipper design wouldn’t work for my plan. The zipper had to go! Having sewn enough dresses, I knew that with this design, I could put the zipper on the left side which meant that I would have to put the dress on over my head, and of course take it off the same way. Hey, no problem…just have to remember to fix my hair after putting on the dress!
Below is a picture of my muslin. As you can see, I left open a section of the left side seam where a zipper would go.

Of course, if I put the zipper on the side, this meant that when I cut out the pattern pieces from my actual fabric, I needed to cut the back bodice on the fold which I was a small bit nervous about since the back bodice center was more a natural curve than a straight line. I laid the pattern piece on the fold of my fashion fabric and fudged as much as I could and kept my fingers crossed! I also had to do the same for the back midriff band but this was easy peasy!
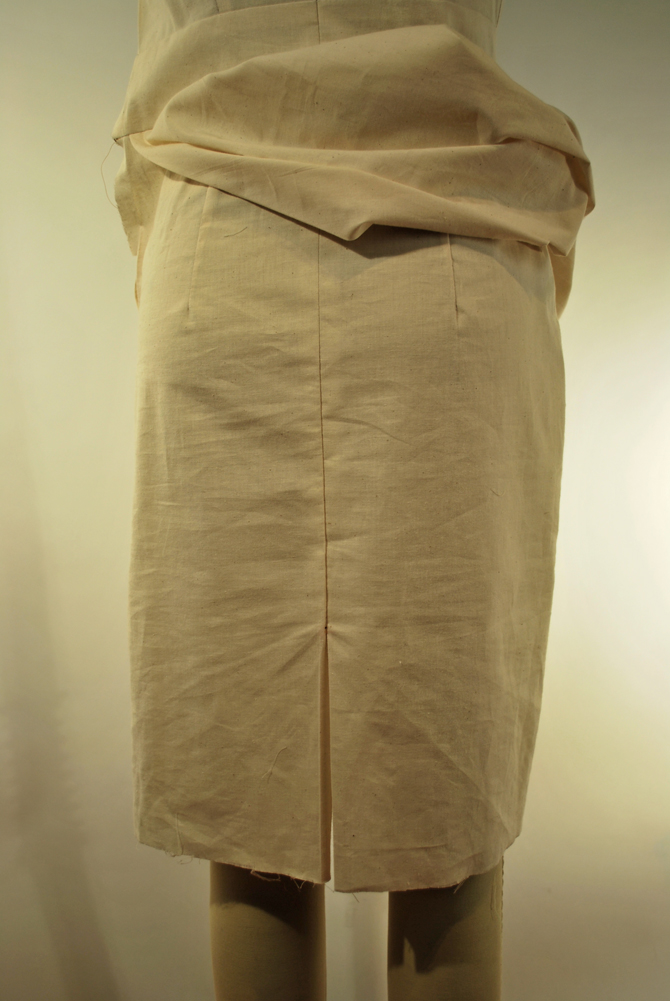
The front drape that came with the pattern, hung separately from the underskirt on the front with its hemmed side edge slightly distanced from the the left side seam where the zipper would be located. I liked this and had no plans on changing it! However, I wasn’t sure what to do with the left side of the back drape. Initially I thought I would have it hang separately like the front drape so made my muslin in that way. See the picture below. (There sure are a lot of wrinkles in the muslin aren’t there?! I did iron it as I was assembling it but it’s been through a lot since then!)
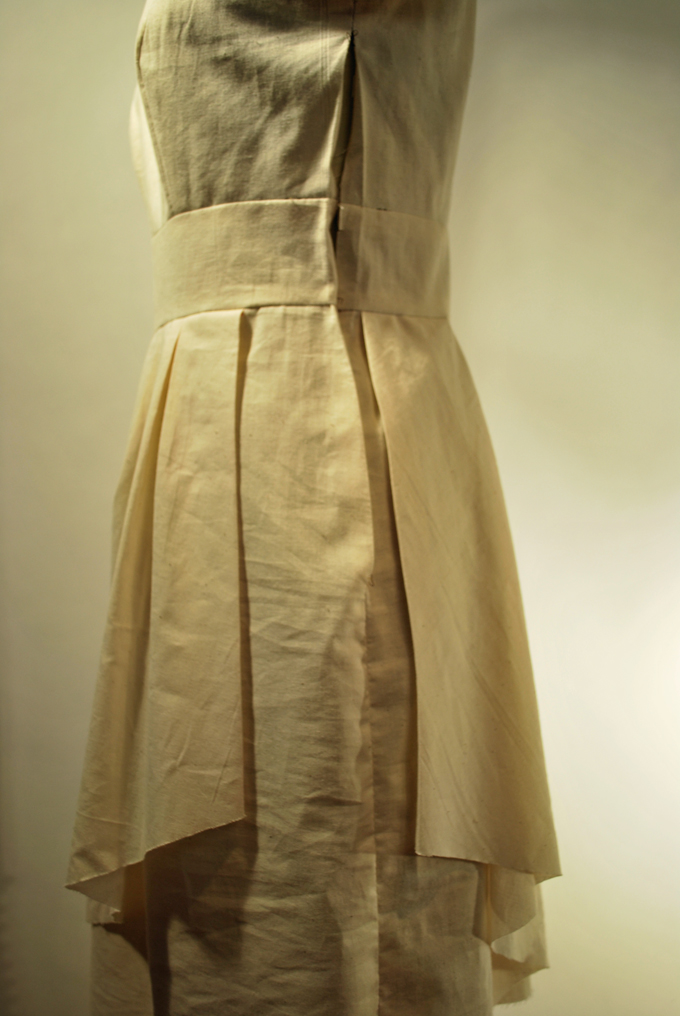
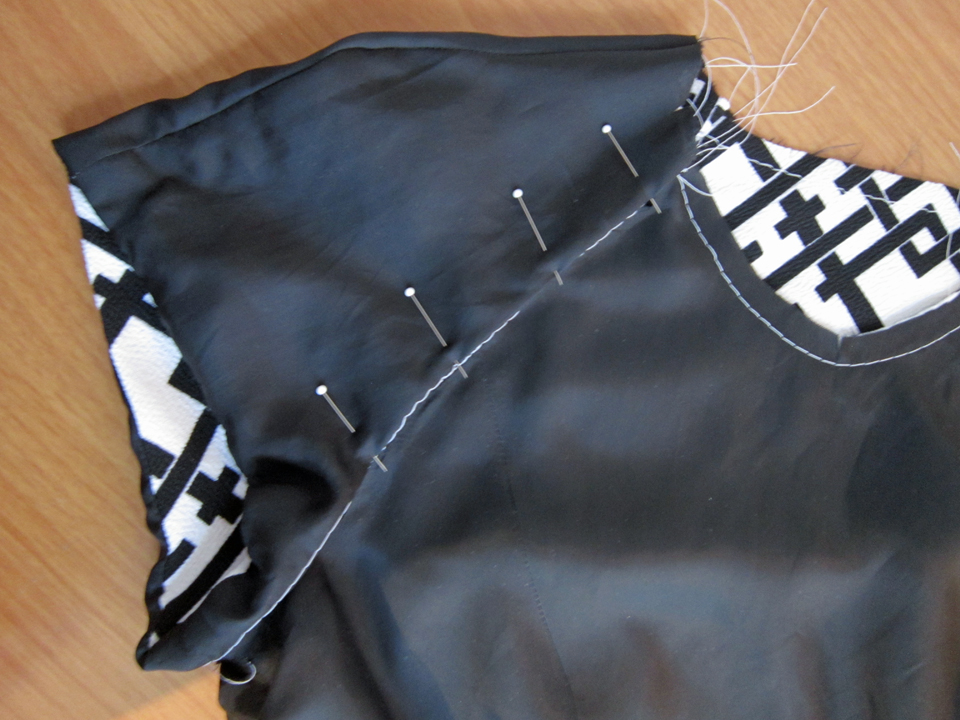
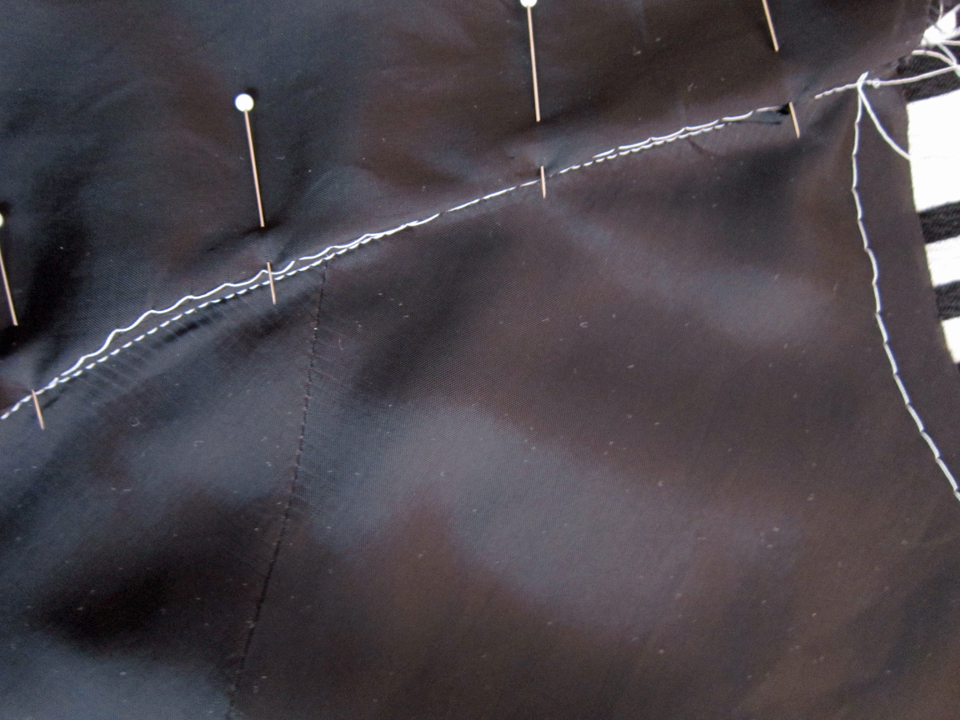
I discovered when I tried on the muslin that I didn’t like the way the left side of the back drape flared out. I worried it would make me look fat! Hey, I’m a girl and I think this way! So I decided that I would sew the left side of the back drape into the underskirt side seam on my actual dress.
After I finished with the muslin and looked at the back…I discovered that besides not having the shape and length exactly right, I also did not cut this piece on the right direction of the grain so it didn’t drape very well. I had a total “a-ha” moment and felt relieved that I had taken the time to do this mock up dress!
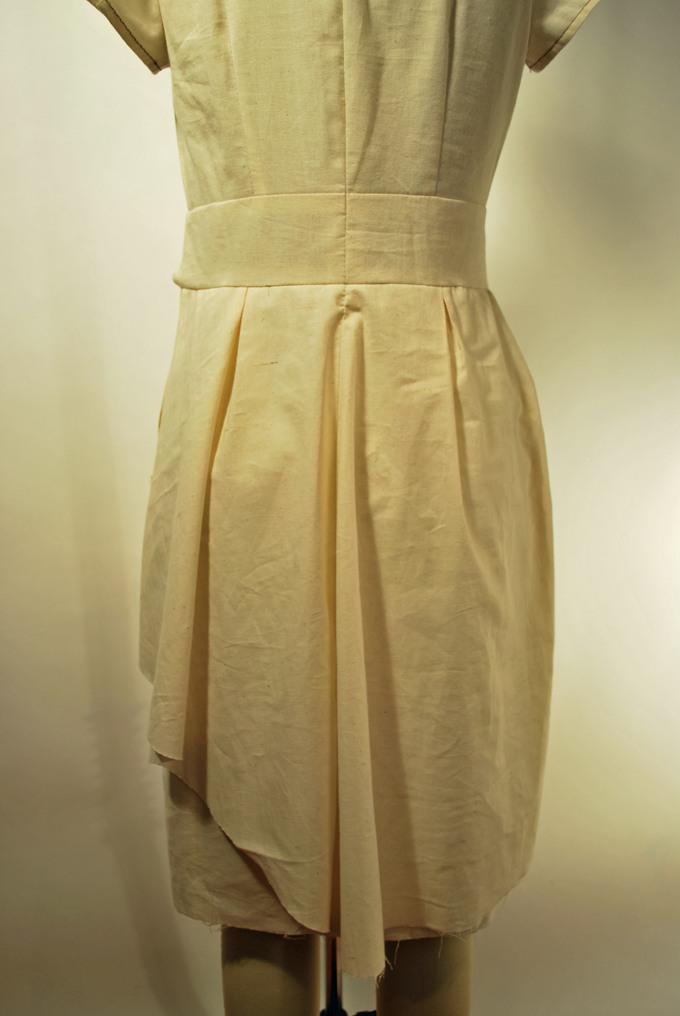
Here is a picture of the underskirt back view. The skirt is vented and I pondered whether I needed to include this feature if I had a drape over the top of it but decided to keep it in the design in case the hem of the skirt was at all narrow. The underskirt I will make out of my black crepe.
Okay…so after I figured out how to re-construct my new version of this Simplicity 1798 Project Runway Dress, I was ready to start on the real deal. One other major decision now occurred…to line or not to line! I’AM the liner queen but I knew I had to really think this through because I hadn’t built my muslin with a liner. Since my underskirt would be black, I discovered that when I put the black crepe under my fashion fabric, the white part of my fabric changed shades. I wanted consistency so I knew that I would have to at least line the bodice so I was off the hook for having to make an optional decision!
I still assembled the bodice per the pattern instructions though allowing for the side zipper placement. Remember… there was no need for a center back seam. I then cut out all the same pieces in the same way for the bodice lining, out of my black Bemburg lining fabric and assembled them. Next, I took the bodice and bodice lining and basted them wrong sides together.
Now it was time for the cap sleeves. Here is where I had to be a little creative. I essentially sewed the lining sleeve to the fabric sleeve the way the pattern instructions tell you to do with the “cold” sleeves. (Though still can’t figure out why you would even bother making these kind of sleeves if there’s going to be big holes in the shoulders of them!) Instead of folding the lining up and onto the sleeves and basting them together, I sewed only the sleeves to the bodice. Below is a picture of the sleeve lining sewn to the sleeve but not yet folded in and onto the wrong side of the sleeve.
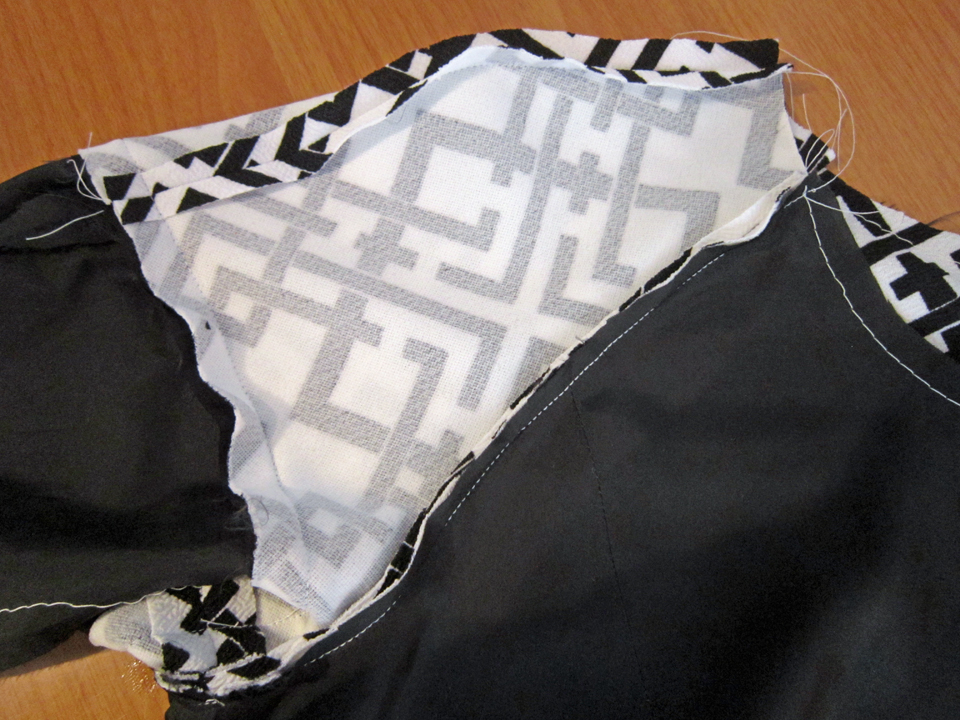
Finally it was now time to fold the lining up onto the inside of the sleeve which is shown in the picture below. Hopefully this makes sense! The white 5/8″ basting stitch along the edge of the sleeve lining is my folding line. My plan was to hand sew the 5/8″ folded edge of the sleeve lining over the top of the bodice/sleeve seam that you can see back in the picture above.
*I use sewing machine basting stitches to mark hems which I will then press into the fabric that creates an even fold line. Then I remove the basting. It takes extra thread but it sure makes things easier! Sometimes I only finger press such as with these sleeve linings, because when a hand sewn seam is on a curve, fabric is a little more manageable when not pressed by an iron.
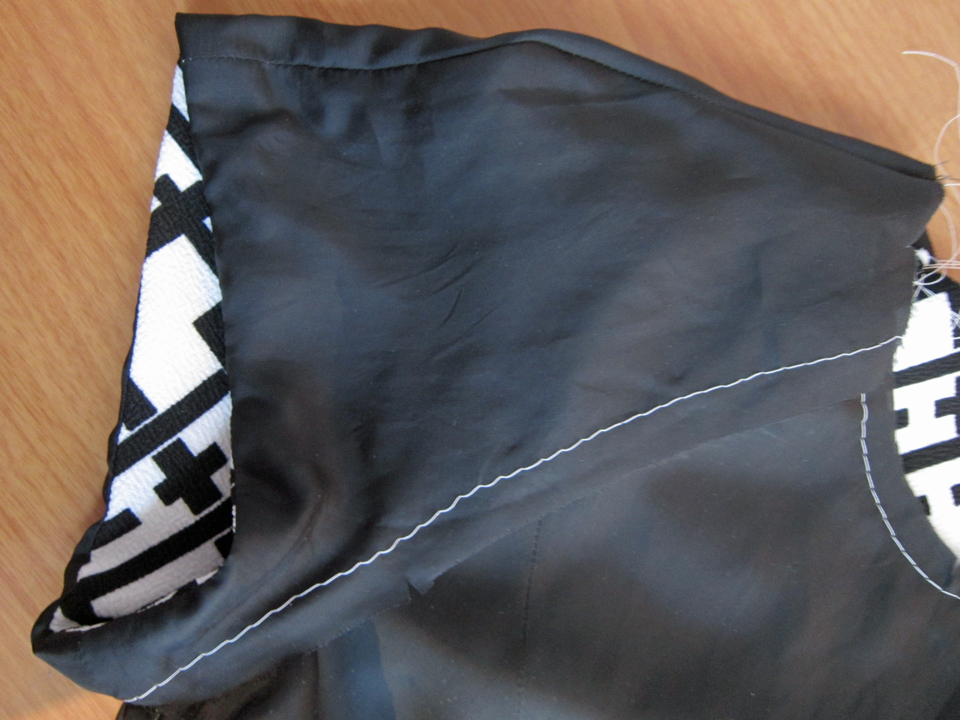
I pinned in place the folded edge of the sleeve lining, shown in the picture below.
I did remove the basting before hand sewing but I left it in for the picture so that it’s easier to understand what the heck I”m doing! Here is a close up picture where you can see the side seam where the bodice is sewn to the sleeve under the folded edge of the sleeve lining.
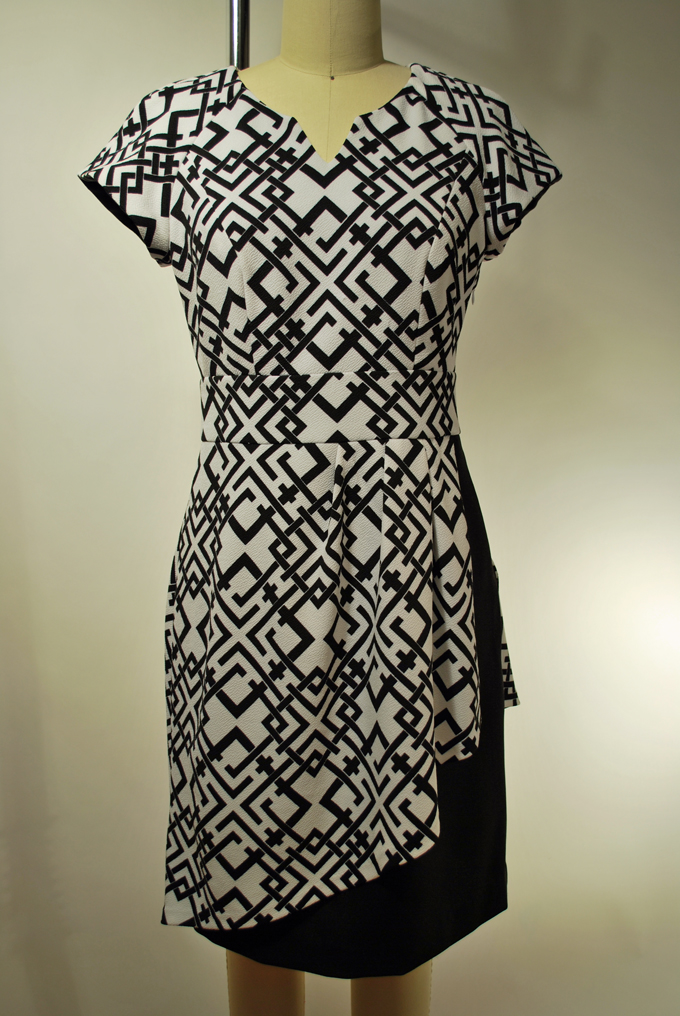
So that’s how I essentially made this dress. I’m not especially brave enough yet to plaster pictures of myself on the internets so I will show you my finished dress, worn by my other half, Phoebe!
This is the front…
The back…which I’m not sure the drape was all that important but it satisfied my want.

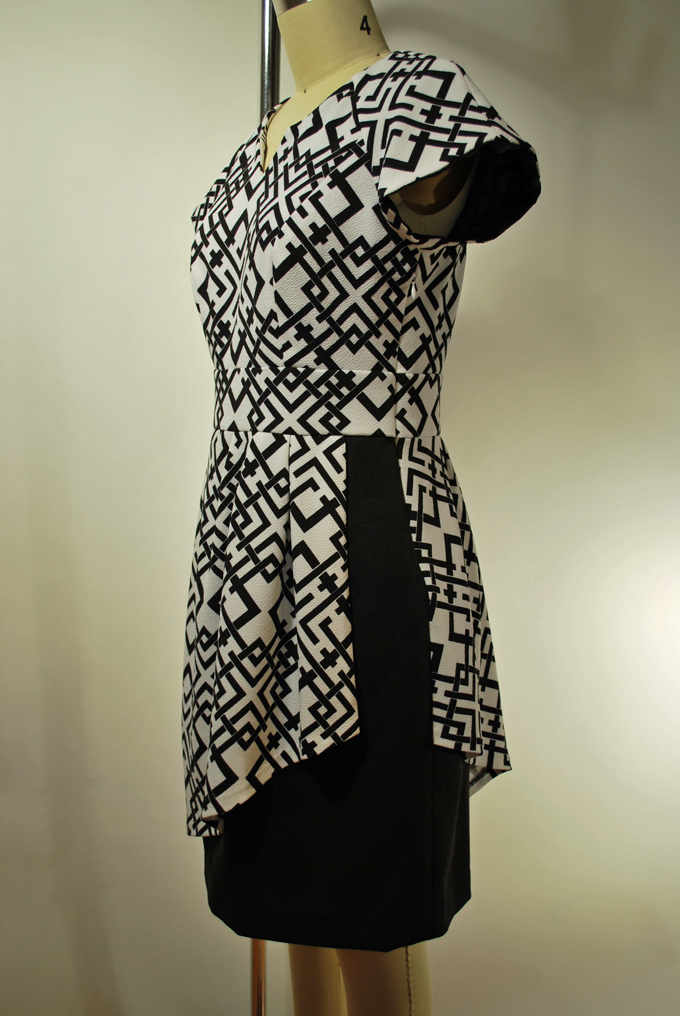
The side where the drapes are the most noticeable and where the zipper got moved to. The back drape left side is sewn into the underskirt left side seam.
And a little extra of what I saw in my imagination!
Well, that wraps up another long blog post. I’m sorry I do that! For those that don’t want to read, there are certainly some pictures to look at! Big smile!
Enjoy the last two days of the month of January, and I’ll be back soon to share more of my sewing shenanigans! Might even be able to show you my new nose!
À la vôtre! Jessica
Read MoreMy New Dress Form Phoebe
It was “Girl’s Day” this last Friday for me and my daughter. When the time is right and we feel the need, off we go to do whatever we want to do for the day, spending time together talking, sharing dreams and laughing… a lot! This last Friday ended up being a shopping day for clothing staples and lunch that included a glass of wine for moi! Mind you, shopping for clothes is not a simple undertaking. When I look at a garment, not only do I look at the design but I also examine the quality of the fabric, the stitching, and query how well it will hold up with wearing. Even my daughter who doesn’t sew, shops according to these guide lines though she also operates under the premise that if she works it right, she can get me to make it for her! If I ever quit sewing, she’s doomed — unless she learns how to sew!
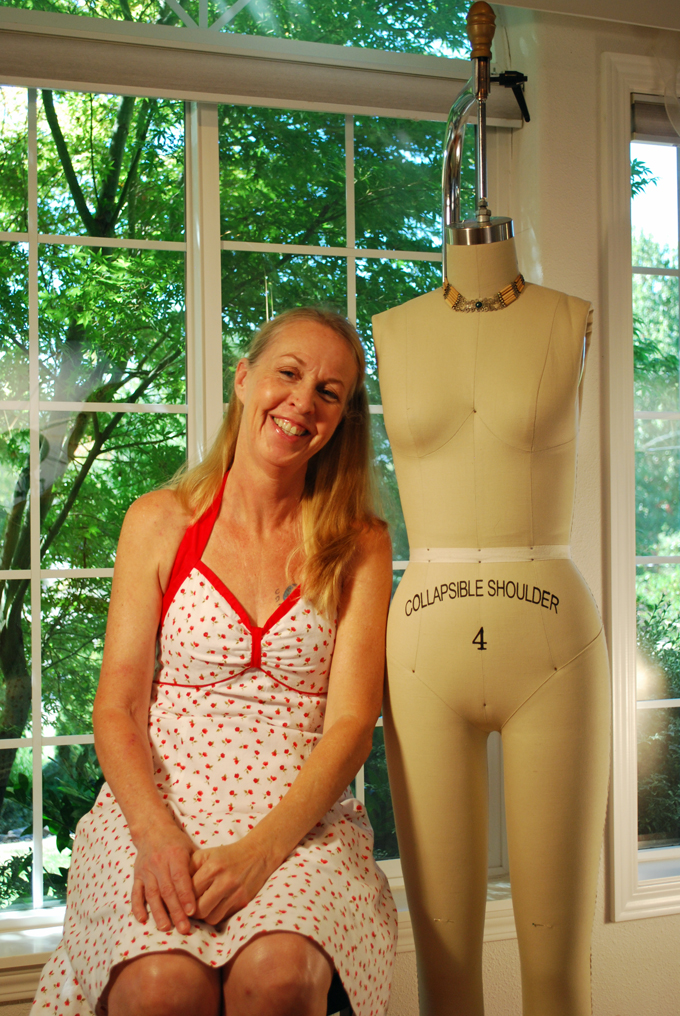
I should say that quitting sewing is the last thing I can imagine doing. For me, creating garments is like needing to breath air! Of course, in order to carry out this life force activity, a number of tools are required that include dress forms. These shapely life-size mannequins really have multiple purposes and the dialogue in discussing them can fill a book! For my post today, rather than doing a lot of explaining of their uses, I decided to keep things simple and introduce you to Phoebee!
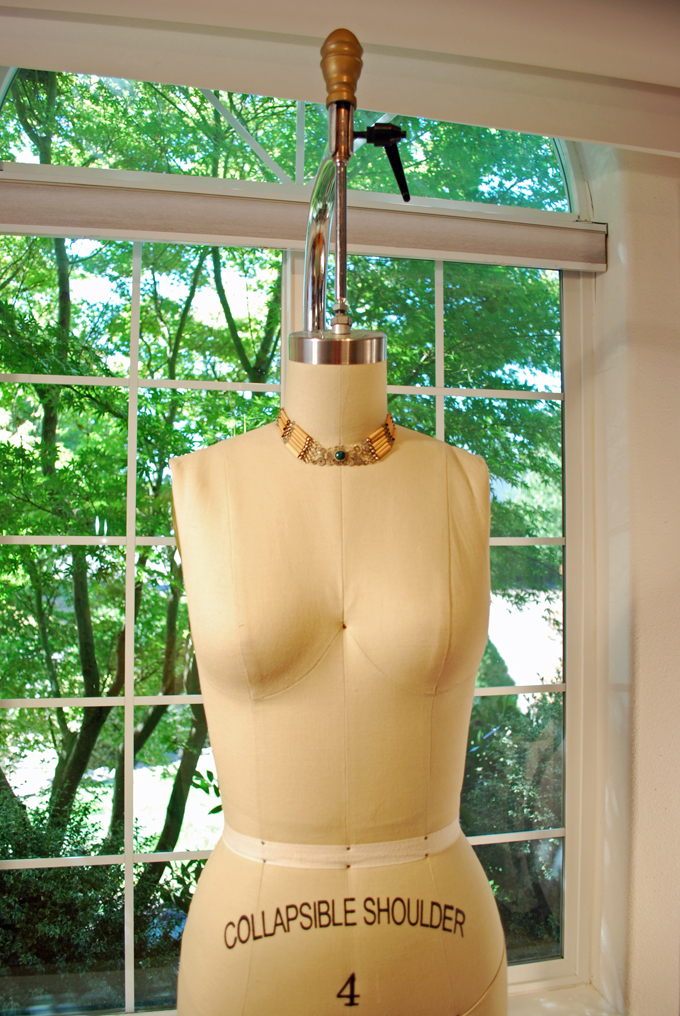 The choker Phoebe is wearing, I purchased from a Huaorani Indian Community in the jungle of Equador, South America.
Phoebe is a Full Industry Pro Female Roxy Dress Form that I purchased from …. drum roll…. you’ll never believe it… wait for it… Facebook! Yes, I am one of those Facebook socialites and I am not ashamed! Especially because it was FB that brought Phoebe and I together. Long story short, I belong to a fashion trade group on FB and one day last month, her previous owner posted her for-sale on the group site. Her sale price was $250.00 and it wasn’t very far to drive and pick her up. Wow! Now that was a deal I could not pass up! I was on it like flies on poop! I have dreamed of owning my very own Wolfie which I discussed in an earlier post, ‘Wolf Dress Forms’, but given the cost of one of them, it has been just that… a dream. I did some research on the “internets” and discovered that the Roxy Dress Forms are constructed quite similarly to the Wolf, and fortunately for me don’t carry the hefty price tag. As for the sizing, well… Phoebe is a size 4 which fits my daughter perfectly, fits me in the shoulders and bust perfectly, but I will have to add a couple of inches in the waist and hips! Yeah… gravity, babies and age do things to female bodies but let’s not go there!
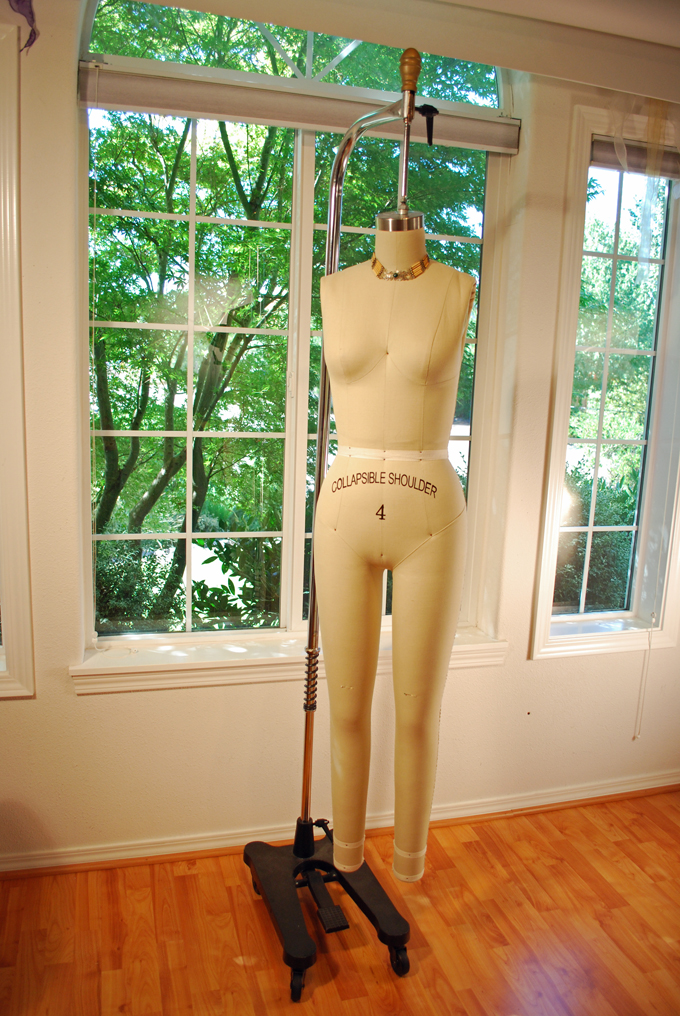
She of course is full length and hangs from a pole on a heavy cast iron horseshoe base with wheels.
We of course had to do a photoshoot together!
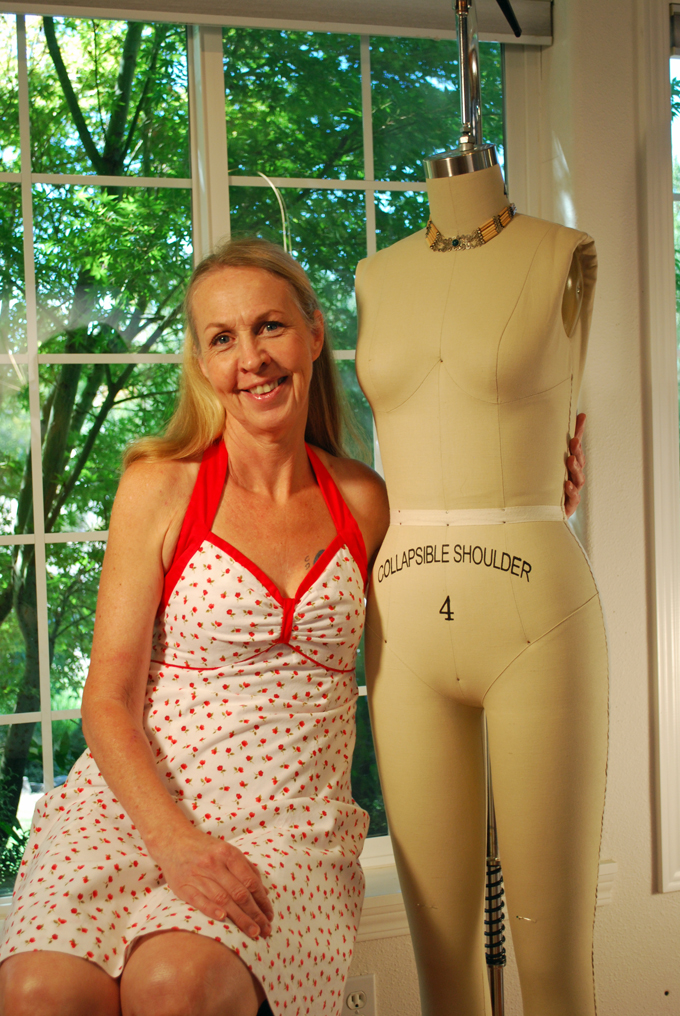
Now I finally have a dress form that is a near fit for me, but I discovered one thing that I really hadn’t given much thought to. Because she hangs, the post above her neck is in the way if I want to test fit for a pull-over-the-head kind of garment. It can be done but the dress form has to first be removed from the hanging apparatus. It’s manageable since the form is not drastically heavy, about 14.8 lbs. to be exact. It’s not often that this will happen so I’m not too worried about it. Besides, the idea for buying this dress form was for it’s true purpose, draping. I have all kinds of ideas that I want to explore, only first I need to purchase some cotton batting and pad out those several inches I mentioned earlier!
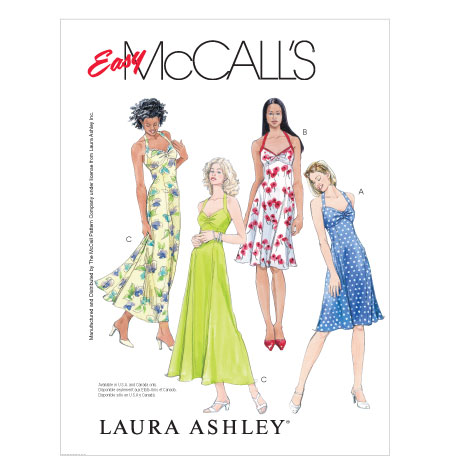
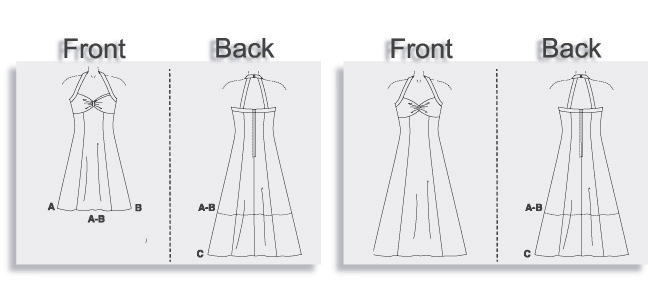
Yes, I did make the dress. It is an out-of-print McCall’s pattern, #4444.
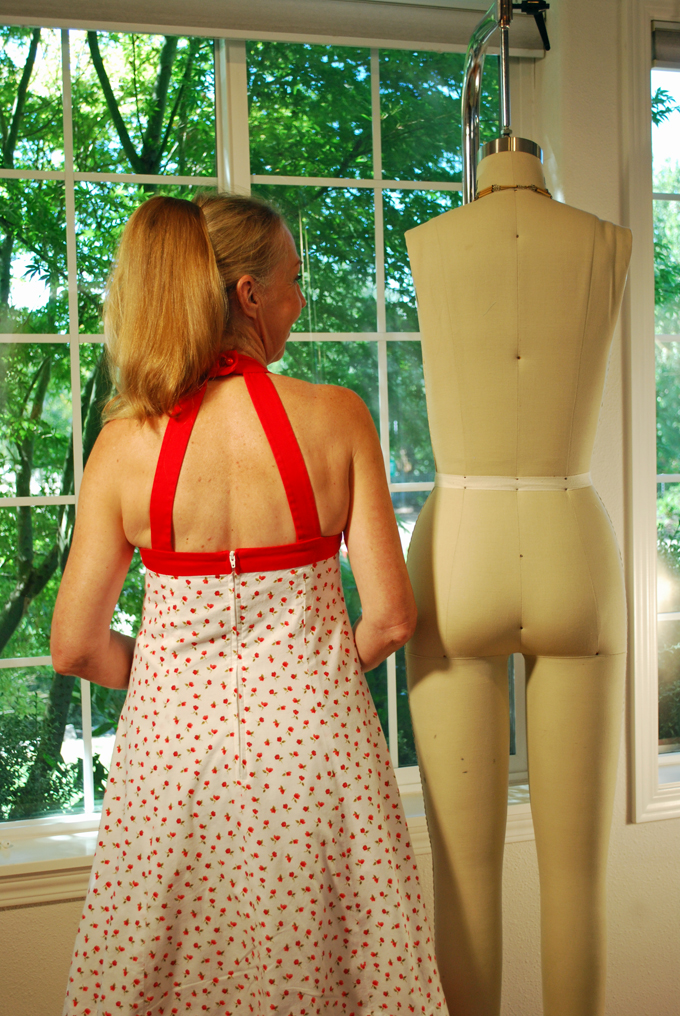
This is what the back looks like.
The live back side now including Phoeb’s!
We are having a really warm summer this year in Oregon. The temperatures are heading back into the 90’s for this coming week. I will appreciatively and gracefully sweat through it since the rain season is just around the corner which I’m not quite ready for. Until then, more sunshine, more summer dresses to wear, more Chardonnay to drink and more time to get to know Phoebe before we begin our draping adventure!
Until next post…
Salut! Jessica
Read MoreAbout Me
 Portland, Oregon,
 United States
Hi there! I’m Jessica Brandon and I am a clothes-loving sewing artist. When I am not sewing, blogging or shopping for shoes for my creations, I fill in the remainder of my days spending time with my children, playing ice hockey, gardening and making and drinking wine!


Up Coming Projects:
Vogue 1426

Vogue 7881

McCall's 7089

Vogue 8997

Vogue 1431

Vogue 9006

Vogue 8991
